The information in this article applies to:

QUESTION
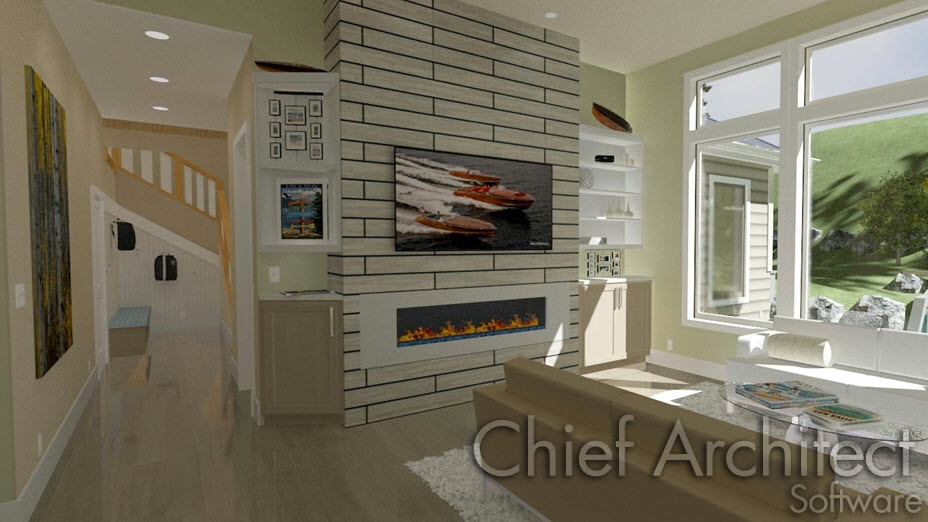
How can I add and apply a custom photograph to a frame, computer, or TV screen in my plan?
ANSWER
In Chief Architect, a custom picture an be imported and defined as a material. Once this custom material is created, it can be added to your User Catalog and applied to an object in your plan. Some common objects in which you may want to add a custom picture to include a picture frame, a painting canvas, or a computer or TV screen.
To add a custom picture to the user catalog as a material
- Select View > Library Browser
 from the menu to open the Library Browser window.
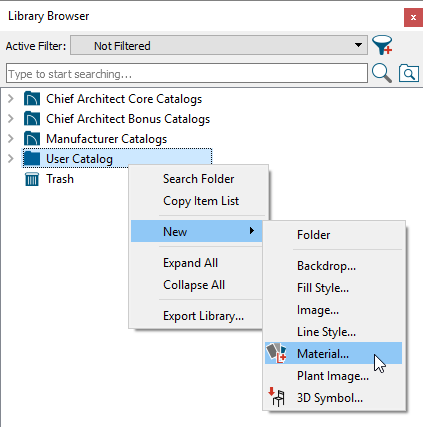
- Navigate to the User Catalog folder, right-click once on User Catalog and select New> Material
 from the menu that displays
-
In the Define Material dialog that displays, select the Texture panel.
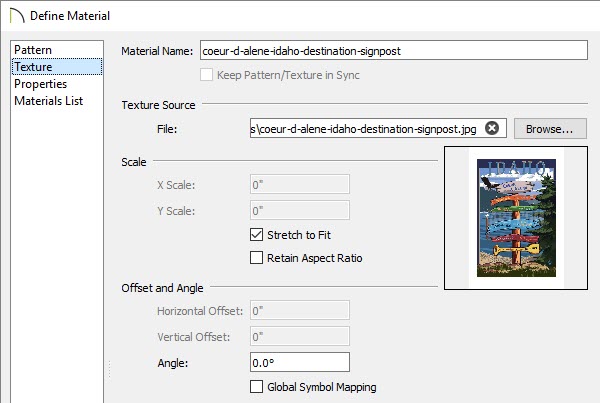
- Under Texture Source, click on the Browse button to display the Select Texture File dialog. Navigate on your computer to the image file that you would like to add to the library, click on it to select it, then click the Open button to close the dialog and return to the Define Material dialog.
-
Type a Material Name for your new material.
-
Check the box beside Stretch to Fit.
-
Make any other desired changes.
-
Click OK to close the dialog and add your new material to the library.
To display the material in a frame or on a screen using the specification dialog
- Browse the library for a picture frame or a screen that you'd like to apply the material to.
- Picture frames can be found by navigating to Chief Architect Core Catalogs> Interiors> Accessories> Mirrors & Frames.
- TV screens, along with monitors can be found by navigating to Chief Architect Core Catalogs> Interiors> Electronics> Televisions & Monitors.
- Once an object has been selected from the library, click in your plan to place it in the desired location.
- Place a desk frame, a TV, or a monitor on a desk, table, or entertainment center and its height will automatically adjust so that it sits on top of the furniture.
- Place a wall-mounted picture frame or a wall-mounted TV against a wall and it will snap to the wall's surface.
- Click on the object that was placed to select it, and then click on the Open Object
 edit button.
- On the Materials panel of the Furniture Specification dialog that opens, click on the Picture, Photo, Screen, Image, or other component that relates to the object, then click the Select Material button.
- In the Select Material dialog, browse to the User Catalog folder, click on the custom material that was created in the section above, then click OK to close the dialog.
- Click OK to close the Furniture Specification dialog.
- Select 3D> Create Perspective View> Full Camera
 from the menu to see the results.
To display the material in a frame or on a screen using the Material Painter
- Browse the library for a picture frame or a screen that you'd like to apply the material to.
- Picture frames can be found by navigating to Chief Architect Core Catalogs> Interiors> Accessories> Mirrors & Frames.
- TV screens, along with monitors can be found by navigating to Chief Architect Core Catalogs> Interiors> Electronics> Televisions & Monitors.
- Once an object has been selected from the library, click in your plan to place it in the desired location.
- Place a desk frame, a TV, or a monitor on a desk, table, or entertainment center and its height will automatically adjust so that it sits on top of the furniture.
- Place a wall-mounted picture frame or a wall-mounted TV against a wall and it will snap to the wall's surface.
- Navigate to 3D> Create Perspective View> Full Camera and click and drag a camera in your floor plan looking at the object you'd like to apply the material to.
- Once the view has generated, select 3D> Material Painter> Material Painter
 and in the Select Material dialog that displays, browse to the User Catalog folder, click on the custom material that was created, and click OK to close the dialog.
- Click once in the center of the picture frame, TV screen, or monitor to paint the material onto the object.
It's important that you're clicking on the objects surface that you want the picture to be applied to. If you click onto the picture frame component or the TV/Monitor component that is not part of the screen, the picture that is used for the material will be applied to these surfaces.