The information in this article applies to:

QUESTION
How can I change the flooring or ceiling material in my plan?

ANSWER
Flooring and ceiling materials can be specified in the Default Settings for a specific floor or an entire plan. Additionally, floor and ceiling materials can be changed for individual rooms by accessing the Room Specification dialog.
Adjusting the floor or ceiling finish using the default settings
- From the menu, select Edit> Default Settings
 .
.
- Expand the Floors and Rooms category, select the Floor/Ceiling Platform option if you want to adjust floor and ceiling finishes for all floors in a plan, or expand the Floor Levels subcategory, and select the floor of your choosing. Once one of these options is selected, click on the Edit button.
- In the next dialog that opens, select the Edit button next to the Floor Finish or Ceiling Finish option, depending on what you're wanting to change.
- In the Floor/Ceiling Finish Definition dialog that opens, make any desired modifications to the floor/ceiling finish layers.
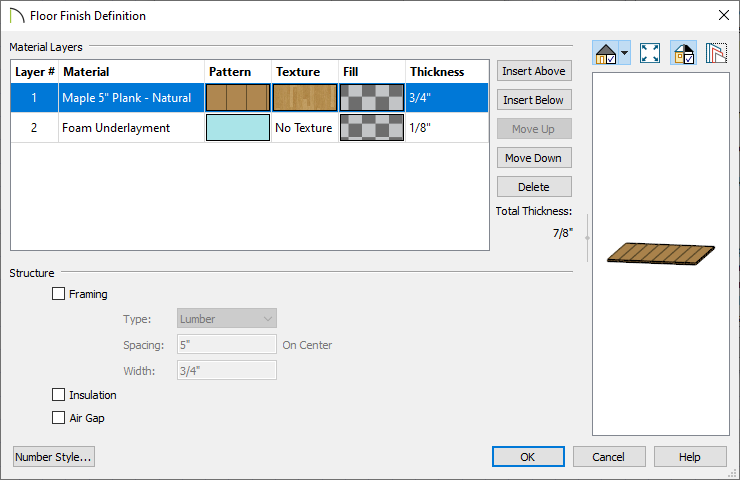
- Layers can be added below or above other floor/ceiling layers by selecting a layer and clicking on the Insert Above or Insert Below buttons.
- Existing layers can be modified by clicking within the cell that correlates to the column you'd like to change.
For example, if you're wanting to change the material of a layer to something different, click on the material name for a layer. In the image above, you would want to click on the words: Maple 5" Plank - Natural. To adjust the thickness, click on the 3/4" value specified for Layer #1.
- Layers can be deleted by selecting a layer and clicking on the Delete button.
- To move layers, select a layer, and click on the Move Up or Move Down button to change the order.
- Once all desired changes have been made, click OK.
Adjusting the floor or ceiling finish using the room specification dialog
- Using the Select Objects
 tool, click inside of the room where you want to change the flooring or ceiling material to select it.
You can also select multiple rooms and modify them all at once. To learn more about group selecting objects, including rooms, please see the Related Articles section below.
- Next, click on the Open Object
 edit button to display the Room Specification dialog.
- On the Structure panel, click on the Edit button next to the Floor Finish or Ceiling Finish option to display the Floor/Ceiling Finish Definition dialog, where you can make any desired modifications to the floor/ceiling finish layers.
- Layers can be added below or above other floor/ceiling layers by selecting a layer and clicking on the Insert Above or Insert Below buttons.
- Existing layers can be modified by clicking within the cell that correlates to the column you'd like to change.
For example, if you're wanting to change the material of a layer to something different, click on the material name for a layer. In the image above, you would want to click on the words: Maple 5" Plank - Natural. To adjust the thickness, click on the 3/4" value specified for Layer #1.
- Layers can be deleted by selecting a layer and clicking on the Delete button.
- To move layers, select a layer, and click on the Move Up or Move Down button to change the order.
- Once all desired changes have been made, click OK.