The information in this article applies to:

QUESTION
What is a Roof Baseline Polyline, and how do I use it?
ANSWER
First, let's define the terms "roof baseline" and "roof baseline polyline".
-
Roof Baseline: A roof plane's baseline is the line in 3D space around which the roof section pivots as you alter its pitch. Typically drawn over the exterior surface of a wall's main layer, the baseline may also be drawn over a CAD line or at the corner or edge of an existing roof section.
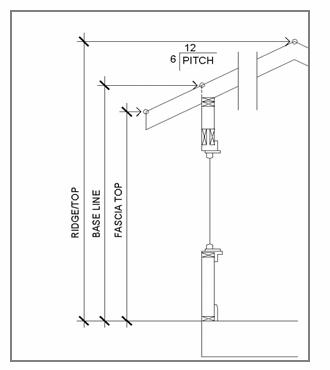
A roof base line is the uppermost portion of a roof plane directly above the main layer of your wall. Baseline height does not include the roofing material or sheathing, just the framing materials.
If, for example, you were looking at a truss or rafter, the baseline would be on the top of the rafter or truss. The baseline would be located at the point where the truss or rafter sits directly above the main layer of the wall the roof plane is resting on.
-
Roof Baseline Polyline: A closed polyline composed of individual roof plane baselines as well as roof directive information for each exterior wall. When placed along gable or high shed walls where no actual baseline is present, the polyline continues and roof directive information is provided.
If a Roof Baseline Polyline is present in a plan, the roof directives saved with it will be used regardless of any changes that you make to roof directives in walls or to settings in the Build Roof dialog.
To create a roof baseline polyline
Roof baseline polylines are created only if you direct the program to do so. Once one is created, it provides the program with roof directive information that can be used instead of directives found in the exterior walls' specification dialogs when generating an automatic roof.
In order to build a roof or create a roof baseline polyline, your plan must first have an interior room area defined by walls.
- When your plan has an interior defined by walls, select Build> Roof> Build Roof
 from the menu.
- On the Roof panel of the Build Roof dialog that displays, check the Make Roof Baseline Polylines box, then click OK.
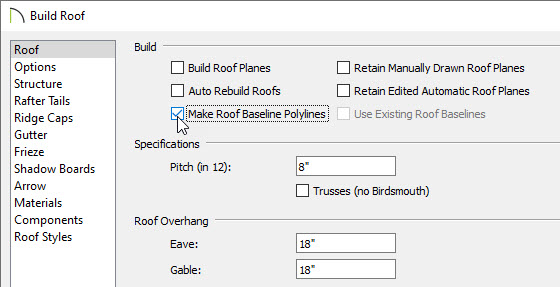
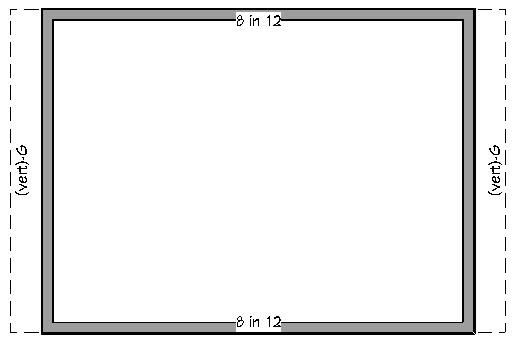
- An automatic roof will not be generated at this time, but a roof baseline polyline will now display in floor plan view.
To build a roof based on the directives in your new roof baseline polyline
- Select Build> Roof> Build Roof from the menu.
- On the Roof panel of the Build Roof dialog that displays, check the Build Roof Planes box, then notice that Use Existing Roof Baselines becomes checked automatically.
- Click OK to close the dialog and build the roof.
To control the display of roof baseline polylines
Like other objects in the program, the display of roof baseline polylines can be controlled in the Layer Display Options dialog.
- Select Tools> Layer Settings> Display Options
 from the menu to open the Layer Display Options dialog.
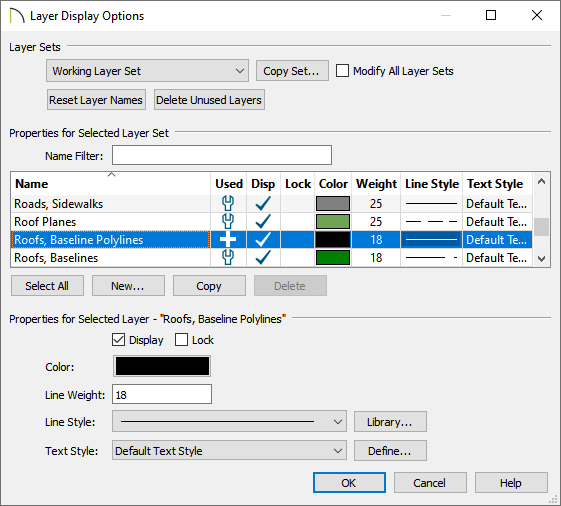
- Scroll to the "Roofs, Baseline Polylines" layer and click to select it.
- At the bottom of the dialog, you can control the line Color, Line Style, and Line Weight of the lines that form the roof baseline polyline in floor plan view.
- To display roof baseline polylines in floor plan view, place a check in the Disp column.
- Roof baseline polylines do not display in 3D views or the Materials List.
- Click OK when you're finished making your desired changes.
- You can also control the display of a roof baseline polyline without modifying the "Roofs, Baseline Polyline" layer:
- Using the Select Objects
 tool, click on the roof baseline polyline to select it, then click the Open Object
  edit button.
- In the Roof Baseline Specification dialog that displays, select the Line Style and Fill Style panels, make any desired modifications to the polyline, then click OK.
To delete roof baseline polylines
If you no longer wish to use an existing roof baseline polyline, you can select and delete it at any time. To delete roof baseline polylines that may not be visible or easily selected, use the Delete Objects dialog.
- Select Edit> Delete Objects
 from the menu.
- In the Delete Objects dialog, click the radio button beside All Floors, check the Roof Baseline Polylines box, then click the Delete button to delete all roof baseline polylines from the plan.