The information in this article applies to:

QUESTION
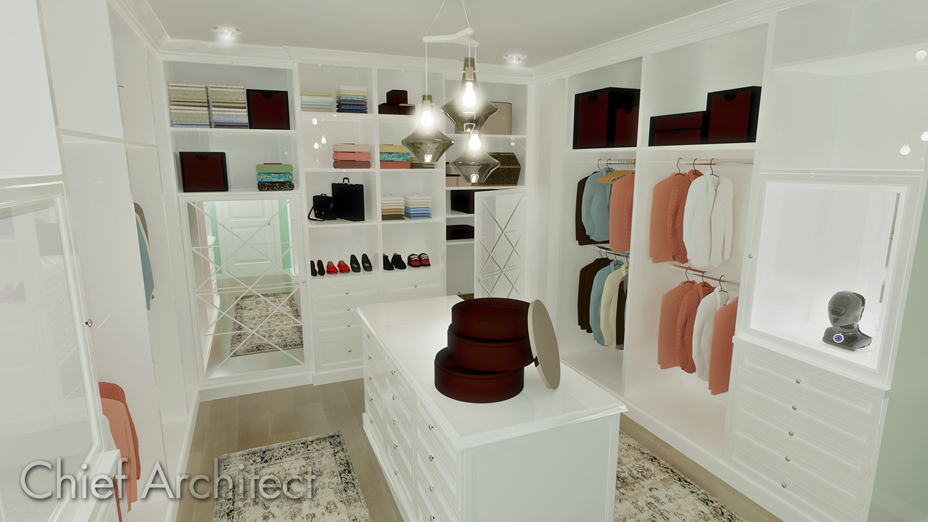
My clients would like a walk-in closet with custom, built-in storage for their primary bedroom. How can I design a custom closet?
ANSWER
Chief Architect's Cabinet Tools allow you to create custom storage configurations for any space.
The first step is to draw the available closet space and determine how much room is available.
Next, decide what kind as well as how many storage components will be used, based not only on the available space but also on the needs of the person or people using the space.
To plan your space
- First, Open
 the plan in which you would like to design a custom closet or select File> New Plan
  from the menu to open a new, blank plan.
- Select Build> Wall> Straight Interior Wall
 from the menu, then click and drag to draw the walls defining your closet space.
- Don't worry about placing the walls in their exact locations as you draw - you can easily position them accurately in a moment.
- Click the Select Objects
 button, then click on a wall to select it. Temporary dimensions will display, indicating the selected wall's distance from nearby walls that are parallel to it.
If you do not see temporary dimensions when you select the wall, select View> Temporary Dimensions or click the toggle button to enable this feature.
- Move your cursor over a temporary dimension and click on it and in the Move Object Using Dimension in-line text box that displays, specify the desired distance that you would like the selected wall to be from the wall opposite, then press the Enter key on your keyboard and the selected wall will be moved and the temporary dimension will reflect the new distance.
- Next, select Build> Door
 from the menu, select the type of door that accesses your closet space, then click to place a door of that type in a wall.
- You can change the door's hinge side and/or swing side by either dragging the triangular edit handle or by clicking the Change Opening/Hinge Side
 or Change Swing Side
  edit buttons.
- Showing the correct door swing is important, particularly in relatively small spaces such as closets, because it affects the available space for the placement of objects like storage components.
Before placing cabinetry, it's helpful to set up your cabinet defaults so that your cabinets display the desired materials, door and drawer styles, hardware and molding profiles.
Full Height Cabinets can be used to create a bank of drawers. Combine drawers with shelves and cabinet doors to create a custom configuration that suits your needs.
To create a bank of drawers below a section of shelves
- Select Build> Cabinet> Full Height
 from the menu, then click in your plan to place a full height cabinet at that location.
- Using the Select Objects
 tool, click on the cabinet to select it, then click the Open Object
  edit button.
- On the General panel of the Full Height Cabinet specification that opens, specify the desired Height, Width and Depth of the cabinet.
In this example, a Width of 24" and a Height of 95" is used.
- On the Front/Sides/Back panel:
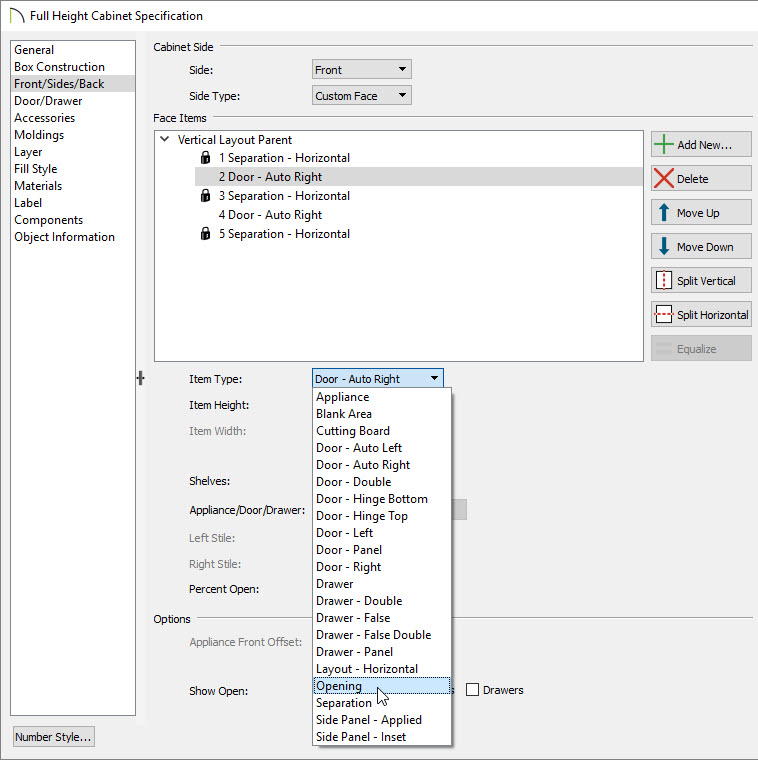
- Click on the top door in the preview image of the cabinet on the right side of the dialog and notice that the options in the Face Items section on the left become enabled.
- Click the Item Type drop down arrow and select Opening from the list.
- Specify the desired Item Height for the Opening.
- You can specify the number of shelves and their spacing by clicking on the Specify button next to Shelves.
- Click on the bottom door then next to Item Type select Drawer.
- Specify the Item Height and then press the Tab key to update the preview pane.
In this example, 5" is used.
- Click on the Separation Horizontal above the first drawer and click the Add New button to insert another drawer.
- Repeat this process until you are satisfied with the number of drawers in the cabinet.
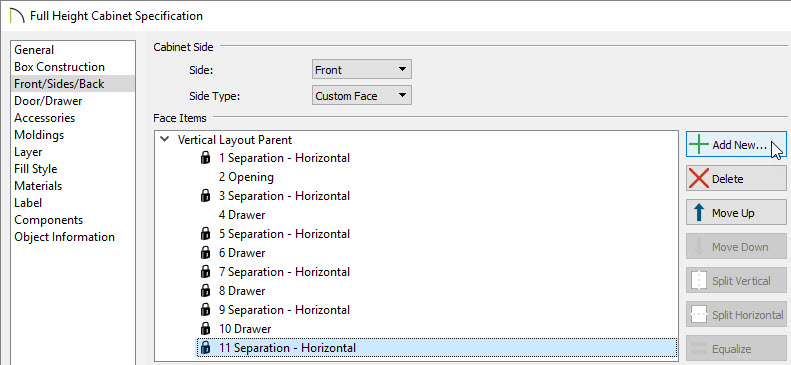
- When you are satisfied with your cabinet, click OK to close the dialog and apply your changes.
- You can combine any of the options in the Item Type drop-down list.
To prevent any further modification from occurring automatically with an item that has been customized, place a check in the Lock from Auto-Resize box for that item.
- Select 3D> Create Perspective View> Full Camera
 from the menu, then click and drag a camera arrow towards the cabinet you just created to see the results so far.
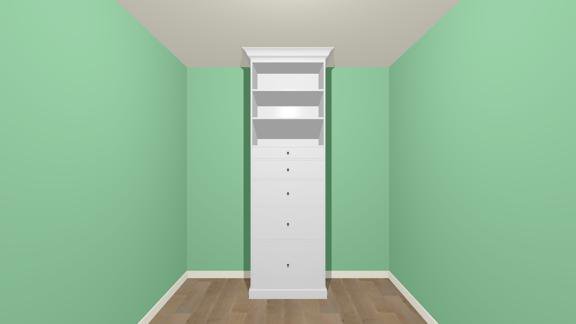
- To make a copy of the full height cabinet you have customized, select File> Close View to return to floor plan view.
- Click the Select Objects
 button, then click on the cabinet to select it and click the Copy/Paste
  edit button.
- Click in the drawing area to place a copy of the cabinet.
- If you would like to place more than one copy, click the Sticky Mode
 edit button after clicking Copy/Paste
  but before you click to place a copy.
- When you are finished making copies, click the Main Edit Mode
 edit button or the Select Objects
  button.
- You can quickly center a cabinet along a wall in a room using the Center Object
 edit button.
- Click on the cabinet you would like to center to select it.
- Click the Center Object
 edit button.
- Move your cursor inside of the room until you see the Center Line indicator showing the axis you want to center on and then click to center the cabinet on the room.
Shelves and partitions can be effectively arranged in a cross section view.
To place shelves and partitions
- Select 3D> Create Orthographic View> Cross Section Elevation
 from the menu, then click in front of the cabinet and drag a camera's focal point toward it, perpendicular to the wall that you would like to build shelves on.
- Select Build> Cabinet> Partition
 from the menu, then click in an empty space on the wall to place a partition at that location.
- Don't worry about placing it exactly where you want it now - it can be moved and resized in a moment.
- using the Select Objects
 tool, click on the partition to select it. Using the edit handles, move it to the desired location and resize it as needed.
- If the partition bumps into other objects as you try to move it, press the Ctrl/Command key on your keyboard as you move it to override any move restrictions.
- If you need additional partitions of the same size, click the Copy/Paste
 edit button and as before click in an empty space on the wall to place your copy at that location, then move the copy into position.
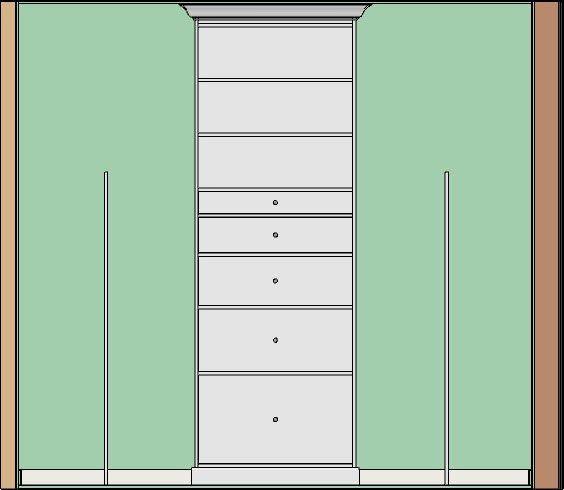
- When your partitions are in place, select Build> Cabinet> Shelf
 from the menu, then click in an empty space along the wall to place your first shelf.
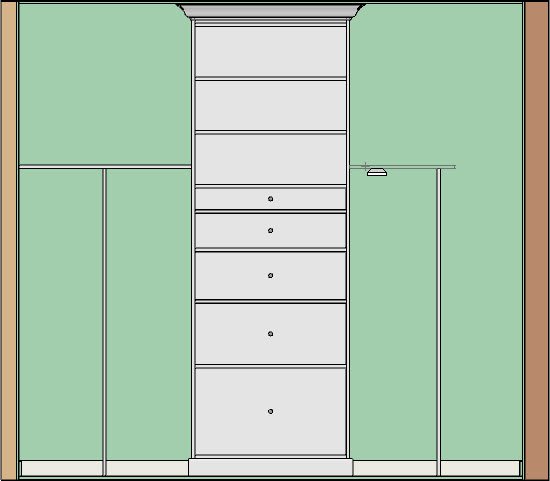
If you want to create a shelf over a hanging rod, use the Closet Shelf w/Rod, found in the Library Browser under Chief Architect Core Catalogs> Interiors> Furniture> Storage Furniture> Shelving> Wall Shelves.
- Move it into position and resize it as necessary.
- If you need to make copies of the shelf above or below it, click the Transform/Replicate Object
 edit button with the shelf selected. In the Transform/Replicate Object dialog:
- Check the box beside Copy and specify the Number of Copies you would like to make.
- Check the box beside Move and specify the interval at which you would like the copies to be made in the Z Delta field (or in the height direction).
- Type a positive Z Delta value to make the copies above the original, or a negative value to make the copies below it.
- Click OK to create the copies.
- Once replicated, you can make any needed changes to your shelves.
- Repeat the steps above along each wall in the closet that needs shelving.
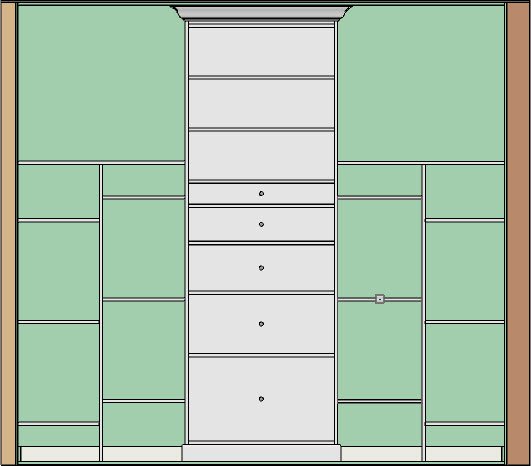
To add accessories to the closet
To help clients visualize how the space can be used, place objects from the Library Browser onto the shelves. In this example, clothing symbols from the Bonus Household Items library are stacked on the shelves and positioned on hanging rods. Other objects from the Furnishings (Interior) library category that you can use to accessorize a walk-in closet include:
- Vanities, dressing tables or dressers, available in Chief Architect Core Catalogs> Interiors> Furniture> Storage Furniture.
- Floor or wall mirrors, available in the Library Browser under Chief Architect Core Catalogs> Interiors> Accessories> Mirrors and Frames and in Bonus Household Items libraries.
- Baskets or storage bins, available in Library Browser under Chief Architect Core Catalogs> Interiors> Accessories> Baskets, Crates, & Boxes.
Remember too, that lighting plays an important role in any room - including custom closets. For example, you can include directional lighting to focus attention on important features in the closet and also maximize the usability of the space.


 the plan in which you would like to design a custom closet or select File> New Plan
  from the menu to open a new, blank plan.
 from the menu, then click and drag to draw the walls defining your closet space.
 button, then click on a wall to select it. Temporary dimensions will display, indicating the selected wall's distance from nearby walls that are parallel to it.
 from the menu, select the type of door that accesses your closet space, then click to place a door of that type in a wall.
 or Change Swing Side
  edit buttons.
 from the menu, then click in your plan to place a full height cabinet at that location.
 tool, click on the cabinet to select it, then click the Open Object
  edit button.

 from the menu, then click and drag a camera arrow towards the cabinet you just created to see the results so far.
 button, then click on the cabinet to select it and click the Copy/Paste
  edit button.
 edit button after clicking Copy/Paste
  but before you click to place a copy.
 edit button or the Select Objects
  button.
 edit button.
 edit button.
 from the menu, then click in front of the cabinet and drag a camera's focal point toward it, perpendicular to the wall that you would like to build shelves on.
 from the menu, then click in an empty space on the wall to place a partition at that location.
 tool, click on the partition to select it. Using the edit handles, move it to the desired location and resize it as needed.
 edit button and as before click in an empty space on the wall to place your copy at that location, then move the copy into position.
 from the menu, then click in an empty space along the wall to place your first shelf.
 edit button with the shelf selected. In the Transform/Replicate Object dialog: