The information in this article applies to:

DESCRIPTION
I keep seeing duplicate callout labels on my doors, windows, cabinets, or other items. What is causing this and how can I get rid of the duplicates?
CAUSE
Duplicate callout labels associated with an object is an indication that there is more than one schedule that has been created with that object included. There a few things that can be done when this occurs:
Deleting extra schedules
-
Using the Select Objects
 tool, click on the unwanted schedule to select it.
-
Click on the Delete
 edit button, or Delete key on your keyboard to remove it.
- If you are not certain where the duplicate schedules are located, use the following suggestions to help locate them.
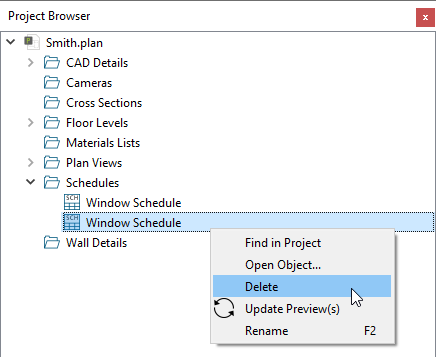
- Access the Project Browser
 and expand the Schedules folder to see a list of shedules located in the project. Right-click on the schedule you want to delete and click Delete.
You can also choose the Find in Project option to locate where the schedule is located in the plan.
- In X11 and prior program versions, the Schedules folder didn't exist in the Project Browser. Instead, use the Window> Fill Window
 tool and go through each floor to try and locate any duplicate schedules.
If you cannot locate the duplicate schedule using the process above, it may be located in a Cross Section/Elevation or a CAD Detail view.
Specifying how the schedule labels the object
-
Open
 one of the schedules that is creating duplicate callouts for your objects.
- On the Labels panel of the Schedule Specification dialog that opens, select the Use Label radio button at the top.
In X13 and prior program versions, uncheck the Use Callout For Label box instead.
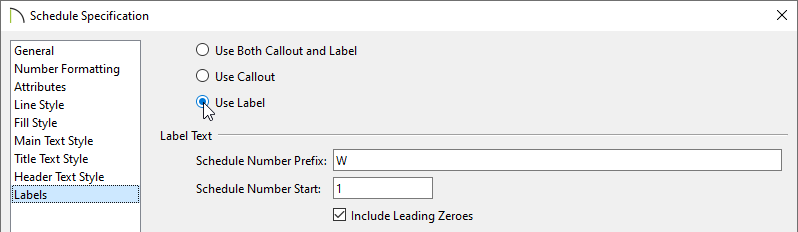
- Click OK to confirm the change and close the dialog.
-
(Optional) If you're using X14 or a newer program version and you don't want the object labels to display, Open the object(s) up to specification, click on the Label panel, check the Suppress Label box, then click OK.
Choosing what floors and/or rooms are included in a schedule
- Using the Select Objects tool, click to select the schedule, then click the Open Object edit tool.
- On the General panel of the Schedule Specification dialog that displays, uncheck Include Objects from All Floors, then set the appropriate floor and/or room that you'd like to be part of this schedule.
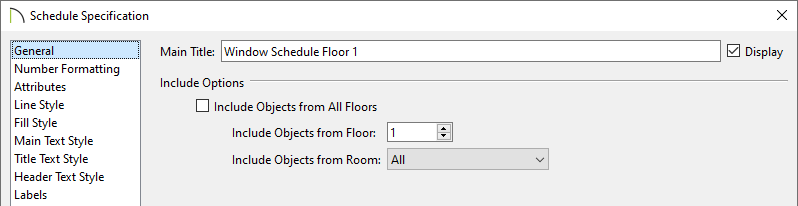
- Click OK to apply the change, and repeat for any other schedules that are located on other floors.
Excluding or removing an objects category from a schedule*
*Applies to Chief Architect X12 and newer program versions
- Using the Select Objects tool, click to select the schedule, then click the Open Object edit tool.
- On the General panel of the Schedule Specification dialog that displays, remove the category the object is located in, from the schedule.
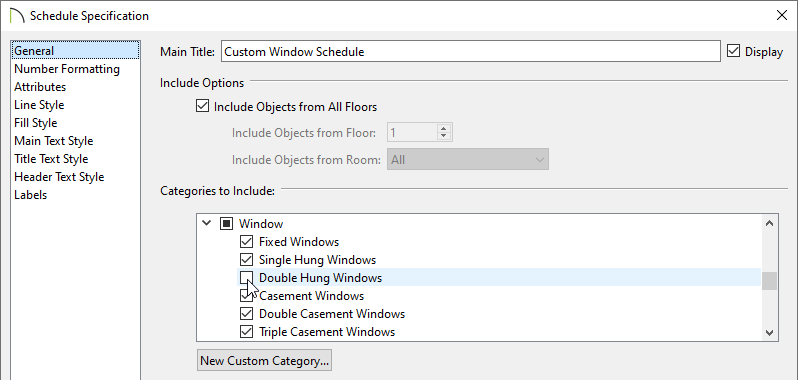
- Click OK to apply the change.