QUESTION
I need to create a fence which is solid on the lower half and has railing panels applied to the upper half. How can I accomplish this in Chief Architect?

ANSWER
Creating a stacked fence with a solid lower portion and a railing on the upper portion can be accomplished using the Fencing and Terrain Wall tools.
To create stacked fencing
- Select Terrain> Terrain Wall and Curb> Straight Terrain Wall
 , then click and drag to draw the terrain wall. This will serve as the solid lower section of the wall.
- Once you have the solid section drawn, use the Select Objects
 tool to select it, then click on the Open Object
  edit button to display the Terrain Path Specification dialog.
- On the General panel, set the appropriate Width, Terrain to Top, and Thickness.
- Access the Materials panel to specify an appropriate material for the lower wall, then click OK.
- Next, select Build> Fencing> Straight Fencing
 , then click-and-drag to create the fence centered within the terrain wall.
- With the fence drawn, use the Select Objects tool to select it, then click on the Open Object edit tool to display the Fencing Specification dialog.
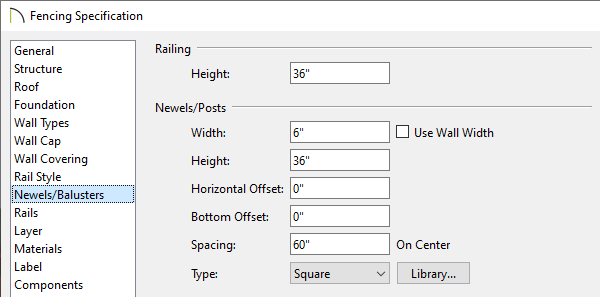
- On the Newels/Balusters panel:
- Under Panels to the right of Type, click on the Library button.
- In the Select Library Object dialog that displays, choose a fence panel style for the top of this fence, then click OK.
A variety of railing panel options can be located by navigating to Chief Architect Core Catalogs> Architectural> Fences and Railings.
- Back in the Fencing Specification dialog, you can adjust the Railing Height, Newel Width, Newel Height, as well as many other settings to your liking.
- Access the Rail Style, Rails, and Materials panels to make further adjustments to the fence railing, then click OK.
To place caps on the fence posts
- Select View> Library Browser
 from the menu to open the Library Browser window if it's not already open.
- Next, browse to Chief Architect Core Catalogs> Architectural> Millwork> Finials & Caps, and choose an appropriate Cap.
If you prefer the globes used in the image at the beginning of this article, browse to Chief Architect Core Catalogs> Shapes> Domes & Spheres> Sphere instead.
- Click in your 2D floor plan view to place the cap.
- Use the Select Objects tool to select the cap and click on the Open Object tool to display the Millwork Specification dialog.
- On the General panel, set the Elevation Reference to Absolute, then change the Elevation at Bottom value to the appropriate value so that it rests on top of the newel. Make any appropriate changes to the Width, Depth, and Height values.
- Select the Materials panel to set the appropriate material for the cap, then click OK.
- Finally, position the cap appropriately over a newel post using the Move
 edit handle.
You can now replicate the cap to each newel post associated with the fence.