How do I build hip and gable roofs automatically?
The automatic roof functionality in Chief Architect allows you to create a wide variety of roof designs in your plans. In this tutorial, we will cover building an automatic hip roof, an automatic gable roof, an automatic dutch gable roof, as well as how to control the roof's height.
Before continuing, it's important to have an understanding of how the automatic roof functionality works in the program. In Chief Architect, a structure's roof is automatically generated using the "Build Roof Planes" and "Auto Rebuild Roofs" settings located within the Build Roof dialog. While the "Build Roof Planes" setting allows you to build the roof based on the current state of the plan, and requires you to recheck the box each time you want to rebuild the roof, the "Auto Rebuild Roofs" setting is a persistent setting that, when enabled, rebuilds the roof in the plan any time a change is made.
Although these settings allow you to quickly, and effortlessly, create a roof for your structure, you will want be aware that its generation is contingent on having properly defined rooms that have been established using the Wall tools. This is important because the roof planes that are generated automatically receive directives from the established rooms (such as the specified room height) and the walls that they bear on. For example, creating a roof gable is accomplished by opening a wall that is part of an enclosed room up to specification and specifying it to be a Full Gable Wall (we will discuss this more later on in the article).
If you have created rooms within a plan using the Wall tools, but the roof isn't generating or updating when using one of the mentioned settings within the Build Roof dialog, it may be caused by one of the following:
Use the links below to quickly navigate to the various sections within this tutorial:
An automatic hip roof is the easiest type of roof to create in Chief Architect, because the program will generate a roof plane on each exterior wall in your plan by default, resulting in a hip condition.
 from the menu, then click and drag four walls to form a basic rectangular structure.
 from the menu to display the Build Roof dialog:
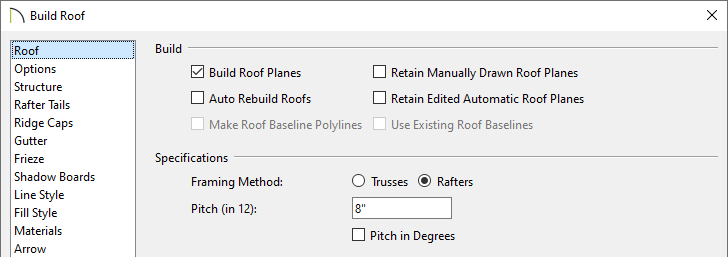

 from the menu to see the results.
If a gable is needed above a particular wall instead of a hip roof plane, this can be set in the Wall Specification dialog of the wall in question.
 edit button.
 from the menu, check the Build Roof Planes box, then click OK to rebuild the roof.
 from the menu to see the results.
In Chief Architect X10 and newer program versions, dutch gable roofs can be generated automatically.
edit button. from the menu, check the Build Roof Planes box, then click OK to rebuild the roof.
 from the menu to see the results.
The height that automatic roofs generate at is determined by the ceiling heights within the structure. So, when the ceiling height for an area is adjusted, the automatic roof plane directly over this area will adjust accordingly when the roof is rebuilt. In the example below, a gable roof has been established over the structure.
 from the menu, check the Build Roof Planes box, then click OK to rebuild the roof.
 edit tool to open the Wall Specification dialog. edit button.
 from the menu, check the Build Roof Planes box, then click OK to rebuild the roof.
 from the menu to see the results.
It's important to remember that automatic roofs are generated based on the current ceiling heights. If you change the ceiling height after the roof is built, the height of the roof will not be affected until it's rebuilt.