The information in this article applies to:

QUESTION
Is there a way that I can control which wall receives molding?
ANSWER
Moldings can be removed from one or both sides of a wall using the Wall Specification dialog. If you'd like to control which types of moldings are removed from a single wall, such as in the instance where you'd like to keep the base molding but remove the crown molding, consider creating a room molding polyline. Additionally, moldings can be suppressed behind objects that are placed against walls.
Removing all moldings from one or both sides of a wall
- Using the Select Objects
 tool, click on a wall that you'd like to remove moldings from, then click the Open Object
  edit button.
- On the General panel of the Wall Specification dialog that displays:
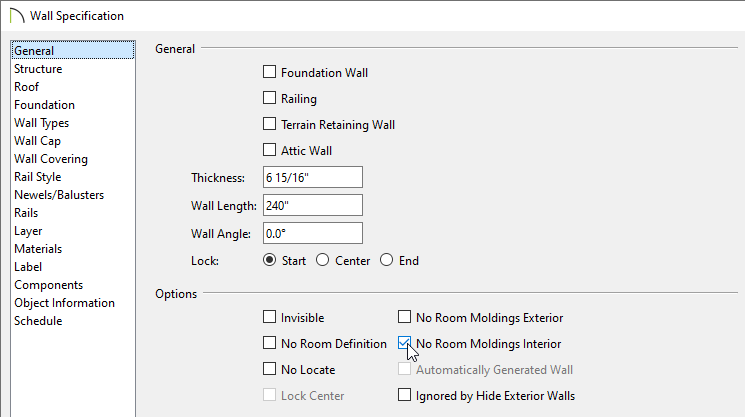
- Place a check in the No Room Moldings Exterior and/or No Room Moldings Interior box, depending on what side of the wall you'd like to remove the moldings from.
- Click OK to confirm the changes.
- All room moldings that were originally on that side of the wall will be removed and will no longer appear.
If you'd like to remove a single molding from a wall, such as just base molding, you can convert a molding profile that is assigned to a room to be a molding polyline. The display of the molding can then be controlled for each edge that is part of the molding polyline.
Removing a single molding from a wall
- Using the Select Objects tool, click in the desired room in your plan view to select it, then click the Make Room Molding Polyline
 edit button.
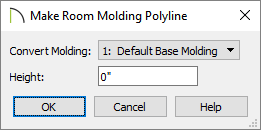
- In the dialog that appears, use the Convert Molding drop-down menu to select a molding profile that's currently applied to the selected room, set a Height value, which specifies how high you want the molding to be off the floor, then click OK.
In this example, we are adjusting the Default Base Molding that's applied and we are leaving the Height at the default value of 0".
- A molding polyline will be created based on the shape of the room. Click on the edge of the molding polyline you wish to remove the molding from, then click the Open Object edit button.
If a wall or the room is selected when you're attempting to click on an edge of the molding polyline, select the Tab key on your keyboard, or the Select Next Object edit button, to cycle to the molding polyline.
- On the General panel of the Molding Polyline Specification dialog that displays, check the No Molding on Selected Edge box, then click OK.
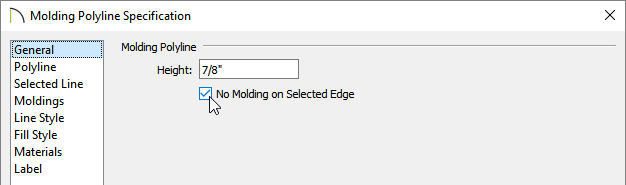
Alternatively, after selecting a molding polyline edge, you can use the Remove Molding from Selected Edge  edit button to perform the same action.
-
This molding will no longer display along this edge.
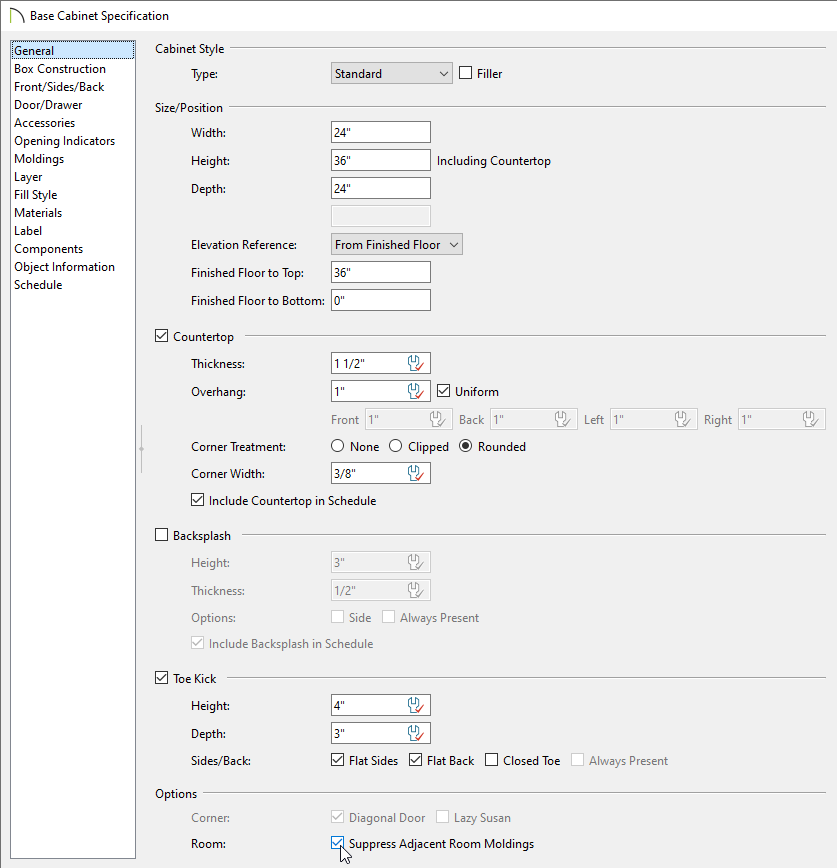
By default, room moldings are suppressed behind cabinets, architectural blocks, and other objects that are placed against a wall. However, if you believe that room moldings are still being generated behind these types of objects, it's possible that the "Suppress Adjacent Room Moldings" setting has been disabled. You can locate this setting by accessing the object's Specification dialog.
Removing room moldings behind objects
- Using the Select Objects tool, click on a cabinet, architectural block, or another object that you'd like to control the room moldings for, then click the Open Object edit button.
- On the General panel of the Specification dialog that displays, under the Options heading, check the Suppress Adjacent Room Moldings box to remove all room moldings behind the object, then click OK.
- Room moldings will now start/stop at each edge of the object that this change was made to, and they will no longer generate behind the object.