Using Molding Polylines to Create a Custom Column


Reference Number: KB-02791
Last Modified: July 16, 2021

The information in this article applies to:

Chief Architect Premier or Chief Architect Interiors


QUESTION

I have searched through the Millwork items that include columns in the Library Browser and have determined that none of the options will suit my needs. How can I create a completely custom column?   


ANSWER

A molding polyline is a profile shape that is extruded along a polyline path. The profile shape can be one that you have drawn, or it can be one that was included with the Chief Architect library. As their name suggests, molding polylines are great for adding moldings to a room, but the tool is versatile enough to be used for so much more.

Custom columns can easily be made by creating a molding profile and extruding the profile along a closed shape. Use the CAD tools to create a custom molding profile that is the actual height of the column you wish to create and half the width minus 1/2" (the molding will be extruded around a 1" square or circle). See the "Creating and Editing Molding Profiles" article in the Related Articles section for more information on creating a custom molding profile and adding it to your library.

For this example, the following molding profile shape is used:

Custom profile that has been created using CAD


To extrude a molding profile to create a column

  1. While in plan view, select CAD> Boxes> Rectangular Polyline  from the menu.

    Using a CAD circle instead of a square will result in a round column.


  2. Click and drag to create a 1" square. Use dimensions to resize the square if necessary.

    1" x 1" Rectangular Polyline created


  3. Using the Select Objects tool, select the square and then click the Convert Polyline  edit tool.


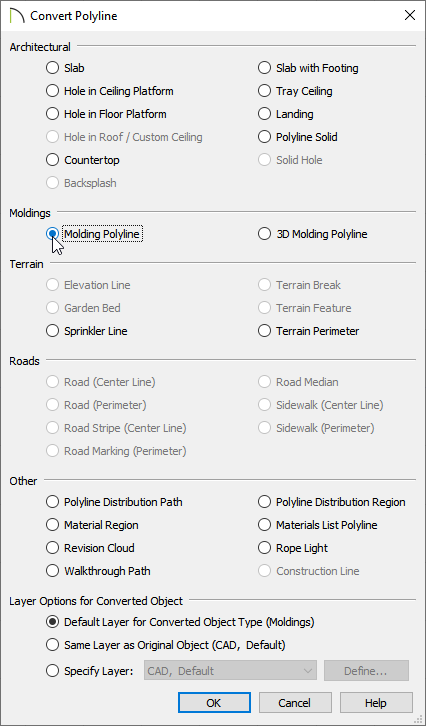
  4. In the Convert Polyline dialog that appears, choose the Molding Polyline option, specify the Layer Options to your liking, then click OK.

    Select the Molding Polyline option in the Convert Polyline dialog


  5. In the Molding Polyline Specification dialog which opens next, select the Moldings panel.


  6. Click the Add New button and browse to the custom molding profile that you created, which should be located in the User Catalog.

    Adding the custom molding profile to Molding Polyline

    • Notice that the height and width match what was used when the profile was created. You can also change these values here if you'd like.

    • Remove the checkmark from Extrude Inside Polyline.
     

  7. Select the Materials panel and specify your desired material for the column.


  8. Click OK to confirm the changes and take a Camera view to see the results.

    Camera view of a custum column


Tapered columns can also be made by using a custom molding profile such as the following:

Tapered column