The information in this article applies to:

QUESTION
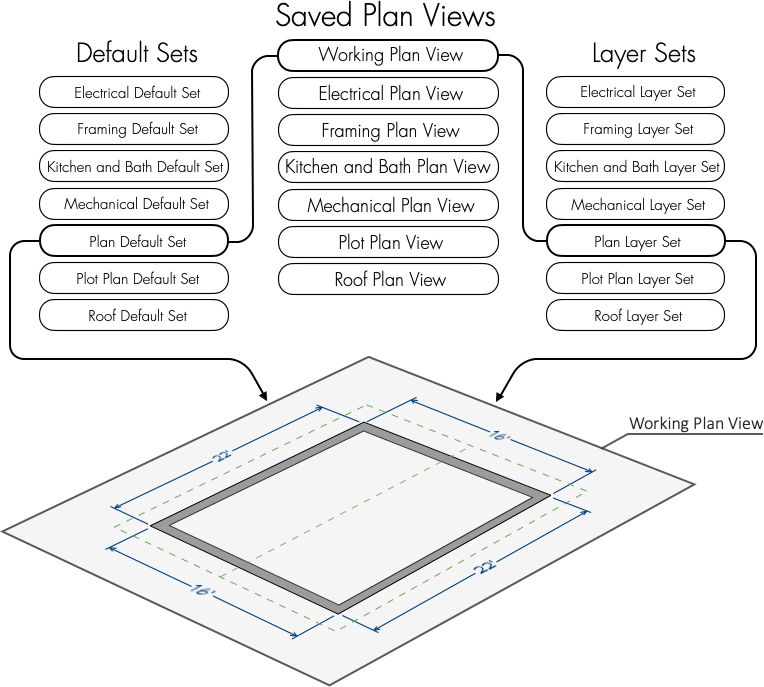
What are Saved Plan Views, and how are they used in Chief Architect?
ANSWER
Saved Plan Views are preconfigured collections of the following settings, which allow you to quickly change them all at once as you create a variety of construction drawings:
- Default Set
- Layer Set
- Reference Display properties
- General plan view-specific settings
For more information on Default Sets, Layer Sets, and the Reference Display, please see the Related Articles section below.
You can learn more about Saved Plan Views in the following sections:
To create a new Saved Plan View
- Use the Saved Plan View Control
 drop down menu to switch to a Saved Plan View that has similar properties to the one you'd like to create, since your new Saved Plan View will inherit the properties of the currently active Saved Plan View.
In this example, we switched to the Mechanical Plan View.

- From the menu, select Tools> Active View> Save Active View As
 .
.
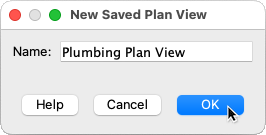
- In the New Saved Plan View dialog that opens, enter a Name, then click OK. Saved Plan Views must have unique names, so if you try to give a new Saved Plan View the same name as an existing Saved Plan View, the program will prompt you to give it a different name.
In this example, we specified Plumbing Plan View as the name.
- From the menu, select Tools> Active View> Edit Active View
 to open the Plan View Specification dialog:
- On the General panel, make your selections for a handful of plan view-specific settings, such as the floor level that displays when this Saved Plan View is initially opened, and how changes are saved.
Click the Help button to learn more about each of the options available in any of the panels within this dialog, if needed.
- Select the Selected Defaults panel and create new Saved Defaults to use as the Selected Defaults for all eight text-based object types, create a new Layer Set, and create a new layer to use as the Current CAD Layer for this Saved Plan View, then save them as a new Default Set.
For more information on how to create and customize new layers, Layer Sets, Saved Defaults, and Default Sets, please see the Related Articles section below.
In this example, we created eight new Plumbing Defaults, a new Plumbing Layer Set, and a new CAD, Plumbing layer to use as the Current CAD Layer, then clicked the Save New Default Set  button and specified Plumbing Default Set as its name.
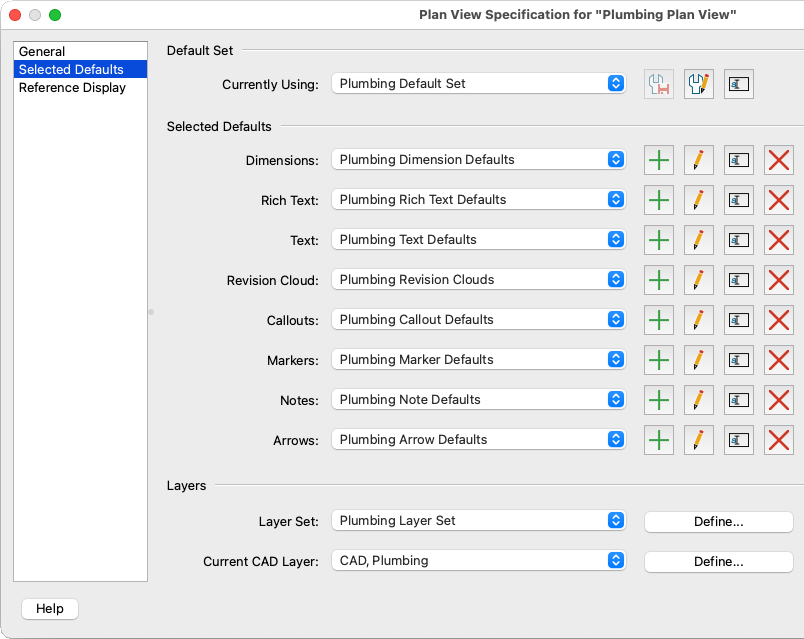
- Select the Reference Display panel and make changes as desired to the properties of the Reference Display for this Saved Plan View.
- Click OK to save your changes and close the dialog box.
Once you've spent time creating custom Saved Plan Views, you may want to copy them to another planor your plan template. Instructions on doing so can be found in the last section of this article. For information on creating a custom plan template, please see the Related Articles section below.
To edit a Saved Plan View
- Use the Saved Plan View Control drop down menu to switch to the Saved Plan View that you want to edit.

- From the menu, select Tools> Active View> Edit Active View to open the Plan View Specification dialog:
- On the General panel, select options to make changes to a handful of plan view-specific settings such as the floor level that displays when this Saved Plan View is initially opened and how changes are saved.
- Select the Selected Defaults panel, then click the Edit Default
 and/or Define buttons to make changes to the Default Set, Selected Defaults, Layer Set, or Current CAD Layer for this Saved Plan View.
- Select the Reference Display panel to make changes to the properties of the Reference Display for this Saved Plan View.
- Click OK to save your changes and close the dialog box.
To delete a Saved Plan View
Do not delete a Saved Plan View that is being referenced or used by a layout file. If a Saved Plan View that has been sent to a layout is deleted, a Warning dialog will display upon opening the layout, and the view will no longer be linked to a Saved Plan View.
Avoid deleting any of the default Saved Plan Views.
- If the Project Browser is not already open, select View> Project Browser
 from the menu.
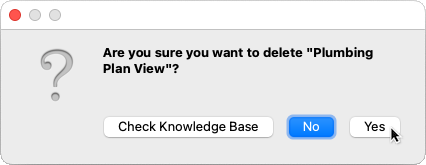
- Open the Plan Views folder, then right-click on a Saved Plan View and choose Delete.
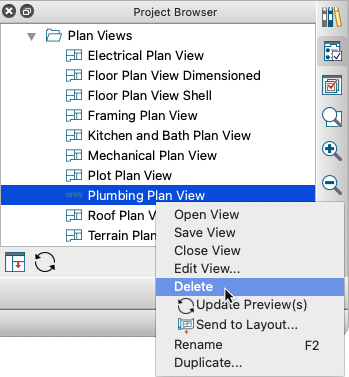
- Click Yes in the resulting dialog to confirm deletion.
To copy Saved Plan Views to another plan
- Select File> Open Plan
 to open the plan or template in which you want to import your Saved Plan Views.
- Select File> Import> Import Saved Plan Views
 .
.
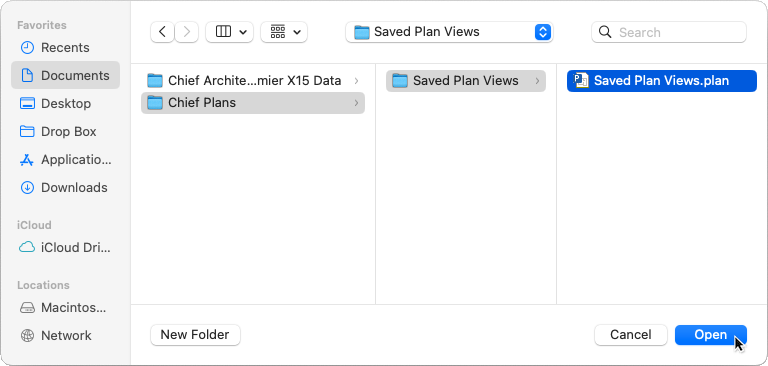
- In the Open Plan File dialog that opens, browse to the location of the plan file that contains the Saved Plan Views you want to import, click to select the plan file, then click Open.
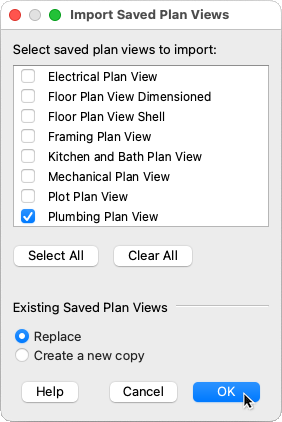
- In the Import Saved Plan Views dialog that opens, click to check the boxes next to the Saved Pan Views you want to import, specify how you want the program to handle existing Saved Plan Views in the current plan that have the same name as those being imported, and click OK.
In this example, we selected the Plumbing Plan View we created in an earlier section of this article to import.
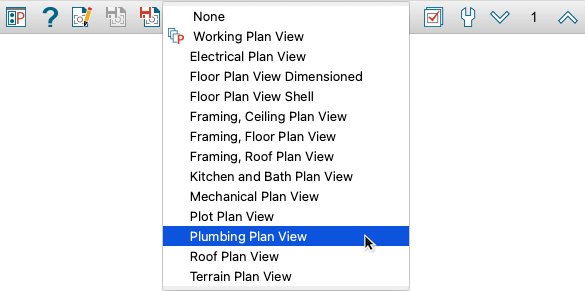
- Open the Saved Plan View Control drop down to access the imported Saved Plan View(s).
- Select File> Save
 from the menu to save the imported Saved Plan Views in the plan or template that you're working with. Alternatively, select File> Templates> Save As Template
  to save a new plan template with the imported Saved Plan Views.

