QUESTION
I have created a custom fixture or furnishing and would like to convert it into a symbol that I can save in the Library Browser. How do I do this?

ANSWER
While 3D symbols can be imported into Chief Architect, you can also create your own symbols and add them to the User Catalog folder for future use.
When object(s) are configured as desired, you can use the Convert to Symbol  or Convert Selected to Symbol
  tools to create a single symbol assigned to a category of objects that reflects how the object will be used.
For example, if you designed a cabinet door using Chief Architects tools, the Cabinet Door/Drawer category can be chosen when creating the symbol, so it can be assigned to a cabinet as such.
To convert an object into a symbol
- Using the Select Objects
 tool, select one or more objects you'd like to convert into a single symbol and click the Convert Selected to Symbol edit button.
In X10 and prior program versions, symbols can only be created in 3D camera views. To do so, take a 3D Camera view in which the object or objects that you wish to convert to a single symbol are the only things displaying. It is recommended to turn off any unwanted display layers, or use a blank plan when performing this method. Once the view is only displaying objects you'd like to be included as part of the symbol, navigate to Tools> Symbol> Convert to Symbol .
- In the Convert To Symbol dialog:
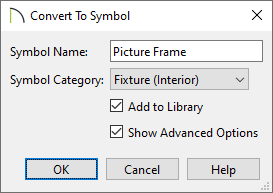
- Provide a Symbol Name.
- Choose the appropriate Symbol Category from the drop-down list.
If you are creating an object that you want to be able to be applied to another type of parametric object in Chief Architect, such as cabinet doors/drawers, knob/pull hardware, built-in appliances, etc, it is very important to select the appropriate type of category.
- Check Add to Library.
- Check Show Advanced Options.
- Click OK.
- In the Specification dialog that opens next:
- In X15 and newer versions, a General panel will be available, in which the object's dimensions can be specified, as well as the elevation.
- On the 3D panel, specify the Symbol Name if one was not specified in Step 2 above. This will be the name that will appear in the User Catalog.
If the symbol will be applied to another object, then you may also want to adjust the Origin Offset here.
- On the 2D Block panel, you can select a different CAD Block than the one automatically generated when the symbol was created, as well as specify fill properties.
To learn more, see the article "Editing 2D CAD Blocks Assigned to 3D Symbols" in the Related Articles section below.
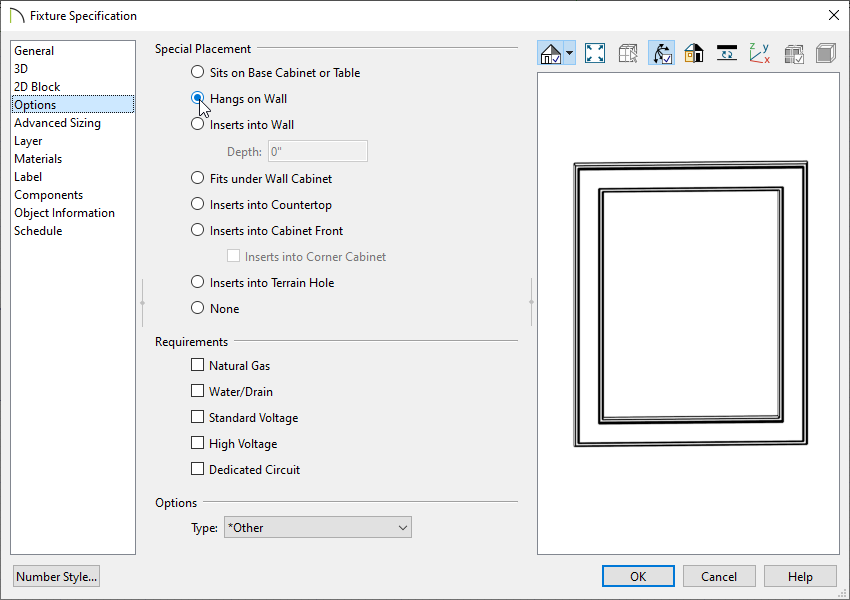
- On the Options panel, you can typically make a number of adjustments, depending on the category that was specified for the symbol in Step 2.
In this example, we've converting a picture frame into a symbol, so we will select the Hangs on Wall placement option.
Click on the Help button at the bottom of the dialog to learn more about the options specific to the type of object you are creating.
- On the Advanced Sizing or Sizing panel, you can adjust additional sizing parameters, such as the bounding box.
- On the Materials panel, you can set your desired materials for the symbol.
- Make any additional changes, as needed, then click OK.
- The symbol will now be added to your User Catalog in the Library Browser for future use.