The information in this article applies to:

QUESTION
How can I create vertical shelves within a cabinet?

ANSWER
You can create vertical shelves within a cabinet by creating a custom symbol and then utilizing the manual shelf settings within the Cabinet Shelf Specification dialog.
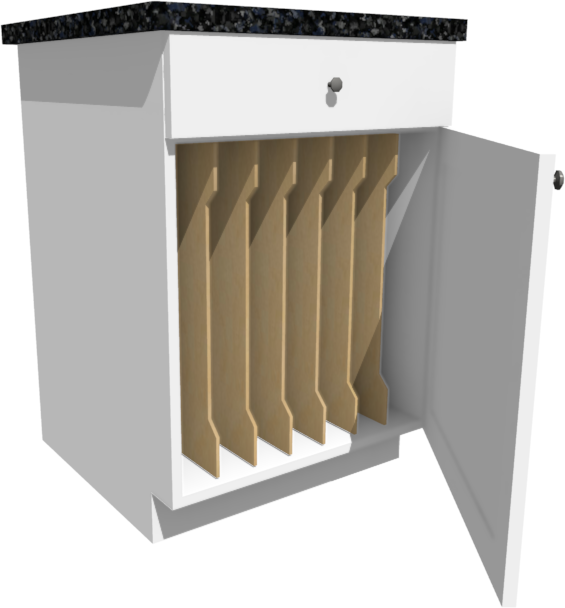
In this article, we will create vertical shelves for a base cabinet. However, these same steps will also apply for wall and full height cabinets.
To create a custom vertical shelf
- Starting with a blank plan, from the menu click Build> Cabinet> Base Cabinet
 , then click in the plan to place a base cabinet.
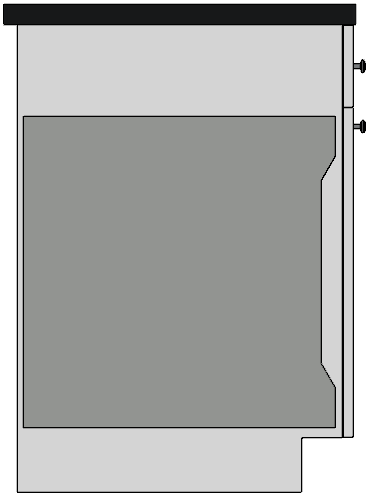
- Next, navigate to 3D> Create Orthographic View> Cross Section/Elevation
 , then click and drag towards one side of the cabinet to create a side elevation view.
- Select Build> Primitive> 3D Solid
 .
.
In X13 and and prior versions, navigate to Build> Primtive> Polyline Solid  instead.
- Click and drag in the area of the cabinet where the vertical shelves will occupy.
In this article, the vertical shelves will be going within the door area under the drawer of the cabinet, so the door panel height is used as a guide.
- Once drawn, modify the 3D/polyline solids dimensions and shape to match that of one of the desired vertical shelves.
- Switch back to a floor plan view and locate the 3D/polyline solid. Using the Select Objects
 tool, select the 3D/polyline solid and move it away from the cabinet.
If the cabinet is selected when you attempt to click on the 3D/polyline solid, press the Tab key on the keyboard or click the Select Next Object edit tool to cycle to the 3D/polyline solid.
- With the 3D/polyline solid selected, click the Open Object
 edit tool.
- On the General panel of the 3D/Polyline Solid Specification dialog, set the Depth or Thickness of the polyline solid to match the desired shelf thickness, then click OK.
In this example, 1/4" is used.
To make copies of the shelf
- Using the Select Objects tool, click on the 3D/polyline solid created in the section above, then select the Multiple Copy
 edit tool.
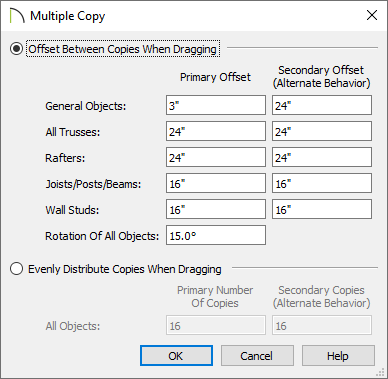
- Next, click on the Multiple Copy Interval
 secondary edit tool, which is also located on the Edit toolbar.
- In the Multiple Copy dialog which opens, select the Offset Between Copies When Dragging radio button, specify the desired distance between the shelves using the General Objects field for the Primary Offset, then click OK.
In this example, 3" is used.
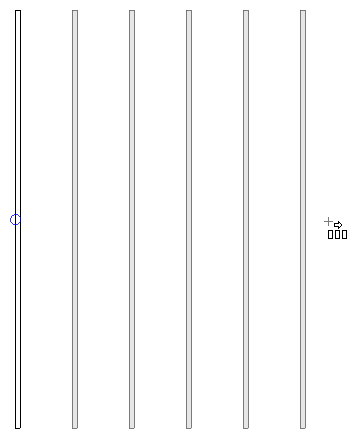
- Move the cursor over the Move
 edit handle of the original polyline solid. When the cursor changes from an arrow to the Multiple Copy
  cursor, click and drag until the desired number of copies are achieved.
In this example, we have created a total of six shelves.
To convert the shelves into a symbol
- Using the Select Objects tool, click and drag a selection marque encompassing the 3D/polyline solids to group select them.
For more information on selecting multiple objects at once, please see the "Group Selecting Objects" resource in the Related Articles section below.
- Click the Convert Selected to Symbol
 edit tool located on the Edit toolbar.
- In the Convert To Symbol dialog that opens:
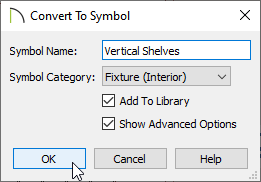
- Specify the Symbol Name.
In this example, "Vertical Shelves" is used.
- Set the Symbol Category.
In this example, the "Fixture (Interior)" category is used.
- Check Add to Library.
- Check Show Advanced Options.
- Click OK.
- In the Symbol Specification dialog that opens next:

- On the General panel, use the Rotate + and Rotate - buttons to rotate the symbol so it faces forward, as shown above.
- On the Materials panel, select the Vertical Shelves component, click the Select Material button, then browse the library for an appropriate material. Once a material has been selected, click OK.
In this example, the Baltic Birch material is used.
- On the Sizing panel, adjust the Width (X) field under the Bounding Box Dimensions section to create buffer space between the cabinet box, and the first and last shelves.
In this example, the value is changed from 15 1/4" to 21 1/4" to create a 3" buffer on each side of the shelf symbol.
- Click OK.
- View the new symbol in the User Catalog section of the Library Browser
 .
.
To add the symbol to a cabinet shelf
- Using the Select Objects tool, select the cabinet that you want to specify vertical shelves for.
- Click the Open Object edit tool to open the Cabinet Specification dialog.
- On the right side of the dialog where the 3D preview is located, select the face item behind which the vertical shelves will be placed.
In this example, we have selected the door face item, which then takes us to the Front/Sides/Back panel.
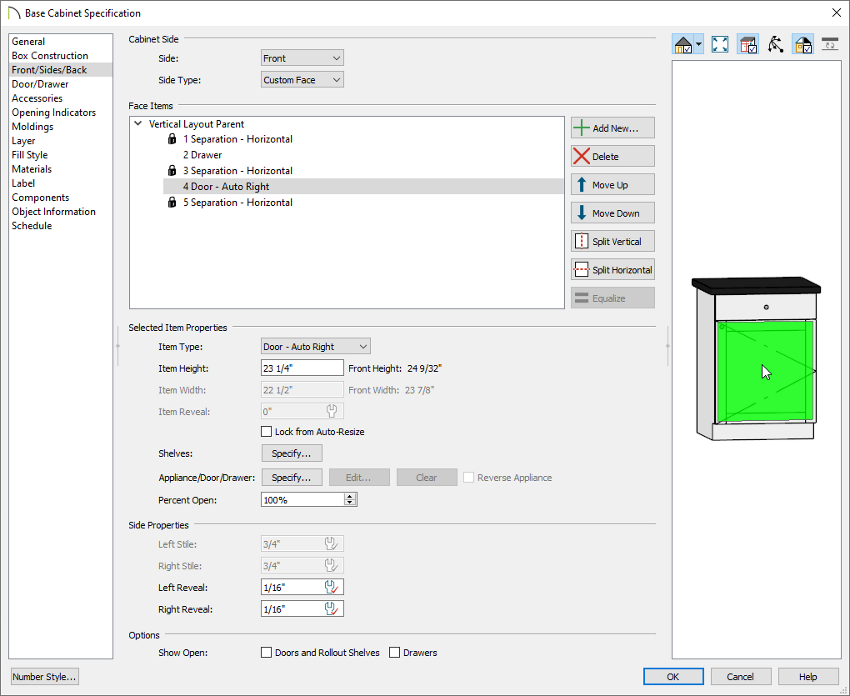
- With this component selected, locate the "Shelves" setting towards the bottom of the dialog, then click the Specify button.
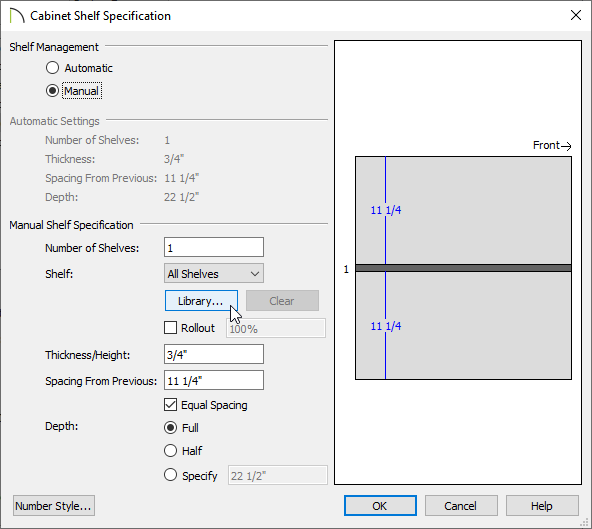
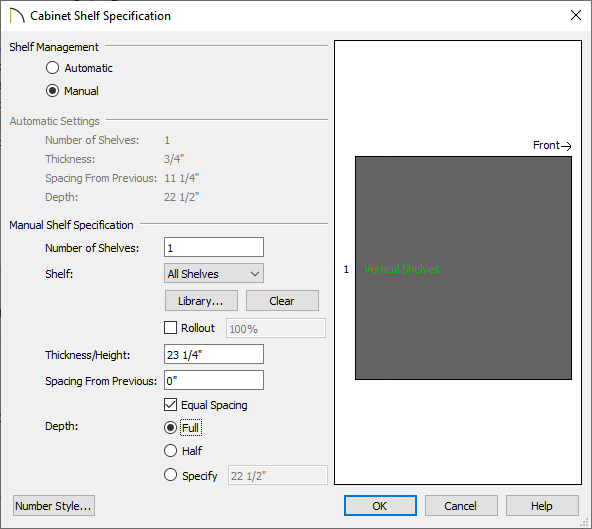
- In the Cabinet Shelf Specification dialog that displays next, select the Manual radio button, then click the Library button next to the "Shelf" setting.
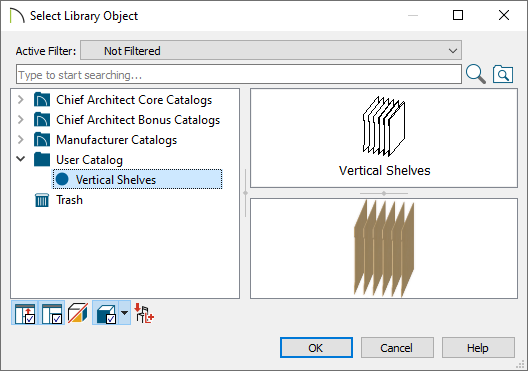
- In the Select Library Object dialog that opens, browse into the User Catalog, select the Vertical Shelves symbol, then click OK.
- Specify the Thickness/Height, Spacing from Previous, and Depth settings to your liking, then click OK.
In this example, the Thickness/Height is set to 23 1/4", the Spacing From Previous is set to 0", and the Depth is set to Full.
- To view the shelves inside of the cabinet, place a check in the Doors and Rollout Shelves box located in the "Show Open" section on the Front/Sides/Back panel. How wide the door is open can be controlled with the Swing Angle/Percent Open setting.
- Click OK to confirm the changes and close the dialog, then take a Camera
 view to see the results.