QUESTION
I would like to create a barrel ceiling on the inside of my structure. How can I accomplish this?

ANSWER
You can easily create a custom curved ceiling for a structure using a manually drawn ceiling plane.
To create a curved or barrel ceiling
- Using the Select Objects
 button, click in an empty space of the room in which you would like to create a barrel ceiling and click the Open Object
  edit button.
- On the Structure panel of the Room Specification dialog that opens, uncheck the box beside the Ceiling Over This Room, then click OK.

- With the default flat ceiling removed from the room, navigate to Build> Roof> Ceiling Plane
 from the menu:
- Click and drag along one of the walls on which the straight sides of the barrel ceiling will rest to create a ceiling baseline.
- Release the mouse button, move your cursor in the desired direction, then click to set the ridge top of the ceiling plane.
- The ceiling plane will display as a dashed, pink rectangle.
- Using the Select Objects tool, click on the ceiling plane near one of its edges to select it, then use the edit handles to resize it to encompass the entirety of the area you would like it to span.
- When the ceiling plane is appropriately sized, select it and click the Open Object edit button.
- On the General panel of the Ceiling Plane Specification dialog that opens:
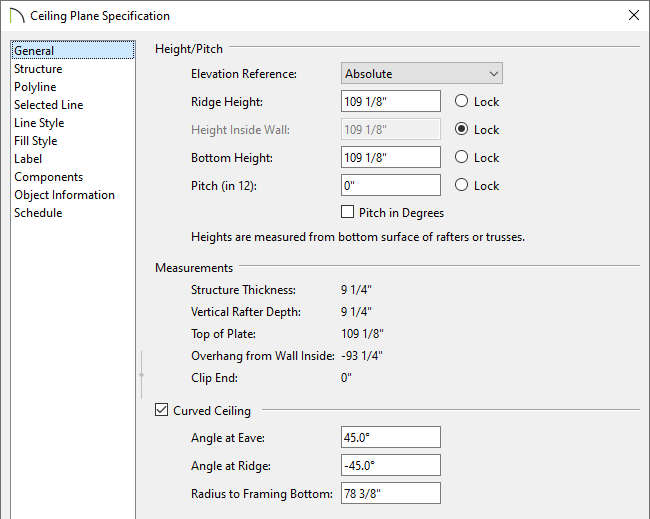
- Place a check in the box beside Curved Ceiling, which will enable the options directly below it.
- If it's not already locked, lock the Height Inside Wall option, then set the Pitch (in 12) value to 0.
- Press the Tab key on your keyboard to apply this new value without closing the dialog box.
- Under the Curved Ceiling section, assign an Angle at Eave (in degrees) value between 0° and 89°. 0° would give you a flat ceiling and 89° degrees, a full 1/2 barrel. Notice that when you press the Tab key on your keyboard, the angle values update so that they are symmetrical.
If you are not sure what value to use, specify 45°. This is a good starting point, and you can make adjustments to this value at any time.
- Click the OK button to close the dialog.
- To see your barrel ceiling in a 3D view, select 3D> Create Perspective View> Full Camera
 and click and drag within the room or area that contains the barrel ceiling.