QUESTION
I recently upgraded my Chief Architect version and when I go through the migration process, I receive the following message:
"The migration of your user settings has completed with one or more errors. View the Migration Log for more details."
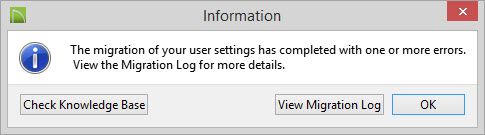
What should I do?
ANSWER
If you have used legacy versions of Chief Architect and copied textures forward, then you may have some images that are using the old 8.3 file name convention (short filename or SFN). These short filenames do not copy well and can cause this error to occur.
To manually migrate old textures
- While the message is on screen click the View Migration Log button.
If you have already closed out of the message you can access the Migration log by navigating to Documents\Chief Architect Premier X15 Data and locating the Migrate_Settings_Log.txt there.
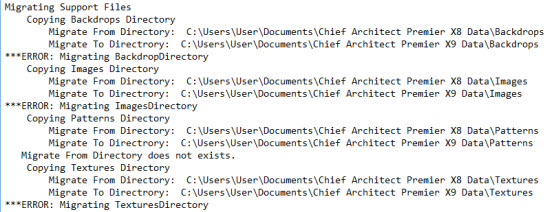
- The Migrate Settings Log will show each directory for migration. Any problem directories will be marked with ***ERROR:
Example:
- The migration process essentially copies the contents of the prior directory to the new directory. Navigate to the "Migrate From" directory listed in the Migrate log for the affected directory.
For this example, the directory: \Documents\Chief Architect Premier X14 Data\Textures is used.
- Locate the files using the old naming convention. These files are typically start with 6 capital letters followed by a tilde (~) and a number.

- Right-click each of these files and rename them, removing the tilde (~) from the filename.
- Next, highlight all files in this folder then right-click and choose Copy from the menu. If you are on a Mac computer and do not have a right mouse button you can hold the CTRL key and click to access this menu.
- Navigate to the equivalent X15 folder and right click an empty space and choose Paste from the menu
For this example, the directory: \Documents\Chief Architect Premier X15 Data\Textures is used.