This article also applies to the following legacy products:
Pro
QUESTION
When I adjust the flooring components of a Deck room, I receive one of the following messages:
- "#272005536 - The Floor Structure Definition for a Deck room should have a planking layer and a joist layer. In order for joists and planks to generate, the joist layer must be specified as Framing."
- "#272005536 - The deck floor structure typically has two layers: a deck planking layer and a joist layer with a framing material. Planking should not be in the floor finish."
- "#272032900 - The planking and joists for Deck rooms must be specified in the room's Floor Structure Definition. Deck rooms do not typically have a Floor Finish."
How do I resolve this?
ANSWER
One of theses messages will display if you add a Floor Finish layer or remove the needed framing characteristics from the Floor Structure of a Deck room.
Unlike other room types that use a Floor Finish material that spans the entire floor, deck planking is part of the Floor Structure and does not require a Floor Finish layer. Although a Floor Finish layer can still be added, it should instead be used to apply some other type of covering laid over the deck planking, such as artificial turf or deck carpet.
If you have not altered the Floor Finish, but you are receiving one of the messages above, then you may have adjusted the Floor Structure of a Deck room in such a way that the joist layer is no longer specified as Framing (or is no longer using a Framing material in legacy versions).
To add a Floor Finish layer to a Deck room*
*Applies to Chief Architect Premier only.
- Click inside the Deck room to select it, then click the Open Object
 edit button.
- On the Structure panel of the Room Specification dialog that opens, click the Edit button to the right of Floor Finish.
-
In the Floor Finish Definition dialog that displays, click the Insert Above or Insert Below button to add a new layer to the floor finish.
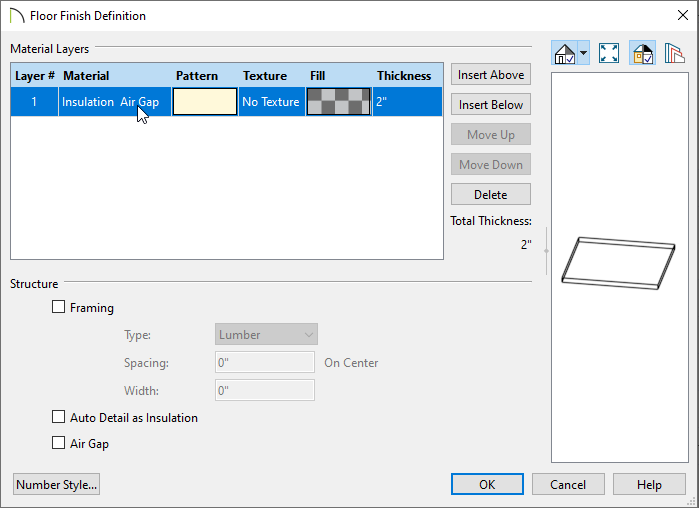
- With the new layer added and selected, click on the current Material to open the Select Material dialog, in which you can select your desired covering material (e.g. turf, deck carpet, etc.).
- Select the Thickness value and enter a thickness of your choosing.
- For more information on the other settings located here, please refer to your program's documentation by selecting the Help button at the bottom of the dialog.
- Once all desired changes have been made, click OK.
-
When the Floor Finish is set up correctly, click OK. You will receive one of the messages listed at the beginning of this article. Click OK on this message, then click OK again to close the dialog altogether.
-
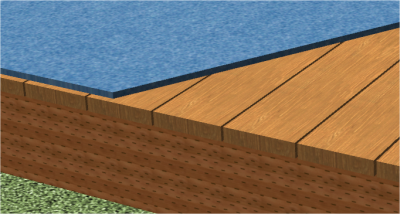
Take a Camera
 view to see the results.
To specify a Deck room's joist layer as framing
- Click inside the Deck room to select it, then click the Open Object edit button.
- On the Structure panel of the Room Specification dialog that opens, under the Floor section, click the Edit button at the bottom.
-
In the Floor Structure Definition dialog, two layers should be listed: Layer #1 should represent the deck planks and Layer #2 should represent the deck joists.
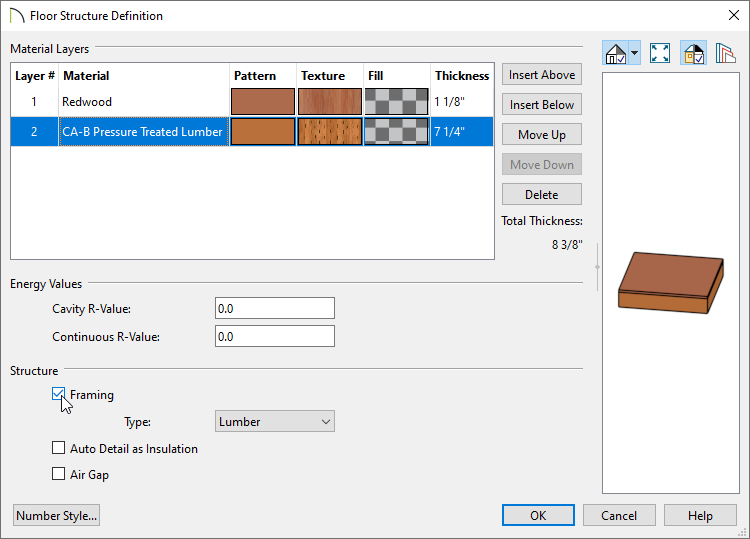
- Select Layer #1 and specify an appropriate deck plank material, such as wood or composite.
- Select Layer #2 and specify an appropriate deck joist material, such as pressure treated lumber.
- With Layer #2 still selected, check the Framing box located under the Structure section, if its not already checked. This must be checked for deck joists to generate correctly.
In legacy versions, a Framing box was not available for Floor Structure layers. Instead, one of the specially designed Framing materials must be set for the joist layer.
- For more information on the other settings located here, please refer to your program's documentation by selecting the Help button at the bottom of the dialog.
- Once all desired changes have been made, click OK.
- Once the Floor Structure is set up correctly, click OK. If you continue to receive one of the messages listed at the beginning of this article, please repeat Step 3.
If the deck joist layer is set as Framing and the message persists each time you close the Floor Structure Definition dialog, please send your plan file to Chief Architect Technical Support using the Technical Support Center.