QUESTION
I finished developing a plan or layout file in Chief Architect or Home Designer 2026 and would like to use the file as a starting point for future projects. What is the best way to do this?
ANSWER
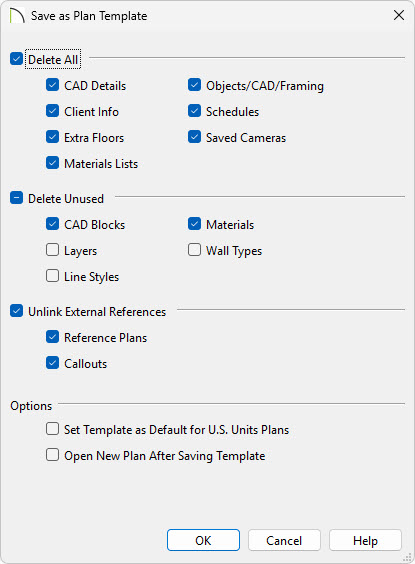
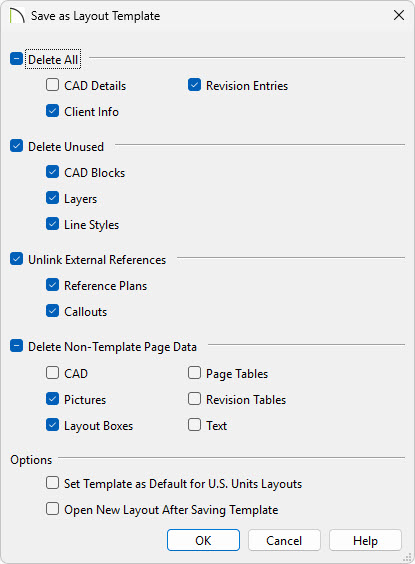
In Chief Architect and Home Designer 2026, a Save As Template tool is available that allows you save a template file from an existing plan or layout file. This tool is useful as it provides the option to keep or delete a variety of items that are in the current file prior to creating the template.
To create a custom template from an existing project
- With the file you'd like to create a template from, select File> Save As Template
 from the menu.
In X16 and prior, choose File> Templates> Save As Template  from the menu instead.
If you're using Project Management in X17, Home Designer 2026, or newer, you can also right-click on a plan/layout file within the Project Browser and choose "Save as Template".
- Determine what items you would like to keep in the template and de-select those boxes.

For layout files, Non-Template Page Data can also be deleted.

For more information on each of these options, click the Help button at the bottom of the dialog to open your program's Documentation.
- Check the Set Template as Default for Imperial/Metric Plans/Layouts box if you would like this file to be the default template when you create a New Plan
 / New Layout
  .
.
- Check Open New Plan/Layout After Saving Template if you'd like to create a new plan/layout right away.*
*Applies to X17 and newer. The "Open New Layout After Saving Template" option is not available in Home Designer.
- Click OK, give the new template a short, descriptive name, then click OK.
In X16 and prior, or when using Traditional File Management in X17 or Home Designer 2026, give the new template a short, descriptive name, then click Save.
When using Project Management in X17 or Home Designer 2026, the template will be located in your Plan and Layout Templates folder within the Project Browser.
In X16 and prior, or when using Traditional File Management in X17 or Home Designer 2026, the program will automatically save the template to the program's Templates directory on your computer.
- Once saved, the original file remains open, and a new file with the specified name and location is created.
If you didn't set this file to be your default template, or overlooked the option to set it as such, you can change this at anytime by accessing the program's Preferences.
To specify the default template(s)
- Select Edit> Preferences
 from the menu if you're on a Windows PC or Chief Architect/Home Designer> Preferences
  if you're on a Mac.
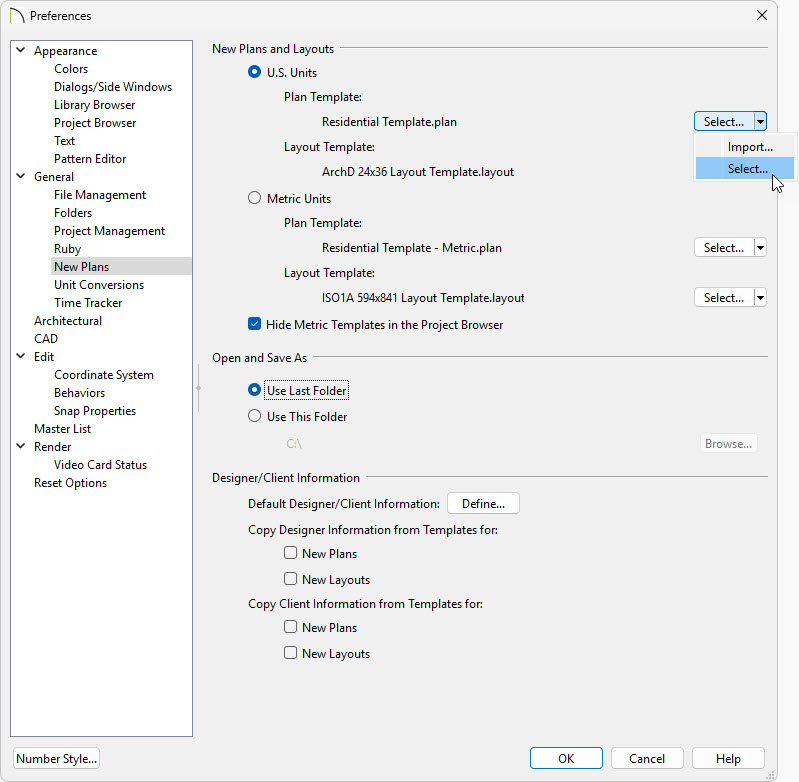
- On the New Plans panel of the Preferences dialog:

When using Project Management in X17 or Home Designer 2026, follow the steps below:
- Click the Select button to the right of the Plan/Layout Template option to open the Select a Replacement Template dialog.
If you don't see the Select button, click on the drop-down arrow next to Import and then choose Select.
- In the Select a Replacement Template dialog find the template you'd like to use, select it, and click OK to set it as your default template. If the plan/layout template you'd like to use isn't listed it's likely that it hasn't been imported into Project Management.
- To import into Project Management, click on Import
If you don't see the Import button, click on the drop-down arrow next to Select and then choose Import.
Additionally, you can use the Project Browser to import templates by right-clicking on the "Plan and Layout Templates" section in the Project Browser and choosing "Import Template(s)".
You can also set a template as a default by right-clicking on it within the Project Browser and choosing "Use as Default Plan/Layout Template."
- In the Select a Plan/Layout Template File dialog, locate the plan/layout file you'd like to import, select it, and choose Open.
- Once it has been imported, repeat the initial steps above.
- Click OK to close the dialog. The Project Browser will display an icon beside the default template(s), as well as display a tooltip when hovering over the file(s).
In X16 and prior, or when using Traditional File Management in X17, follow the steps below:
- Click the Browse button to the right of the Plan/Layout Template text field for the unit of measurement you're using.
If you don't see the Browse button, click on the drop-down arrow next to Edit Path and then choose Browse.
- In the dialog that opens next, browse to the location of your new plan/layout template file, select it, and then click Open to specify this file as your default plan/layout template.
- Click OK to close the dialog.
Now, when a new plan/layout or project is created, the file(s) specified in Preferences will be the default option.


 from the menu if you're on a Windows PC or Chief Architect/Home Designer> Preferences
  if you're on a Mac.