QUESTION
What are wall caps and how can they be applied and used in Chief Architect?

ANSWER
Wall caps are objects that can be applied to the top of half-walls, retaining walls, full height walls, and pony walls. They are often used in glass shower wall situations to separate tile and glass, used as a brick ledge for an exterior pony wall, or are added to half-walls or retaining walls as a finishing material or cap.
Working with wall caps
- Using the Select Objects
 tool, click on a wall you would like to add a wall cap to and choose the Open Object
  edit tool.
Additionally, wall caps can be applied to any applicable wall tools located within the Default Settings  .
.
- In the Wall or Railing Specification dialog that displays, click on the Wall Cap panel.
- Click the Add New button to open the Select Library Object dialog and browse the library for a profile that meets your needs. If a wall cap is already present, you can Replace or Delete it.
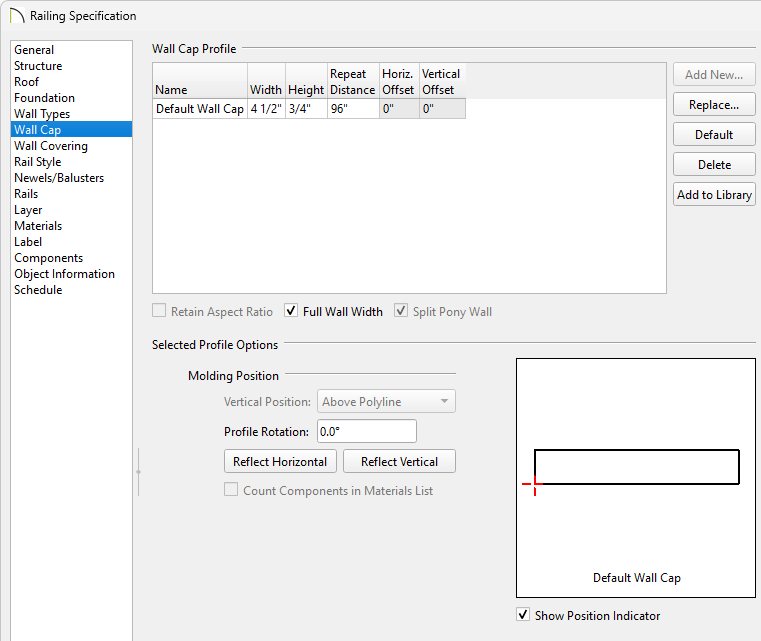
- With a wall cap profile added to a wall, make any other desired adjustments to the profile.
By default, the cap generates on the exterior side of the wall, outward from the surface of the upper wall. This detail is sometimes referred to as a “water table”.
- To enter a custom Width, uncheck the Full Wall Width box.
If this box is checked, the wall cap will be the same width as the lower wall it is applied to.
- Adjust the Height of the cap.
- On a half wall, you can adjust the Horizontal Offset* and Vertical Offset* of the wall cap, but the Full Wall Width option must be unchecked.
On a pony wall, these controls are only available with Split Pony Wall unchecked.
*Applies to X18 and newer.
- For pony walls without railings above, you can check the Split Pony Wall checkbox, which will make the cap build between the two parts of a pony wall, splitting them.
- Adjust the Molding's Vertical Position* and Horizontal Position* to control the placement of the molding.
*Applies to X18 and newer.
In X18 and newer, beneath the molding preview, check the Show Position Indicator to have a visual representation of these positions.
-
- Specify a Profile Rotation value to rotate the cap profile.
- Select the Reflect Horizontal and/or Reflect Vertical buttons to reflect the profile.
- On the Materials panel, click on the Wall Cap component, click on the Select Material button, and browse the library for an appropriate material to apply to the cap.
- Once all desired changes have been made, click OK to close the dialog.
- Take a Camera
 view to see the results.
