This article also applies to the following legacy products:
Pro | Architectural | Suite
QUESTION
What are layers, and how are they used in Chief Architect and Home Designer?
ANSWER
It can be helpful to think of each layer in the program as a transparency sheet on which objects are drawn. Each object in the program is assigned to a layer, and nearly all views in the program use multiple layers, like stacking transparency sheets together.
Layers are used to stay organized, as well as to increase efficiency by allowing you to quickly change how (or whether) a group of objects are collectively displayed, rather than changing the display of objects one-by-one.

You can quickly see which layer an object is on by selecting the object and looking in the Status Bar at the bottom of the program.
You can learn more about layers in the following sections:
To toggle the display of a layer
- Access the plan in which you would like to toggle the display of a layer.
- From the menu, select Tools> Layer Settings> Display Options
 .
.
In Home Designer, select Tools> Display Options instead.
- In the Layer Display Options dialog that opens, you'll see a list of all available layers in the current plan. Scroll to the target layer and click in the Disp column for that layer to toggle its display on or off.

- Click OK to confirm your changes and close the dialog.
In Chief Architect Premier, layers are organized into multiple Layer Sets to further improve efficiency. For more information on Layer Sets, please see the Related Articles section below.
To change the properties of a layer
- From the menu, select Tools> Layer Settings> Display Options .
In Home Designer, select Tools> Display Options instead.
- In the Layer Display Options dialog that opens, scroll to and select the layer that you want to change:
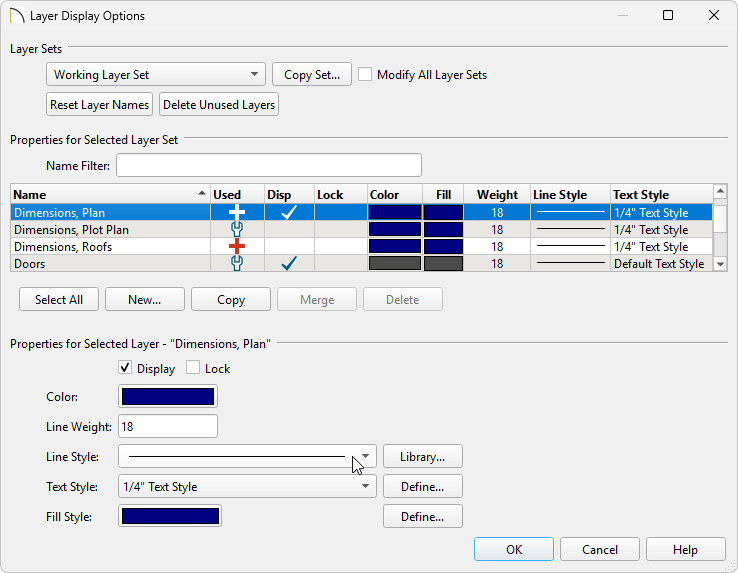
- Click in the Color column for that layer to change its color or the Fill*** column to change the Fill Style color.
- Double-click on the Name** of a layer to rename it.
- Use the Properties for Selected Layer section at the bottom to change the Color, Line Weight*, Line Style*, Text Style*, and Fill Style***.
*Applies to Home Designer Pro, Home Designer 2026 and newer, and Chief Architect Premier.
**Applies to Chief Architect Premier.
***Applies to Chief Architect Premier X18 and newer versions.
- Click OK to confirm your changes and close the dialog.
To lock or unlock a layer*
*Applies to Home Designer Pro, Home Designer 2026 and newer, and Chief Architect Premier.
Objects on a locked layer cannot be selected.
- From the menu, select Tools> Layer Settings> Display Options .
In Home Designer, select Tools> Display Options instead.
- In the Layer Display Options dialog that opens, scroll to the target layer and click within the Lock column or Lock checkbox to toggle the lock status on or off.

Some layers that are locked by default include:
- Roofs, Gutters
- Roofs, Overhang Area
- Roofs, Ridge Caps
- Roofs, Trim
- Click OK to confirm your changes and close the dialog.
To change an object's layer**
**Applies to Chief Architect Premier.
- Using the Select Objects
 tool, click on the target object, then click on the Open Object
  edit button.
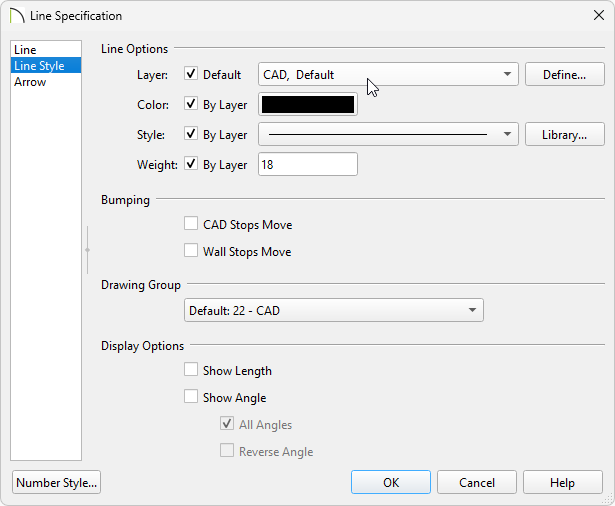
- In the object's Specification dialog, select the Layer or Line Style panel.
- Using the Layer drop-down menu, select the layer you want to assign the object to.
- Click OK to confirm the change and close the dialog.
There are other ways to change an object's layer, such as using the Layer Painter and Layer Eyedropper tools. For more information, please see the Related Articles section below.
To create a new layer**
**Applies to Chief Architect Premier.
- From the menu, select Tools> Layer Settings> Display Options .
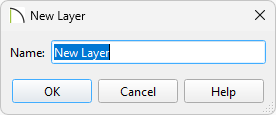
- In the Layer Display Options dialog that opens, click the New button to open the New Layer dialog and give it a name. Layers must have unique names, so if you try to give a new layer the same name as an existing layer, the program will prompt you to give it a different name.
- Once a name is specified and you click OK, the newly created layer will be selected in the Layer Display Options dialog, and you can specify its properties as desired.
- Click OK to confirm your changes and close the dialog.
To create a new layer that has the same properties as an existing layer, select a layer and click the "Copy" button, then rename and modify the properties of the new layer as desired.
To delete a layer**
**Applies to Chief Architect Premier.
- From the menu, select Tools> Layer Settings> Display Options .
- In the Layer Display Options dialog that opens, scroll to the target layer, then click on it to select it.
- Click the Delete button to delete the selected layer.
- Click OK to confirm your changes and close the dialog.