QUESTION
How can I change what wall layers are displayed? For example, I don't want to see the exterior wall layer(s) in my plan view; is this possible?
ANSWER
Several properties relating to wall layers can be adjusted using the Wall Type Definitions dialog. Once these properties are specified, walls, as well as individual wall layers can be toggled on and off using the Layer Display Options dialog or Active Layer Display Options side window.
Adjusting the display properties of individual wall layers
- Navigate to Build> Wall> Define Wall Types
 .
.
- In the Wall Type Definitions dialog that displays:
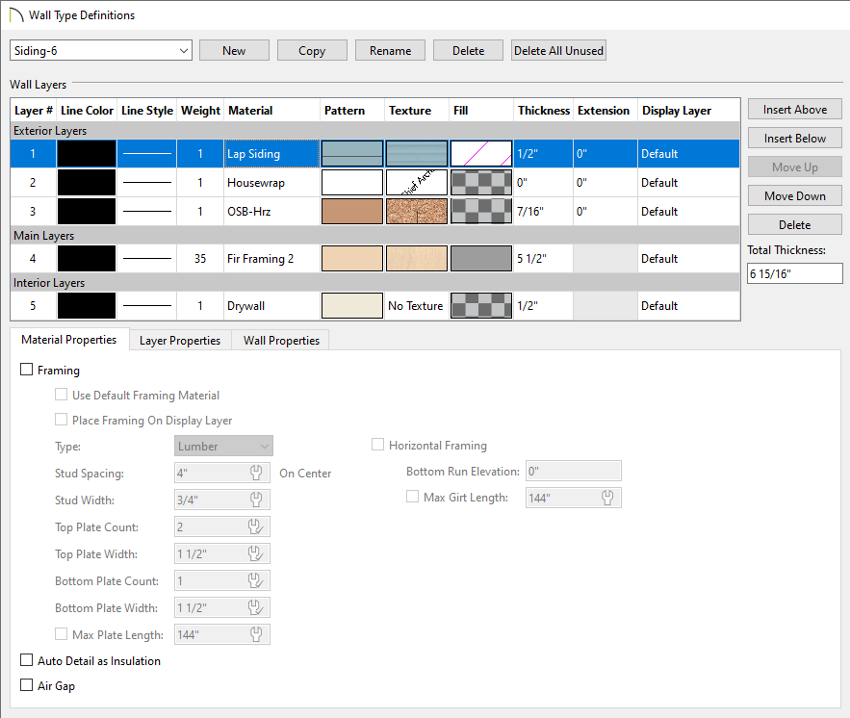
- Use the drop-down menu located in the top left corner to choose the wall type that you would like to modify.
- Click on a selected layers' Line Color and/or Weight column to change the line color and line weight.
- Click on a selected layers' Material, Pattern, and/or Texture column to open the Select Material dialog, where materials and their properties can be specified.
- Specify the desired fill style for a wall layer by selecting a particular wall layer and clicking its Fill column.
- Specify the Thickness of each wall layer.
- Use the Display Layer* column to manually specify the display layer that each wall assembly layer is placed onto. By default, all wall assembly layers are placed on the same display layer as their owner wall.
You can also change the display layer of wall assembly layers by accessing the Layer Properties tab.
*Applies to X16 and newer versions.
To avoid unexpected behavior, the "Walls, Layers" and "Walls, Main Layer Only" layers should not be assigned to individual wall assembly layers.
To learn more about the various other options in this dialog, as well as how to work with display layers, please refer to the Related Articles section below.
- Once the display properties are specified to your liking, click OK.
Any existing walls in the plan that utilize the modified wall type will update.
Toggling the display of walls and their layers
- Navigate to Tools> Layer Settings> Display Options
 or access the Active Layer Display Options
  side window.
-
In your currently active layer set, locate the "Walls..." layers (or the display layers that you placed individual wall layers onto) then use the Disp column or Display checkbox to toggle the layers on and off.
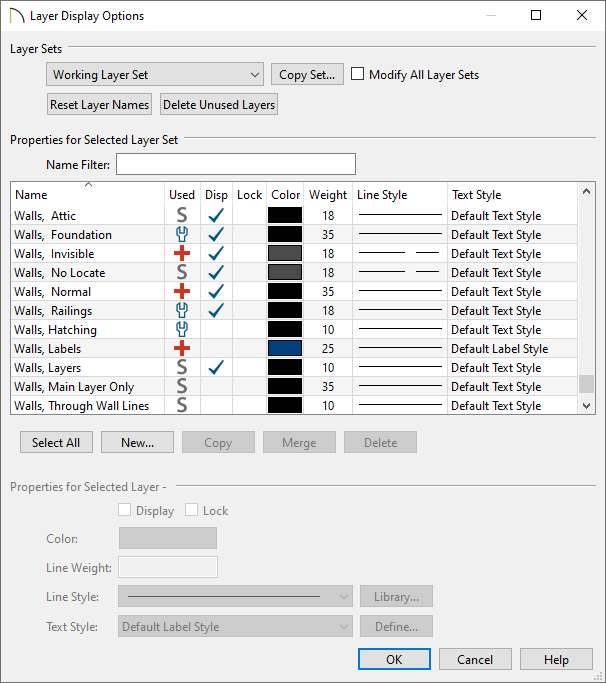
- By default, most of the Wall tools generate walls as well as individual wall assembly layers on the "Walls, Normal" display layer. The exceptions to this are foundation walls, which are generated on the "Walls, Foundation" layer, railings, which are generated on the "Walls, Railings" layer respectively, Room Divider walls, which are generated on the "Walls, Invisible" layer, and Attic walls, which are typically generated automatically on the Attic floor level, and are placed on the "Walls, Attic" layer.
This can be changed within the Default Settings or on a per wall/railing basis by accessing the Layer panel in the respective dialog.
-
The "Walls, Main Layer Only" layer will disable the display of all non-structural wall layers, leaving those located in the Main Layers category within the Wall Type Definitions dialog displayed. This layer affects the display of walls in plan view only.
If you notice that only your structural layers are displayed, and this is unwanted, disable the display of this layer, then ensure the "Walls, Layers" layer is displayed.
-
The "Wall, Layers" layer displays all of the individual wall layers within a wall type. When disabled, wall types display with two lines representing the inside and outside surfaces. This layer is displayed by default.
-
The "Walls, Through Wall Lines" layer displays the entirety of a wall's lines when walls are intersecting. This layer is disabled by default.
-
The "Walls, Hatching" layer is used for wall hatching when the Wall Hatching
 tool is used.
-
The "Walls, Labels" layer is used for wall labels. Labels can be specified in the Default Settings or on a per wall/railing basis by accessing the Label panel in the respective dialog.
- The "Walls, No Locate" layer is used for walls that are marked as "No Locate" in their Specification dialog.
-
Click OK to confirm the changes.
MORE INFORMATION
- Foundation walls have footings that display in all views when the "Footings" layer is turned on. Foundation walls may also have brick ledge lines that display in plan view when the "Brick Ledge Lines" layer is turned on.
- Either the upper or lower portion of a pony wall can display in plan view. Only the portion that displays can be snapped to or aligned with walls above or below. Access the Wall Types panel within the Wall Specification dialog to control these properties.
- In plan view, railings not specified as solid display their main layer(s) regardless of whether "Walls, Layers" or "Walls, Main Layer Only" is turned on.
- Railing newels, balusters, and rails can be set to display in plan view by accessing the Newels/Balusters panel within the Railing Specification dialog.
- When a camera is located on the exterior of a structure, you can select 3D> Camera View Options> Hide Camera-Facing Exterior Walls
 , allowing the interior to be seen as you rotate around the model. Interior walls set as Attic walls are also hidden when this setting is active.