Understanding Layer Sets


Reference Number: KB-00765
Last Modified: January 17, 2024

The information in this article applies to:

Chief Architect Premier or Chief Architect Interiors


QUESTION

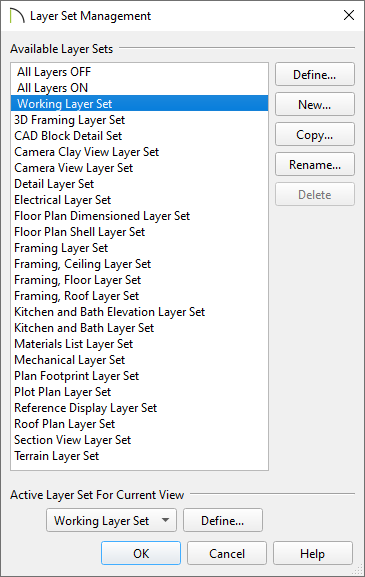
What are Layer Sets and how are they used in Chief Architect?


ANSWER

Layer Sets can be thought of as a stack of transparency sheets gathered together for a particular purpose that can be quickly applied to your drawing. Rather than turning on and off layers one-by-one, Layer Sets allow you to quickly switch from one collection of layer attributes to another.

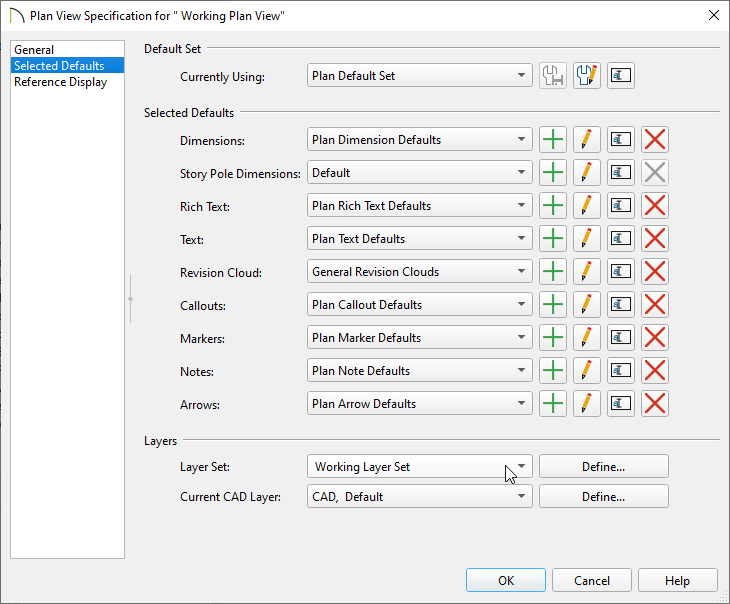
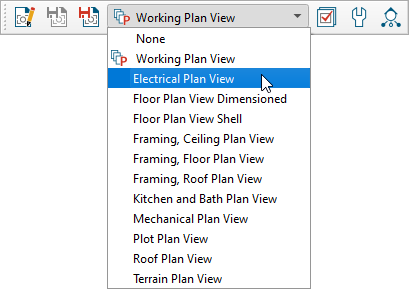
Additionally, Layer Sets are connected to Saved Plan Views, which allow you to change a variety of options in the program all with a single click. If you're editing your electrical plan, for example, your job will be easier if unrelated objects such as roof planes and ceiling framing are not in the way. You could access your Layer Display Options and browse the dozens of layers in the list, turning off each unneeded layer for the view you're in; or, you could simply switch to the Electrical Saved Plan View, which could be associated with an Electrical Layer Set that has all of your preferred display settings already setup to your liking.


Image displaying different layer sets


Chief Architect template plan files include a number of Saved Plan Views and Layer Sets created for a variety of purposes, including:

  • Display settings for different types of views.
  • Display settings for specific drawing tasks.
  • Settings for the Reference Display.

Understanding how Layers and Saved Plan Views function, and how they are associated with Layer Sets, is fundamental in establishing a productive workflow. Please view our Related Articles section to learn more about these topics.


You can learn more about Layer Sets in the following sections:


To manage, customize, and create Layer Sets

  1. Open  your desired plan, or create a New Plan .


  2. Navigate to Tools> Layer Settings> Layer Set Management .

    Here, you can scroll through the various Layer Sets that are contained within the plan and make any desired modifications.

    Layer Set Management dialog with the Working Layer Set selected

    • To customize layer properties for an existing Layer Set, select the name of the Layer Set to highlight it, then click Define to open the Layer Display Options dialog.

      Layer settings such as Line Style, Line Color, Line Weight, Text Style, whether or not a layer is locked, and if a layer is displayed for the Layer Set can be specified here.

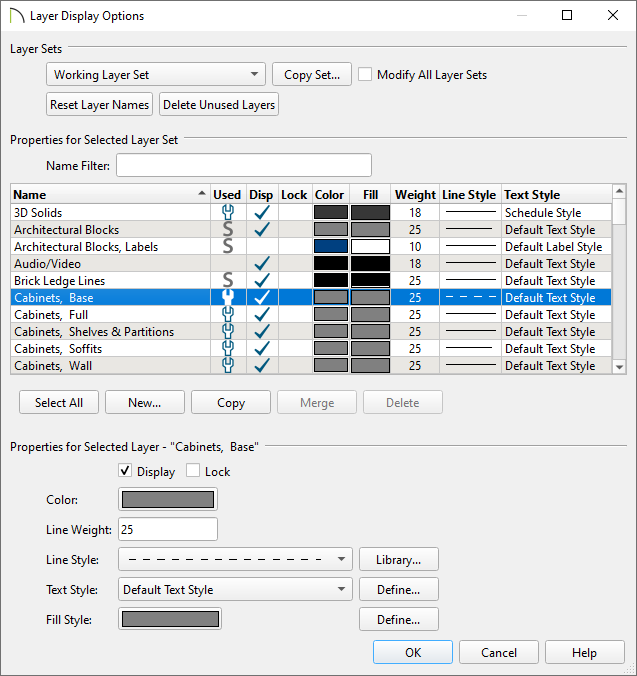
      For more information on layers and their properties, please see the "Understanding Layers" resource in the Related Articles section below.


      Layer Display Options dialog where layer properties can be modified

    • Click the New button to open the New Layer Set dialog and create a new Layer Set. Layer Sets must have unique names. If you try to give the new Layer Set a name that already belongs to a Layer Set in the current plan, the program will ask you to choose a new name.

      New Layer Set dialog where a name can be specified

      Once a name is specified and you click OK, the Layer Display Options dialog will open for the newly created Layer Set allowing you to specify your desired layer settings.

    • Click the Copy button to open the New Layer Set dialog and create a new Layer Set based on a copy of the currently selected Layer Set.

      Again, once a name is specified and you click OK, the Layer Display Options dialog will open for the newly created Layer Set allowing you to specify your desired layer settings.

    • Click the Rename button to rename a Layer Set and the Delete button to delete Layer Sets.

      The Layer Set specified as the Active Layer Set For Current View cannot be deleted.

      Don't delete Layer Sets that are being referenced or used by a layout file.

      Also, it's important to be aware that any changes made to a Layer Set in one view will affect all other views that use the same Layer Set.


    • Click the Import button to import layer settings from a .layers file or the Export button to export the layer settings in the current plan to a .layers file.

      More information on importing and exporting Layer Sets can be found further down in this article.

    • The Active Layer Set for Current View drop-down option displays the Layer Set that is used in the plan view that was active when this dialog was opened.


  3. When you're finished customizing Layer Sets, click OK to confirm the changes and close the dialog.


To link Layer Sets to Saved Plan Views

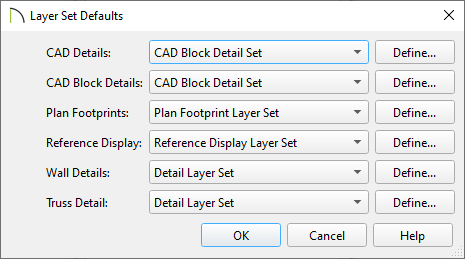
Layer Sets should be linked directly to a Saved Plan View unless the Layer Set will be used for 3D Camera views, Cross Section/Elevation views, CAD Details, Wall Details, Truss Details, or in unison with the Reference Display. For more information on linking Layer Sets to other types of views, please see the following section.

  1. Navigate to Tools> Active View> Edit Active View , or right-click on the desired plan view in the Project Browser , then choose Edit View.

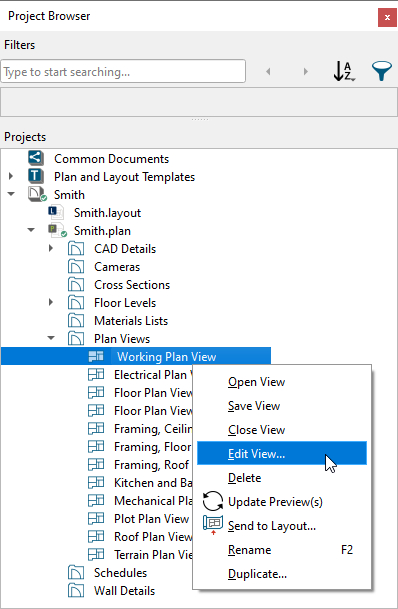
    New Saved Plan Views can be created by navigating to Tools> Active View> Save Active View As, or by right-clicking on the Plan Views folder in the Project Browser and selecting "New Saved Plan View."

    On a Mac, hold down the Control key while clicking to initiate a right-click command. More information about right-click commands on Apple input devices can be found in the following Apple resource: Right-click on Mac.


    Right-click on a plan view and select Edit View in the Project Browser


  2. On the Selected Defaults panel of the Plan View Specification that displays, select the the Layer Set drop-down to designate which Layer Set you'd like to link to the plan view. In most cases, you will want to have a different Layer Set associated with each different plan view.

    Selected Defaults panel of the Plan View Specification dialog


  3. Click OK to close the dialog. Now, the Layer Set and the Saved Plan View will be linked.


To link Layer Sets to other types of views

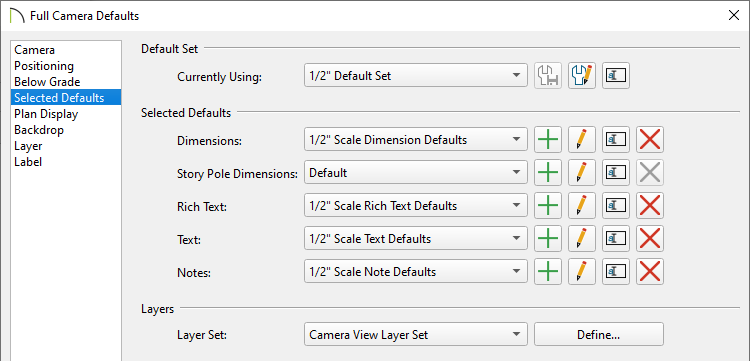
When a view other than a Saved Plan View is created, you may notice that it is also linked to a Layer Set. For example, when a Cross Section/Elevation view is created, the Section View Layer Set is used for that view by default; when a Framing Overview is created, the 3D Framing Layer Set is used by default. These can be managed and setup to your liking by accessing the Default Settings.

  1. Navigate to Edit> Default Settings ,  click on Layer Sets, then click Edit.


  2. In the Layer Set Defaults dialog, notice the Layer Sets that are setup for each particular type of view.

    Layer Set Defaults dialog


  3. Make any desired changes, then click OK.

    We don't recommend using the same Layer Set between a Saved Plan View and a different type of view. For example, don't link the "Working Layer Set," which is connected to the "Working Plan View," to any other type of view listed in this section.


  4. Staying within the Default Settings dialog, expand the Camera Tools category, select each camera tool, either all at once, or one-by-one, then click Edit.


  5. On the Selected Defaults panel of the Camera Defaults dialog that displays, specify your desired Layer Set to be used.

    Selected Defaults panel of the Full Camera Defaults dialog


  6. Once all desired changes are made, click OK and Done to close the dialogs.


To use Saved Plan Views to switch Layer Sets

Saved Plan Views are linked to Default Sets, Layer Sets, and a variety of other settings in any given plan. With this mind, Chief Architect makes it easy to switch between all of these various settings simultaneously with a single click.

  1. Access a plan view that you want to switch the Layer Set for.


  2. On your toolbar, look for the Saved Plan View Control drop-down, click on it once, then select a different Saved Plan View from the list. You can also switch between Saved Plan Views by accessing the Project Browser  side window.

    Electrical Plan View selected in the Saved Plan View Control drop-down


    When you switch between Saved Plan Views, the Layer Set should also change if it's setup to do so.

    For demonstration purposes, you can see that the image below shows that the Layer Set matches the Saved Plan View, as they are linked.

    Saved Plan View Control drop-downand the Active Layer Set Control drop-down

    Note: If changing the plan view does not also change the active Layer Set, the plan view may not be setup to change, or it's not linked correctly to the view. Please refer to the first section in this article or view the Related Articles section to learn more.


To use the Active Layer Display Options to switch Layer Sets

The Active Layer Display Options is a side window that is typically docked beside the Project Browser and Library Browser. This side window allows you to see and make layer-related changes on the fly for the view that's active. The Layer Set can also be switched here if it's displayed.

  1. Access a view that you want to switch the Layer Set for.


  2. If the Active Layer Display Options is not displayed, navigate to View> Active Layer Display Options to turn on the display of this side window.


  3. Click the Settings button at the bottom of this side window and enable the Layer Set Control option to be displayed if it's not already.

    Turning on the Layer Set Control for the Active Layer Display Options side window


  4. With the Layer Set Control now displayed, the Layer Set can be switched for the active view.

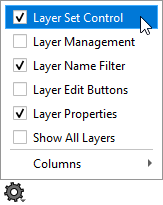
    If you use the Active Layer Display Options to switch the Layer Set while a Saved Plan View is active, you should be in the "Working Plan View" or you should have the intention of switching back to the Layer Set you want to be linked with the currently active plan view.


To export and import Layer Sets

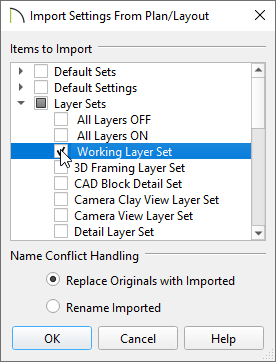
If have created or customized your Layer Sets, you can transfer them to other plan files by exporting and importing them.

  1. In the plan file where you created or customized Layer Sets, select File> Export> Export Layer Sets from the menu or navigate to Tools> Layer Settings> Layer Set Management , and click on the Export button.

    All layers in the file will be exported to a .layers file no matter which method is chosen.


  2. In the Export Layer Set File dialog, type a short, descriptive Name and choose an easy-to-find location on your computer such as the Desktop or Documents, then click OK.


  3. Open  a plan file in which you would like to use your custom Layer Sets, select File> Import> Import Layers Sets from the menu or navigate to Tools> Layer Settings> Layer Set Management , and click on the Import button.


  4. In the Import Layer Set File dialog, browse to the location where you saved your file in Step 2 above, select it, and click the Open button.


  5. In the Import Layer Sets dialog which opens next, browse through the list of Layer Sets and select the Layer Set(s) that you would like to import into the current plan.

    Import Layer Sets dialog with two layer sets set to replace existing layer sets within the plan they are being imported into

    • Choose whether you want to Replace existing Layer Sets that have the same name or to Create a new copy.

      If you're importing Layer Sets that have the same name as existing Layer Sets already present in the file, and you choose the Create a new copy option, the new, imported Layer Sets will have a number appended onto the name.

    • Click OK to close the dialog and import the selected Layer Sets.


To modify all Layer Sets in a file

In most cases, you will want changes that you make to a given Layer Set to affect only that individual set. Occasionally, though, you may find it helpful to apply a particular change to all Layer Sets in a plan.

  1. Select Tools> Layer Settings> Display Options from the menu.


  2. In the Layer Display Options dialog that opens, check the box beside Modify All Layer Sets.


  3. Make any changes that you want to any layer(s) that you would like reflected in every Layer Set located in the file.


  4. Uncheck the box beside Modify All Layer Sets once you're done making changes, then click OK to apply the changes to all Layer Sets in the file.

Return To Top