QUESTION
I want to add an attached carport to my shop or house. How can I build this?

ANSWER
An attached porch or carport can be created using properly defined railings and the automatic roof generation tools.
- Select Edit> Default Settings
 from the menu.
- In the Default Settings dialog, expand the Walls category, select Deck Railing, then click on the Edit button.
- On the Rail Style panel of the Deck Railing Defaults dialog:
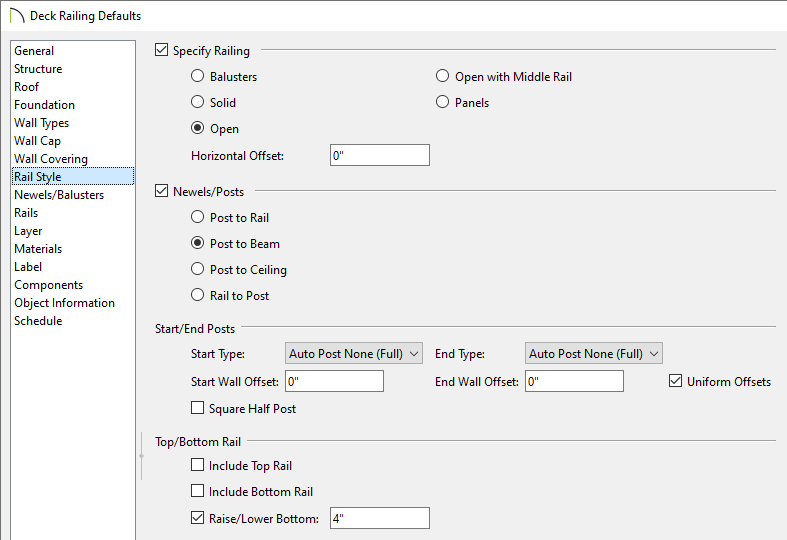
- Move the radio button to Open under the top section.
-
Move the radio button to Post to Beam or Post to Ceiling under the second section.
-
Change the Start Type and End Type to Auto Post None (Full).
- Uncheck both Include Top Rail and Include Bottom Rail.
- On the Newels/Balusters panel, set the Width and Max Spacing to your preference.
In this example, a Width of 3 1/2" and a Max Spacing of 144" are specified. This will allow us to create 4" x 4" posts that are 12' apart.

- On the Rails panel, adjust the Beam's Width and Height if you specified Post to Beam in Step 3.
In this example, we specified a Width and Height of 3 1/2".
- Click OK, then click Done to apply the changes and close the dialogs.
To draw railings
- Navigate to Build> Railing and Deck> Straight Deck Railing
 , then draw three deck railing walls off of the existing structure to create a Deck room, as shown in the image below.
In this example, the existing structure is 24' x 40' and has a ceiling height of 144".

- If needed, select the left deck railing, then use the temporary dimension that displays to set the railing to be a specific distance from the main structure.
In this example, a value of 12' is specified.

- Using the Select Objects
 tool, select the newly created Deck room, then click on the Open Object
  edit button.
- On the General panel of the Room Specification dialog that opens, use the Room Type drop-down to change the room type to one of your preference.
In this example, the Room Type is changed from Deck to Porch. This will replace the deck framing with a 4" concrete slab.

- On the Structure panel, ensure that Roof Over This Room is checked, uncheck Flat Ceiling Over This Room, check Use Soffit Surface for Ceiling, then click OK.

- Using the Select Objects tool, click on the front horizontal wall of the main structure to select it, then click the Open Object edit button.
- On the Roof panel of the Wall Specification dialog, select Full Gable Wall, then click OK. Repeat this process on the opposite parallel wall, as well as to the two short parallel deck railings.
You can select one or more walls/railings and use the Change to Gable Wall(s) edit tool to quickly convert hip walls to full gable walls.
- Using the Select Objects tool, click on the single vertical railing, then click the Open Object edit button.
- On the Roof panel of the Wall Specification dialog:

- Specify the desired lower Pitch.
In this example, a value of 3" in 12" is specified.
-
Check the Upper Pitch box, then specify the desired Upper Pitch value.
In this example, a value of 6" in 12" is specified.
-
Specify where tostart the upper pitch by specifying a value in the Starts at Height or In from Baseline field.
In this example, a value of 142" is specified in the In from Baseline field.
- Click OK.
- Select Build> Roof> Build Roof
 , and on the General panel of the Build Roof dialog that displays:

- Check either Build Roof Planes or Auto Rebuild Roofs.
- Specify the desired Pitch (in 12), preferably the value that was set as the upper pitch in the last step.
In this example, a value of 6" in 12" is specified.
- Specify the Eave and Gable Roof Overhang values.
In this example, 2" is specified for both.
- Click OK.
- Finally, select 3D> Create Perspective View> Perspective Full Overview
 to see the results.
