QUESTION
I am not able to see my framing when I create a cross section/elevation view. What do I need to do to display the framing?

ANSWER
If you are unable to see framing in a cross section/elevation view, framing components may not yet be generated or may not be displayed correctly within the active layer set.
In addition to cross section/elevation views, wall framing can be displayed and edited in Wall Detail views, which are elevation views dedicated to wall framing. Please see the "Working With the Project Browser..." resources, as well as the "Manually Editing Wall Framing" resource in the Related Articles section below to learn more.
To display framing in a cross section/elevation view
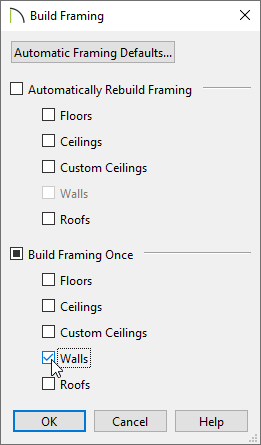
- If you have not yet built framing in your plan, select Build> Framing> Build Framing
 , check the appropriate framing boxes in the dialog that appears, then click OK.
In X15 and prior versions, access the desired dialog panel(s), then check the appropriate Build Framing box for each type of framing you would like to generate.
In this example, wall framing is generated.

- Select 3D> Create Orthographic View> Cross Section/Elevation
 or Back Clipped Cross Section
  from the menu, then click and drag a camera arrow to create a cross section/elevation view.
- To quickly, and easily, see framing in the section view, switch to the "3D Framing Layer Set."
You can change the Layer Set by accessing the Layer Display Options  , Active Layer Display Options
  side window, or the Cross Section/Elevation Specification dialog.
For more information on Layer Sets, please see the "Understanding Layer Sets" resource in the Related Articles section below.
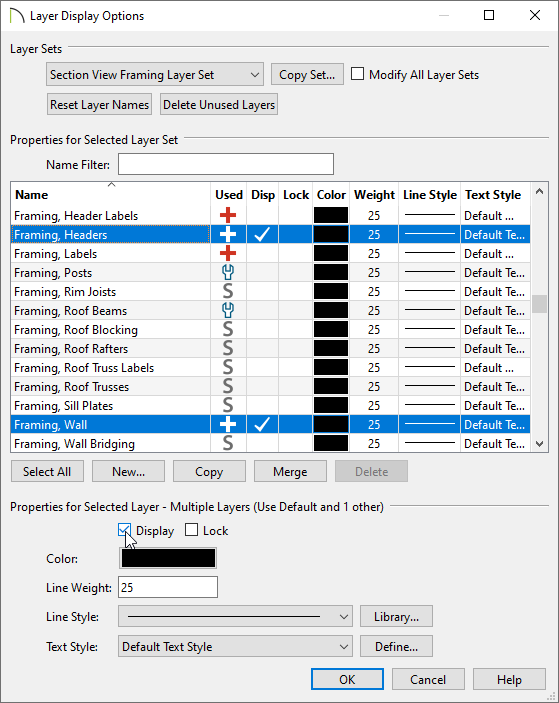
- If you would like additional control over which framing layers are displayed, navigate to Tools> Layer Settings> Display Options
 from the menu to open the Layer Display Options dialog or access the Active Layer Display Options
  side window.
- In the dialog or side window that displays:

- Note the Layer Set that is currently in use. You can choose to create a new layer set by selecting the Copy Set button, edit the current Layer Set, or choose a different Layer Set to modify.
In this example, a new Layer Set has been created called "Section View Framing Layer Set."
- Browse to the layers that start with "Framing, ..." and check the Disp column or Display box of each layer that you would like to display.
- For any layers that you don't want to display, remove the check from the Disp column or Display box instead. Common layers that may need to be hidden to see the framing components within include "Walls, Normal" and "Roof Planes."
- Click OK to close the dialog and apply your changes.
-
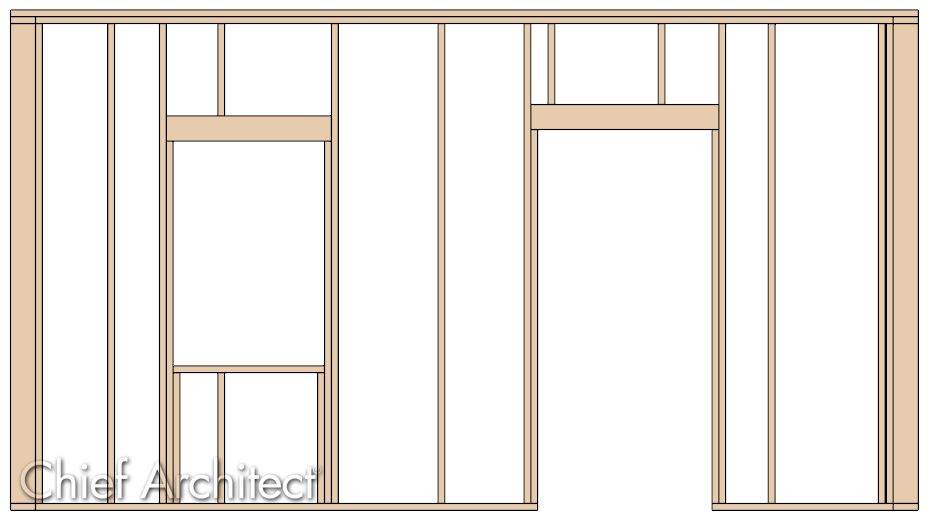
The selected framing layers will now display in the active cross section/elevation view.


 , check the appropriate framing boxes in the dialog that appears, then click OK.
 from the menu, then click and drag a camera arrow to create a cross section/elevation view.
 , Active Layer Display Options
  from the menu to open the Layer Display Options dialog or access the Active Layer Display Options
