QUESTION
I have a layout template file that I would like to customize the page size for, but I don't want to have to redraw the title block and border. Is there a quick or easy method to resize this information?
ANSWER
The title block and border consist of CAD objects and text, and they can easily be group selected and resized.
To resize a title block and border
- Access the layout file that you would like to assign a different page size.
In this example, the default layout template layout is used. For U.S. Units (Imperial), the default layout template is ArchD 24x36 Layout Template.layout, while for Metric Units, the default layout template is ISO1A 594x841 Layout Template.layout.

- From the menu, select File> Print> Drawing Sheet Setup
 .
.

- Specify the desired Drawing Sheet Orientation and Size.
In this example, the size was changed to ANSI B (11" x 17").
- Make sure Show Drawing Sheet in View is checked.
- Make sure the Drawing Scale is 1 in = 1 in.
- Click OK to close the dialog and apply your changes.
- Navigate to Page 0
 and use the Fill Window
  , and/or Zoom
  tools as needed so that you can see title block and border, along with the white, rectangular Drawing Sheet Boundary in its entirety.
- With the Select Objects
 arrow selected, click and drag a selection box around the title block area. Be sure not to include the Drawing Sheet in the selection.

- With the title block contents and the title border selected, use the topmost edit handle and drag inwards to scale the entire selection to fit within the designated Drawing Sheet area.
If you experience difficulty with the layout border snapping to the edge of the Drawing Sheet, hold the Ctrl/Command key to temporarily disable snapping while positioning.

- If necessary, adjust the title block and border further, or use File> Print> Center Sheet
 to ensure that everything is centered properly on the Drawing Sheet.

- To save the customized layout file as a layout template, select File> Save As Template
 or within the Project Browser
  , right-click on your layout file, and choose Save as Template from the contextual menu when you're using Project Management.
In X16 and prior, select File> Templates> Save As Template  .
.
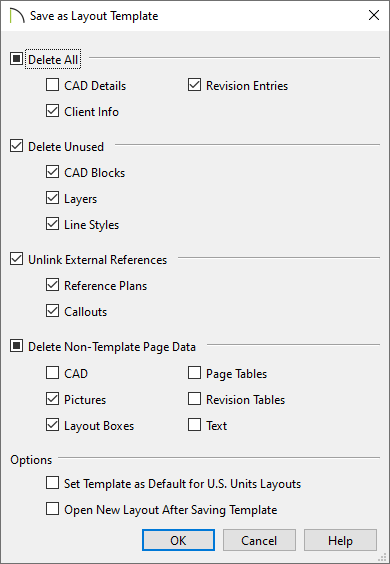
- In the Save as Template dialog that displays:

- Check the box beside each category of object or data that you want to delete from the current file.
- Check Set Template as Default for U.S. Units/Metric Layouts to use the new template as your default template whenever a new layout is created.
- Check Open New Layout After Saving Template if you'd like to create a new layout right away.
- Click OK.
- Give the new layout template a short, descriptive name, as well as a location, if given the option, then click OK or Save.
When using Project Management in X17, the template will be located in your Plan and Layout Templates folder within the Project Browser.
In X16 and prior, or when using Traditional File Management in X17, the program will automatically save the template to the program's Templates directory on your computer unless a different location is chosen.
To learn more about templates, please see the Related Articles section below.


