 by
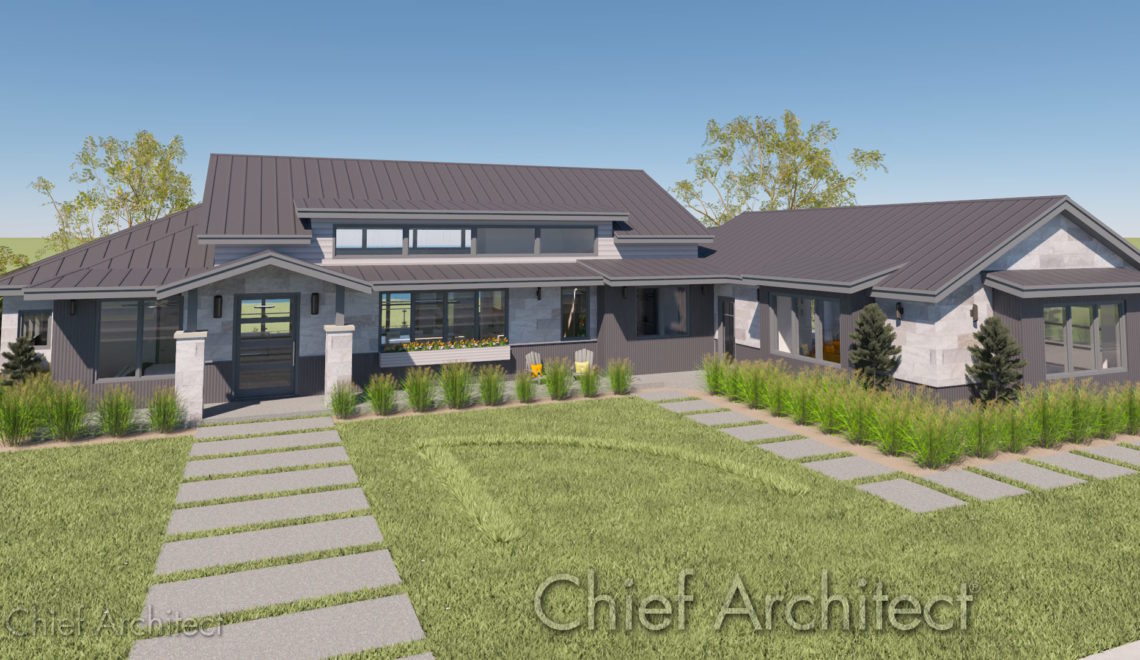
by A beautiful yard requires careful planning and preparation. Creating a landscape plan and sprinkler layout saves time, reduces material waste, and helps ensure the health of your plants and lawn. Follow this step-by-step guide to use 3D software such as Chief Architect Premier or Home Designer to design and visualize an efficient, functional, and beautiful outdoor space you will love.
Landscape Planning and Design
1. Create Plot Plan
Before anything else, you must first map your property’s physical boundaries, including elevation information if your lot isn’t flat. This map is called a plot plan.
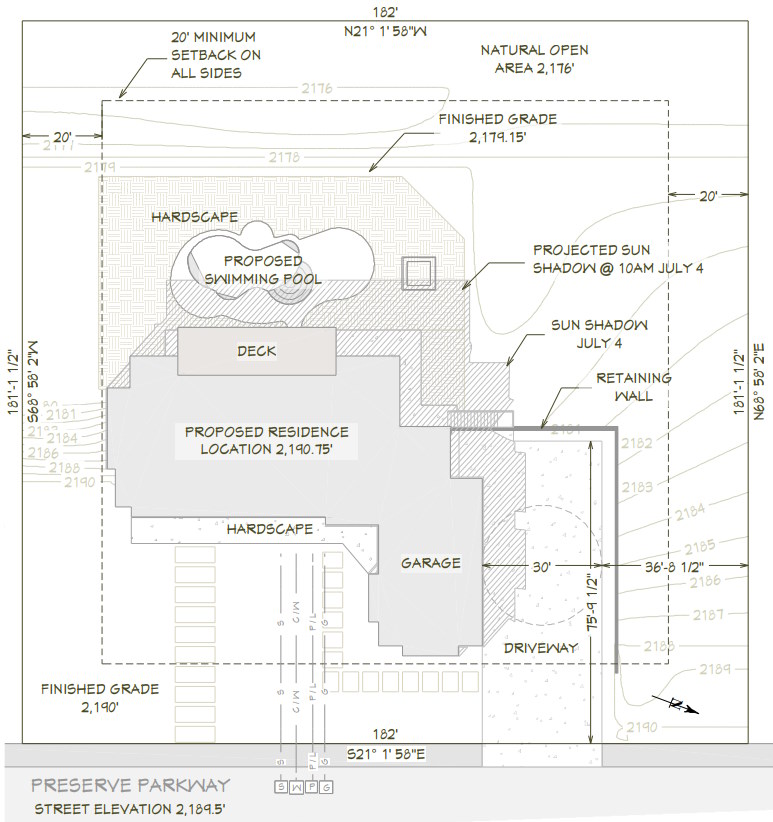
- Measure property lines: Use a long tape measure or a laser distance meter to record your exact lot dimensions. You can sometimes get your property dimensions online from your local assessor’s office (plat maps), a previous survey, or on your original construction documents.
- Plot fixed structures: Draw your house, driveway, patios, fences, and large existing trees. Include any existing landscape beds or features that you want to retain. Be sure they are accurately located within your property lines.
- Mark utilities: It’s important to locate underground gas, water, and electric lines before finalizing any digging plans. It can be both costly and extremely dangerous if you disturb or damage utility lines. Your local utility company typically offers a free service to mark the locations of underground utilities.
Use 3D software to help you create your plot plan: The tools in Chief Architect’s software make the mapping process easy.
- Use the Terrain tools to create your lot.
- Create a basic floor plan of each structure on your property and be sure they are positioned accurately within the property lines.
- Use the Landscaping tools to create existing landscape features you want to preserve, such as beds, water features, patios, walkways, etc.
- Use the CAD tools to mark the utility lines in your plot plan.
2. Analyze Your Site Conditions
Matching your design to your yard’s natural environment ensures plant survival and water efficiency.
- Track sun exposure: Note areas receiving full sun, partial shade, or deep shade throughout the day.
- The Sun Study tools in Chief Architect’s software allow you to add a north pointer and sun angle by setting longitude/latitude, time of year, and time of day. This helps you identify and visualize full sun, partial shade, and full shade areas with precision both throughout the day and seasonally.
- Identify wind patterns: Consider high-wind zones that can dry out soil quickly or disrupt sprinkler spray. NOAA offers maps showing prevailing winds, average wind speed and direction by month. Visit the US Wind Climatology site for information.
- Check slopes: Mark high and low spots to plan for water runoff and drainage issues.
- Use the Elevation Data tools in Chief Architect’s software to add contour information (slopes, hills, and valleys).
- Test soil texture: Determine if your soil is sand, clay, or loam to choose compatible plants.
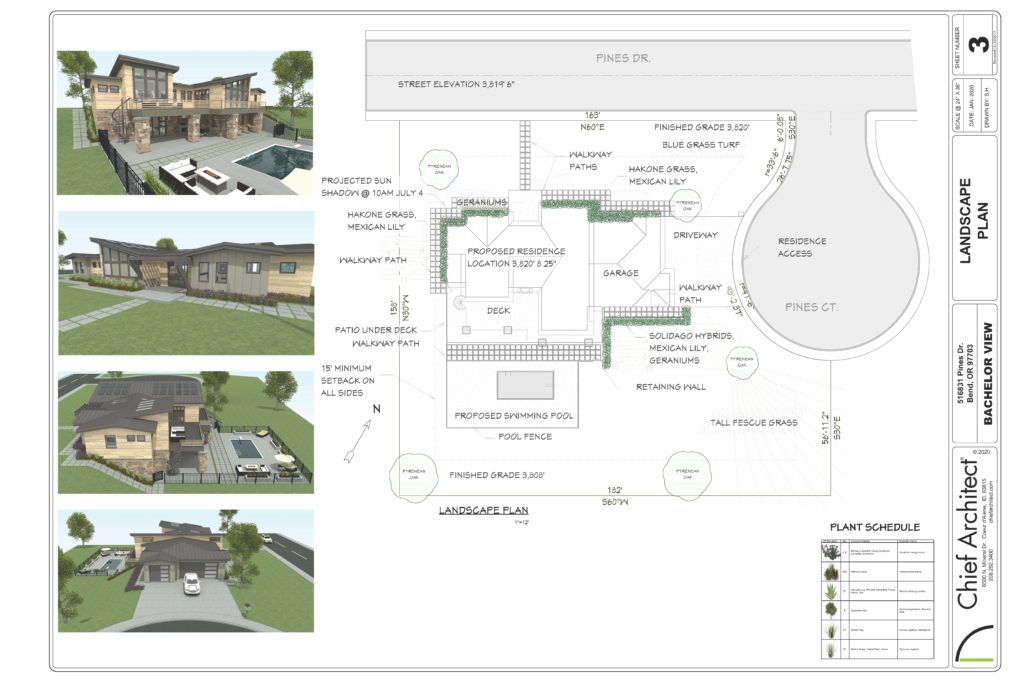
3. Design the Landscape Layout
- Define use areas: Allocate separate spaces for lawns, planter beds, outdoor living and cooking areas, patio and deck areas, water features, dog runs, and vegetable gardens.
- There are specific tools in Chief Architect to help you define Planter Beds, Outdoor Living Spaces, Water Features, and much more.
- Group by water needs: Practice hydrozoning by placing high-water plants together and low-water plants elsewhere.
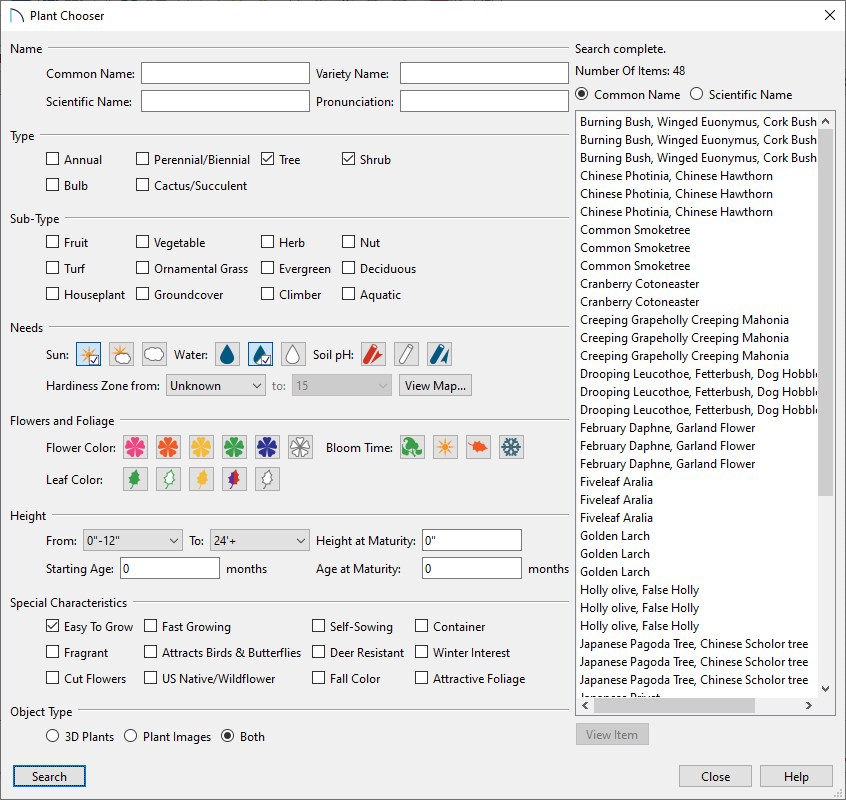
- Use the Plant Chooser tool to easily find plants based on water needs, from drought tolerance to high-water needs.
- Resistant planting: Integrated Pest Management (IPM) is the practice of selecting plant species that deter pests such as insect infestation, disease, and plant consumption by animals (deer). Your local nursery and online research will be your best guides to ensure plants thrive in your area.
- The Plant Chooser tool in Chief Architect’s software also has a filter for “deer resistance” and “native plants” that are often better adapted to your area.

- Plant hardiness zones: These are geographic areas defined by the USDA based on the average annual extreme minimum winter temperature. Be sure to choose plants that will thrive in your location.
- The Plant Chooser tool in Chief Architect’s software allows you to search for plants based on hardiness zone and has a built-in map to help you find your hardiness zone.
- Plan mature sizes: Research adult heights and widths so plants do not overcrowd walkways or windows.
- The Grow Plants tool in Chief Architect’s software helps you visualize your landscape as it matures. Simply use the slider to show up to 20 years of growth in your entire landscape plan.
- Layer your heights: Place tall trees at the back, medium shrubs in the middle, and short groundcover up front.
- The automatic 3D Overview cameras in Chief Architect allow you to visualize plant layering from different perspective views around your home. This allows you to maximize attractive plant layering from specific high-visibility areas (from the street, from walkways to your front door, or from outdoor living areas).
- Resources: There are many online and local resources to help you with landscape planning.
- University Extension Offices: Can be an invaluable and often free resource of local information on native plants and regional gardening tips.
- Web Search: Use Google image search to find landscape images that can inspire design ideas.
- AI Prompts: There are many free AI prompts, such as Google’s Gemini, that can be helpful in learning landscaping principles and answering specific questions. For example, “Give me a list of purple foliage plants that are deer resistant, low growing, tolerate shade and compatible with hardiness zone 6-7.”
Irrigation Planning and Design
1. Determine Water Capacity
Your home’s plumbing limits how many sprinkler heads can run at one time.
- Measure water pressure: Attach a pressure gauge to an outside faucet to record pounds per square inch (PSI). You can purchase an inexpensive gauge that attaches to your spigot like a hose. The pressure at the gauge should read between 30 and 50 PSI. If you are over 60 PSI you should consider adding a pressure regulator. If your pressure is below 30 PSI it may be necessary to add an irrigation booster pump.
- Calculate flow rate: Time how many seconds it takes to fill a one-gallon bucket from an open faucet.
- Calculate gallons per minute: Divide 60 by the number of seconds it takes to fill up the 1-gallon bucket. This math gives you your home’s total Gallons Per Minute (GPM) capacity. For example, if it takes 10 seconds to fill the bucket, the math is 60/10 = 6 (6 GPM). Plan to use 80% of your maximum GPM for the sprinkler system. The leftover flow is meant to prevent water starvation in your home (reduced or fluctuating water pressure when using plumbing fixtures or appliances in your home while your sprinkler system is running).
2. Map Sprinkler Head Placement
Proper spacing prevents dry patches and keeps your lawn evenly green.
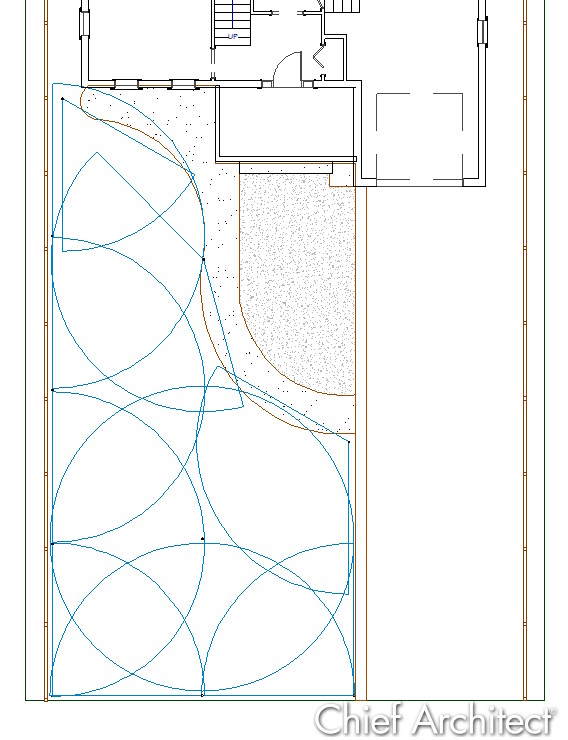
- Choose head types: Use rotary heads for large lawns and fixed spray heads for narrow grass areas, planter beds, and flower beds.
- Achieve head-to-head coverage: Position every sprinkler so its spray reaches the base of the neighboring heads.
- Chief Architect Software has a complete library of Irrigation Components, including rotary spray heads, fixed spray heads, emitters, drip heads, and bubblers. These irrigation components include an adjustable spray pattern, so you can see each sprinkler’s coverage to ensure head-to-head coverage.
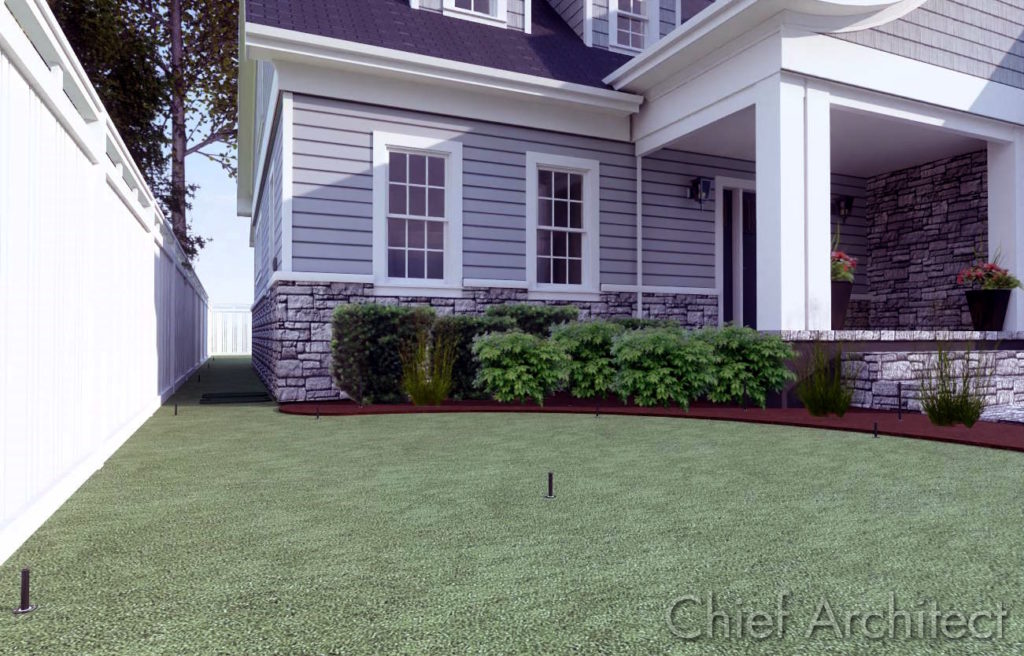
- Plan drip lines: Drip systems are highly water-efficient and deliver measurable water to individual plants/trees.
- Delivers measurable water directly to the root zone of each plant
- You can avoid over/under watering by adjusting the emitter’s water flow
- Helps limit weed growth. Water is not delivered to unplanted areas, limiting seed germination and growth.
- Avoid mixed types: Never mix rotating heads, fixed spray heads, or drip lines on the same irrigation zone.
- Separate sun and shade: Put shaded and sunny areas on separate zones to help manage differing water needs.
3. Planning Zones and Pipe Routing
Dividing the system into zones ensures adequate water pressure reaches every nozzle.
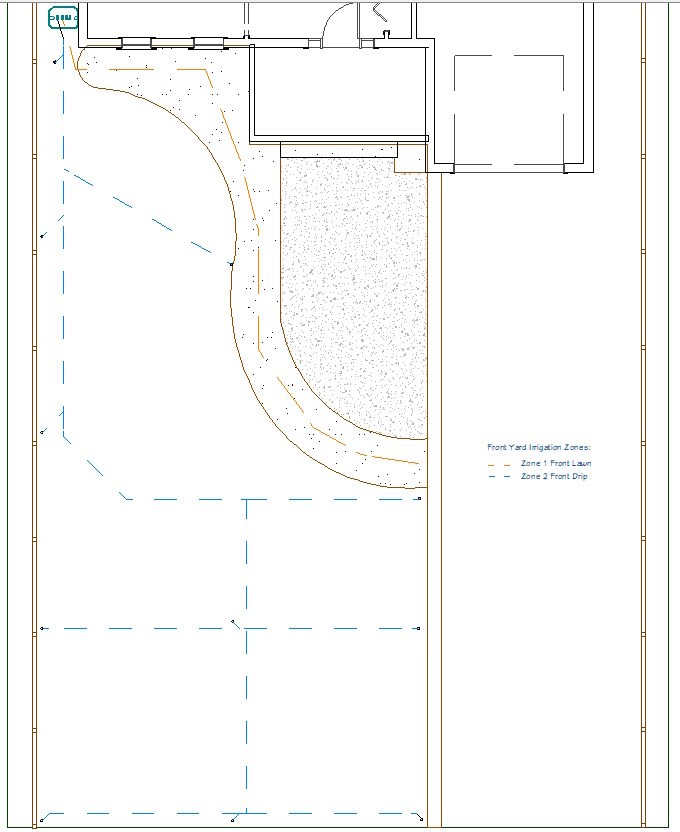
- Control valve and controller/timer location: A control valve is needed for each irrigation zone. The valve regulates water flow (on/off) for a given zone and is electronically controlled by your sprinkler system’s controller/timer. The controller/timer needs an electrical outlet nearby, and a wire must be run between the controller/timer and your valve bank. This wire signals the valve to allow water to flow.
- The irrigation control valves are commonly grouped together in “valve banks.” Typically, all of the system’s control valves are located together in a control valve box.
- Make sure the location of the valve bank allows for easy connection to the main water source for the sprinkler system. Note that many municipalities also require a backflow prevention device between your household water and your irrigation system to prevent cross-contamination of the drinking water supply. Consult your local municipality for details.
- Locate the controller/timer in a place with an electrical outlet. Consider how you will run the control wire from the controller/timer to the valve bank. A common location for the controller/timer is inside a garage or on the exterior wall of a garage with a nearby outlet.
- The Chief Architect library contains everything you need to plan out the system, including control valves, valve bank boxes, controller/timer boxes, and backflow/antisiphon valves.
- Group by GPM: Add up individual head demands so the total of each zone doesn’t exceed 80% of your home’s max GPM.
- Draw pipe paths: Map lateral PVC or poly pipes connecting the sprinkler heads back to a central valve bank location.
- Use Chief Architect’s built-in CAD tools to layout supply and distribution lines. You can use line styles and colors to visually group zones and distinguish between different water line sizes and materials.
- Keep paths straight: Minimize turns and sharp angles to maintain high water velocity.
- Maximize water pressure: To help ensure good pressure at every valve on a given zone, it is recommended to start with a larger diameter pipe from the control valve, such as 3/4” PVC or poly pipe. Then, run 1/2” branch lines off of the larger line to each individual water head. Running the line as a daisy chain to each valve is not recommended because the water flow at the end of the chain will be significantly reduced.
4. Select a Controller and Sensors
Smart technology prevents water waste and automates your watering schedule.
- Count your zones: Buy a controller/timer featuring more station outputs (zones) than your current design requires to allow for future expansion.
- Add a rain sensor: Install a wireless shut-off sensor to stop irrigation cycles during rainstorms.
- Consider smart Wi-Fi: Choose a controller that adjusts watering schedules based on local live weather feeds and allows you to control watering schedules remotely.
Summary
Designing and installing your own sprinkler system can save you thousands if you are willing to put in the work. The irrigation system components are relatively inexpensive, so the opportunity to save on labor costs can be substantial. As with any job, having the right tools can be a game-changer. Here are two tool recommendations to help with your project planning and installation.
- Design Software – 3D software like Chief Architect’s Premier or Home Designer software is a huge help in planning out the overall landscape design, choosing plants, and laying out the irrigation system.
- Trenching tool – There are tools available at your local equipment rental shop that can help with the labor involved in installing underground waterlines. There are machines that create open trenches (dig a trench automatically and deposit the dirt next to the trench), and there are trenchless systems. Open trench machines can be messy and will disturb existing grass. This requires establishing new grass in the backfilled area of the trench. Trenchless machines, while more expensive and requiring more skill to run, offer a much cleaner install. Only the direct area surrounding the sprinkler head itself is disturbed.
Thoughts or questions? Please use the comments section below.


