 By
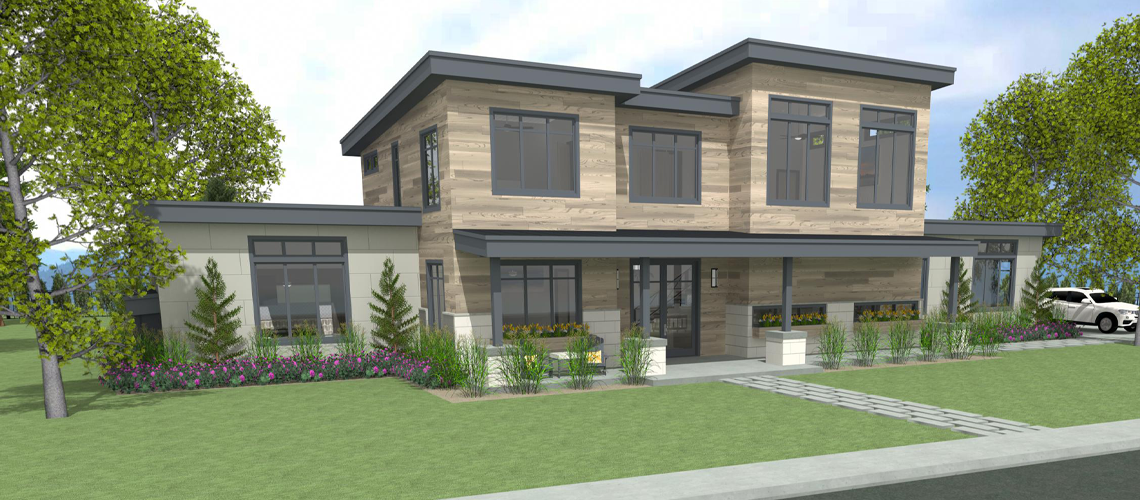
By Chief Architect live webinars are a great way to further your knowledge in the software. This webinar series focuses on the process used to design the Austin Sample Plan. These webinars allow attendees to ask questions to Chief Architect staff and hear questions from other Chief Architect users. Sometimes a sneak peek of new features coming to the next version of Chief Architect is provided.
See the full webinar schedule to sign up. Can’t attend the live session? Sign up and we will email you a recording of the presentation.
- Session 1: New Plan Tips & Space Planning
- Session 2: Massing and Conceptualization
- Session 3: Doors & Windows / Schedules & Dimensions
- Session 4: Foundations – Crawl, Basement, Slab, Mixed
- Session 5: Roofs – Styles, Options & Details
- Session 6: Ceilings – Vault, Shed, Trey & A Reflected Plan
- Session 7: Wall Framing
- Session 8: Floor & Roof Framing
- Session 9: Elevations & Cross-Sections
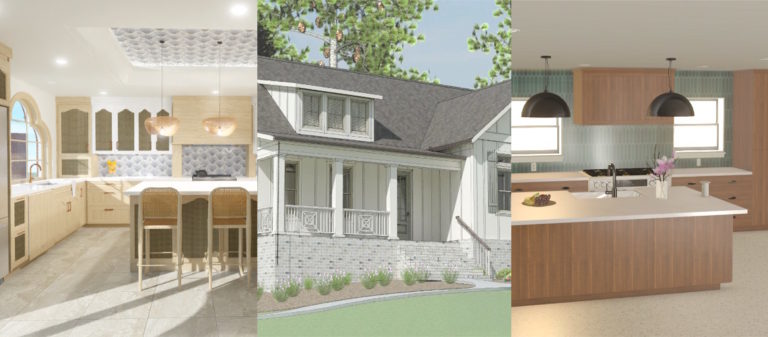
- Session 10: Kitchen Design Part 1 — Floor Plan & Cabinet Layout
- Session 11: Kitchen Design Part 2 — Elevations, Dimensions & Islands
- Session 12: Bath Design
- Session 13: Remodeling/As-Built Overlays
If you are new to Chief Architect or using an older version, a free trial is available for download.
Session 13: Remodeling / As-Built Overlays

The final session in the Austin webinar series was about the remodeling process and creating as-built overlays.
The webinar took the plan from the last session and began by discussing the remodeling process. Two plan files were already available 1) an as-built plan of the existing design and 2) the completed remodel plan. In the completed remodel plan, a new layer set and plan view were created to clean up the view. Using the Reference Display feature, the as-built plan overlayed the completed remodel plan in 2D. This showed where changes will occur in the floor plan. A 3D view of the completed remodel plan was created, and the as-built plan was overlayed. Different rendering techniques were used to show different levels of detail. Next, an elevation view was created and the completed remodel plan was overlayed with the as-built plan, and a dimension measuring the difference in elevation heights was added. The webinar concluded by discussing how to update your template plan to account for remodeling overlays.
A video replay of the webinar is available here.
During the question and answer session of the webinar, there was a question about controlling the appearance of the overlays in a floor plan view. When you overlay the as-built plan over the completed remodeled plan, you pick which layer set from the as-built plan you would like to see displayed. You can be very specific with how this layer set appears, such as having the lines appear in a certain color or a dashed line style.
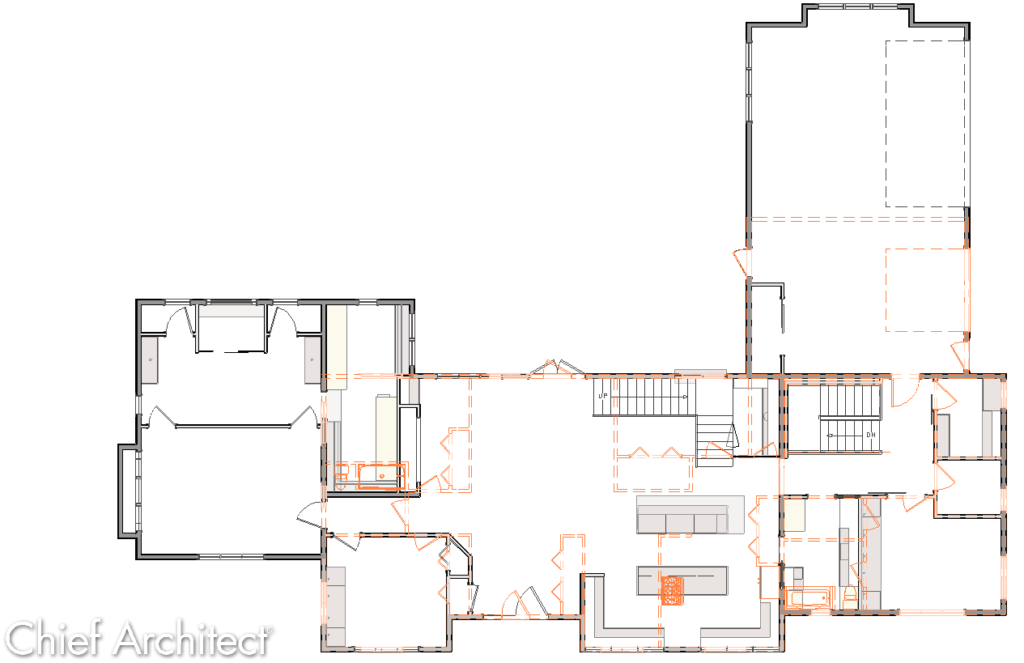
This webinar used the Austin sample plan. The full sample plan can be downloaded from our samples gallery.
Session 12: Bath Design
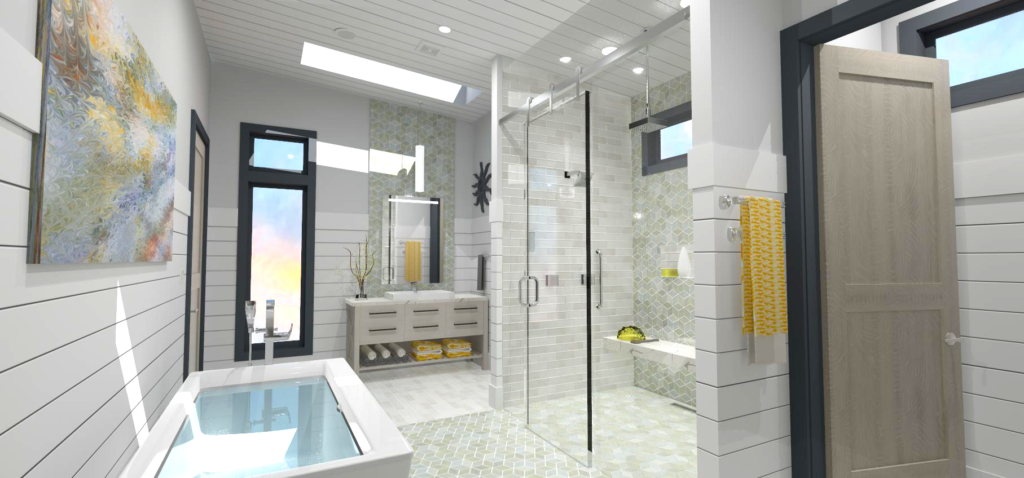
The twelfth session in the Austin webinar series designed the primary bathroom for the Austin sample plan.
This sessioncontinued from the kitchen elevation and island session by automatically placing interior dimensions for the bath suite. The dimensions were then adjusted as needed. A wall elevation and dimensions were generated for the vanity wall. A custom backsplash was designed behind the vanity. A wall elevation was generated in the shower and a bench and niche were designed. Dimensions were then added to the shower elevation. A bath fixture schedule was created. A shiplap wainscoting was applied and various materials were adjusted. The webinar concludes by adding notes and a notes schedule.
A video replay of the webinar is available here.
During the question and answer session of the webinar, there was a question on how to create material swatches for the layout. This can be accomplished by drawing a square shape using the 3D solid or countertop tool, then applying the desired material onto it. This can then be sent to the layout where information about the material can be added.

This webinar used the Austin sample plan. The full sample plan can be downloaded from our samples gallery.
The next session will discuss remodeling and creating as-built overlays.
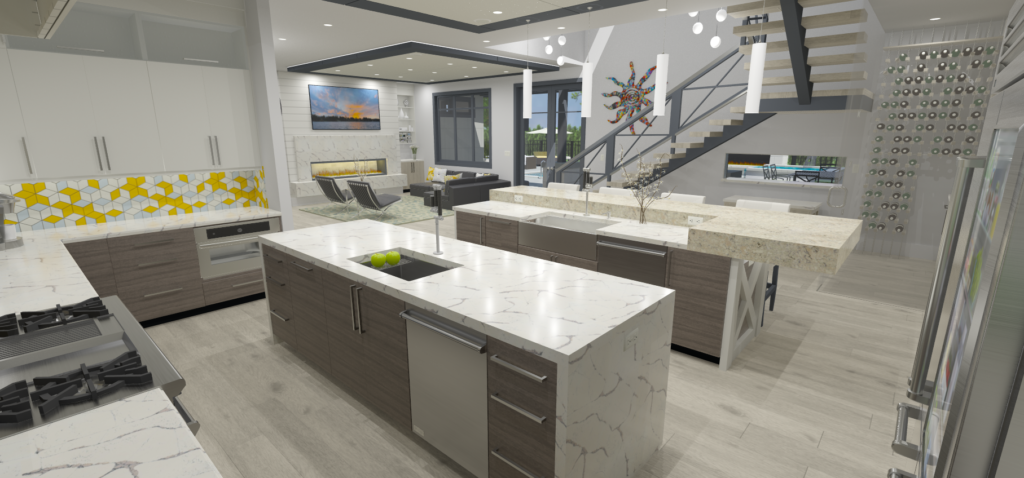
Session 11: Kitchen Design Part 2 – Elevations, Dimensions & Islands
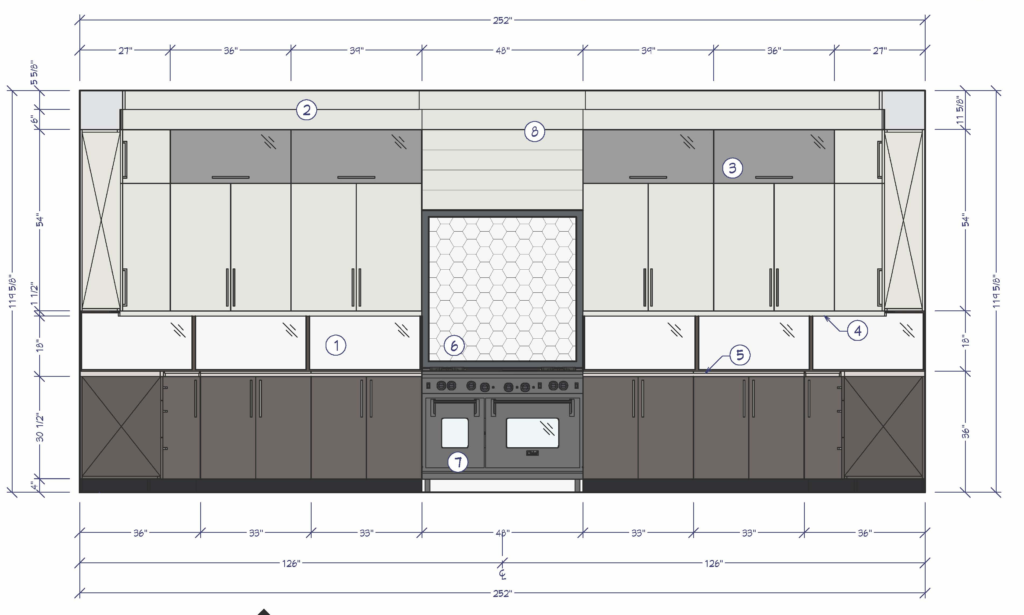
This session in the Austin webinar series was about creating kitchen islands and elevations with dimensions.
The session started by taking the design from the last session about kitchen floor plans and cabinetry and began by creating a wall elevation and automatically generating dimensions, then the elevation was notated. Next, the plan display for the elevation callout was adjusted. A kitchen notes schedule was added. An island was added from the user library and was then adjusted to have waterfall sides. A second island was placed and the countertop was adjusted to have a wrap-around counter. A unique custom end panel was then added and the islands were dimensioned in the floor plan. A cabinetry schedule was then added and customized. A back-clipped elevation of the island was then generated and notated.
A video replay of the webinar is available here.
During the question and answer portion of the webinar, there was a question about adjusting countertop holes to match the specifications of a custom sink. There are two ways to do this. First, if you convert the custom sink to a symbol, it can be marked to automatically insert into countertops. By doing this, when you add it to your plan it will automatically place it in the cabinet and cut the appropriate hole in the countertop. The second way to do this is to freehand position the sink in the cabinet, then draw a polyline around the sink, and mark the polyline as a hole in the countertop. More information on countertops is available here.
This webinar used the Austin sample plan. The full sample plan can be downloaded from our samples gallery.
The next session will continue the design process by designing the bath.
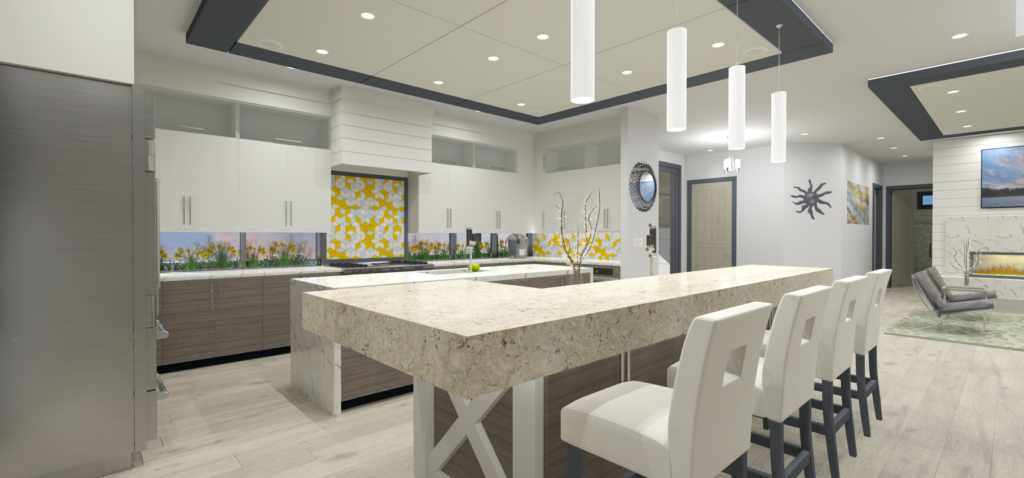
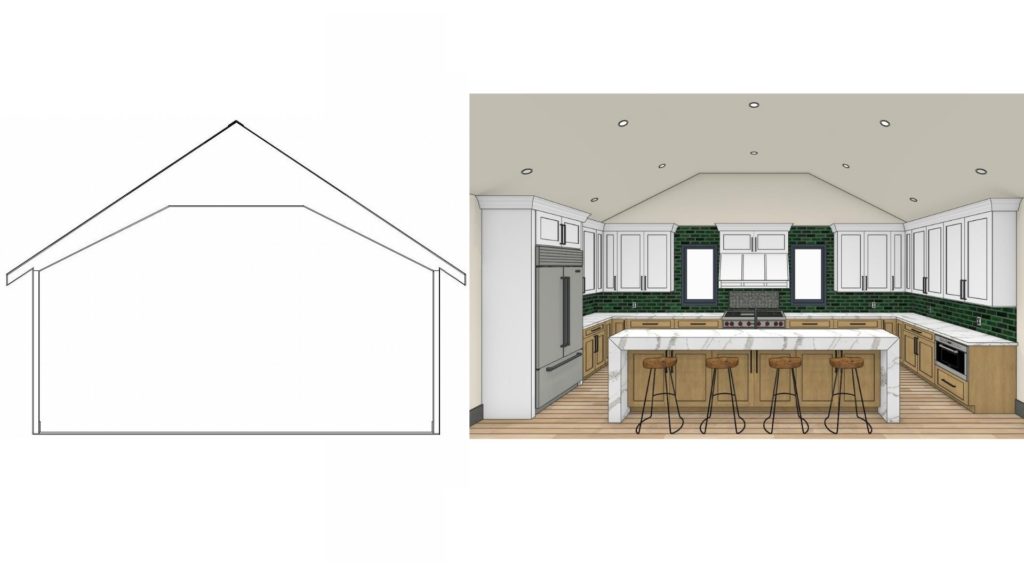
Session 10: Kitchen Design Part 1 — Floor Plan & Cabinet Layout
The tenth session in the Austin webinar series was about creating kitchen floor plans and cabinetry layouts. The Austin Sample plan has two kitchens: A butler’s pantry, sometimes referred to as the “kitchen for the kitchen” or a “Messy Kitchen” for food preparation and cooking, and a larger main kitchen for entertaining. This webinar session covered how to layout the larger main kitchen.
This webinar took the design from the elevations and cross-section webinar and began by placing the cook range and hood. Next automatic room dimensions were added and modified. Base and wall cabinets were added and designed. Once the wall cabinets were designed, a backsplash was added. An elevation of the cook range wall was generated where a backsplash with a border was designed. Finally, an edge molding was applied to the countertop
A video replay of the webinar is available here.
During the question and answer portion of the webinar, there was a question about how to insert accessories into cabinets. The software has features to specify that a cabinet face item will have an accessory behind it. This works for both drawers and doors, allowing you to insert accessories such as waste pull-outs or door spice racks. The accessories can then be shown in 3D views, schedules, and more. More information about this is available here.
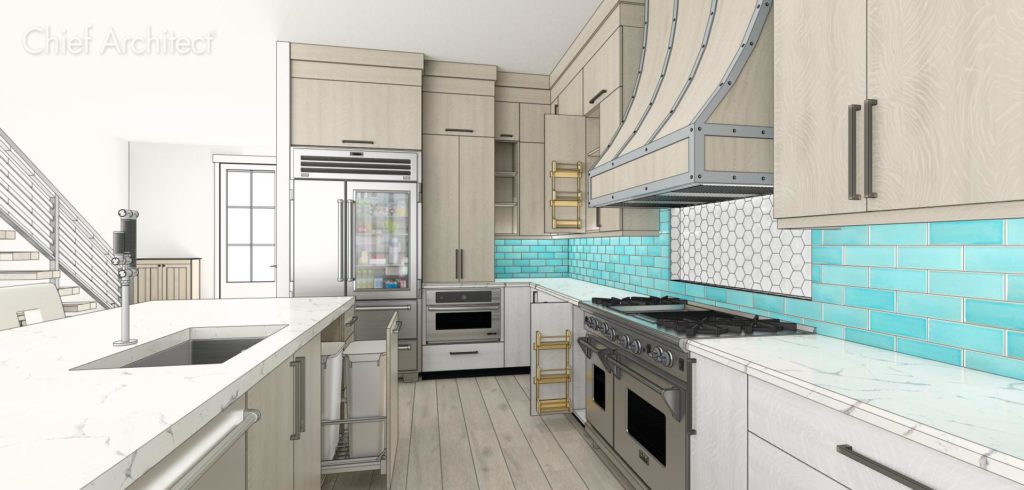
This webinar used the Austin sample plan. The full sample plan can be downloaded from our samples gallery.
The next session will continue the kitchen design by designing an island and notating elevations.
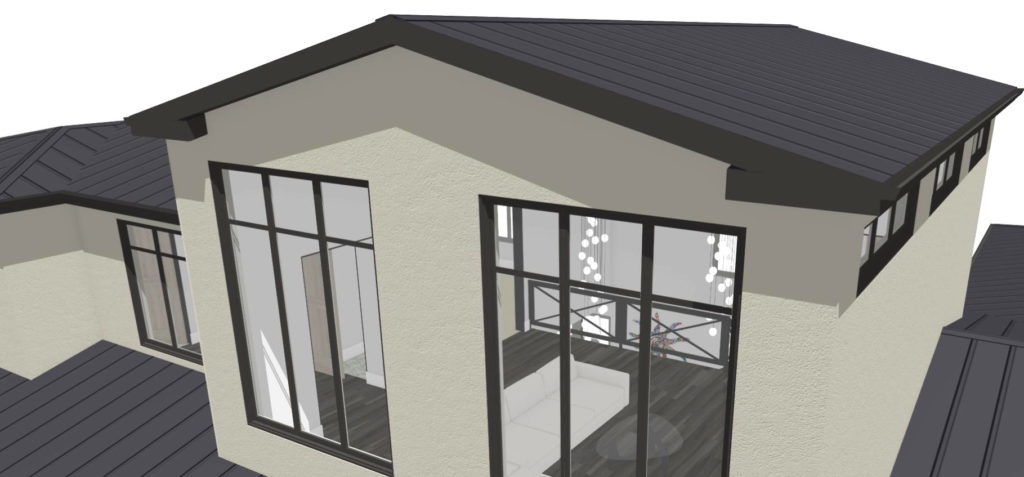
Session 9: Elevations & Cross-Sections
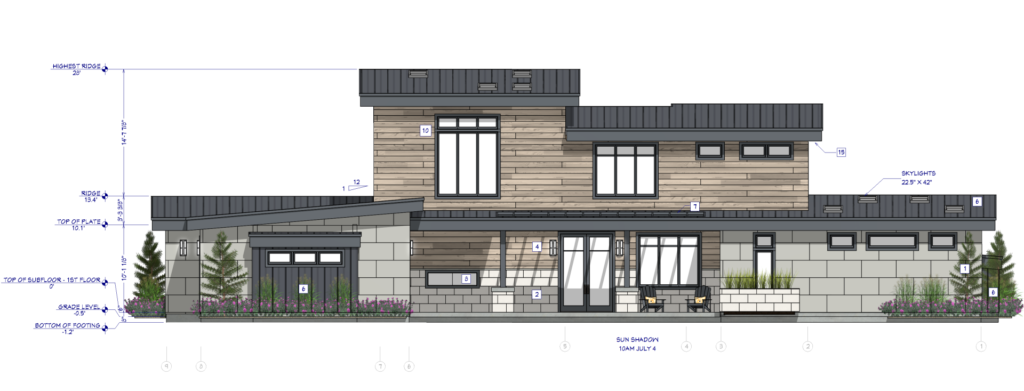
The ninth session in the Austin webinar series was about creating elevation and cross-section views.
This webinar took the design from the last session about floor and roof framing and started by reviewing the three different types of elevation cameras and their settings. Elevations of all sides of the design were generated. The elevations were notated with dimensions, text, and an exterior notes schedule. Construction guidelines were added in both the plan and elevation view. Next, a section view through the stairs was generated and a headroom dimension was added. A final section view was added and a roof pitch indicator was added, along with details for the supports of a car elevator.
A video replay of the webinar is available here.
During the question and answer portion of the webinar, there was a question about story pole dimensions. When in an elevation view, Chief Architect Premier can automatically create story pole dimensions locating key elevations such as footings, grade level, framing headers, roof ridges, and more. The dimension string shows both the elevation of the object and the distance between objects. There is a marker that clearly labels the elevation, and the marker’s extension from the dimension line can be customized. More information on dimensioning elevations is available here.
This webinar used the Austin sample plan. The full sample plan can be downloaded from our samples gallery.
The next session continues the design process by designing the kitchen floor plan and cabinet layout.
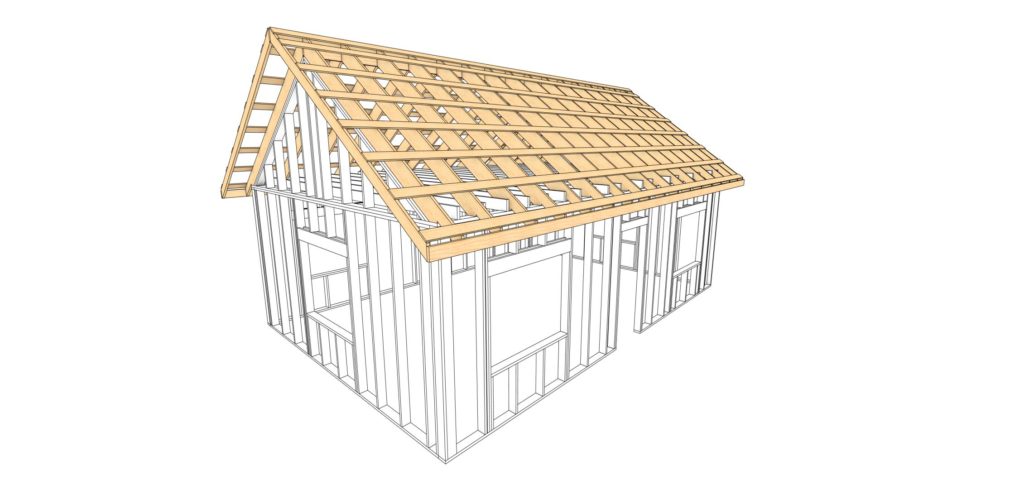
Session 8: Floor & Roof Framing

The next session in the Austin webinar series was about floor and roof framing. This webinar took the design from the wall framing session and began by reviewing how to set your floor structure framing. The automatic floor framing was built and the floor joist direction was changed. Some walls were marked as bearing to make the floor joists lap over the wall with the option to have a foundation wall and footing underneath it. Next beam settings were reviewed and some beams were added to support the floor joists. In the basement walls were marked to hang floor joists from the wall and joist hangers were added. The webinar concluded by stick framing the roof and creating exposed rafters over a covered porch.
A video replay of the webinar is available here.
During the question and answer portion of the webinar, there was a question about how to add roof purlins. Chief Architect X14 can automatically include roof purlins. There are two ways to add roof purlins: either between or on top of rafters or trusses. With either purlin framing method, you can specify the spacing, size, and type of framing member being used, as well as how far the purlins are offset from the top or bottom of the rafters or trusses.
Purlins
This webinar used the Austin sample plan. The full sample plan can be downloaded from our samples gallery.
The next session continues the design process by creating elevations and sections.
Session 7: Wall Framing
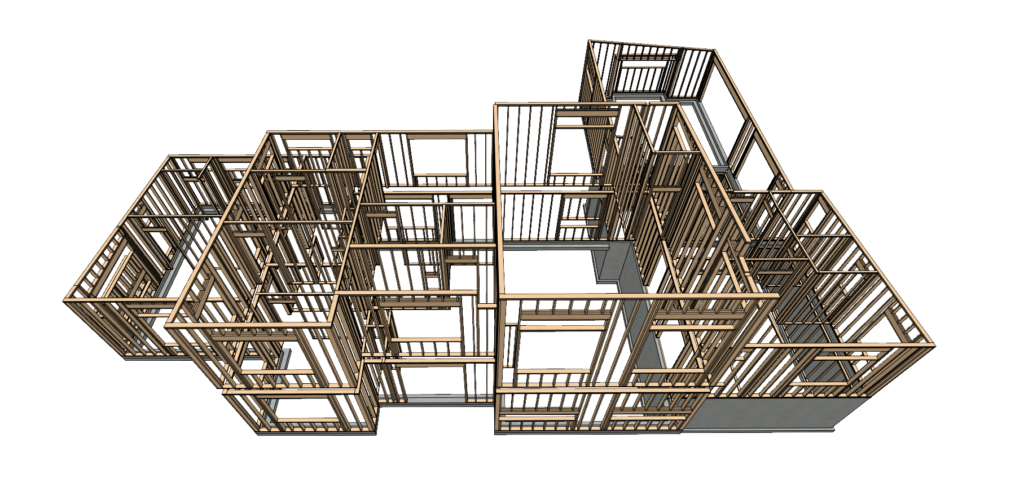
The next session in the Austin webinar series covered Wall Framing. This webinar begins by taking the design from last session’s ceiling webinar and automatically generating the wall framing. With the Automatic framing in place, manual adjustments were made, and dimensions were created. A saved plan view for wall framing was created to isolate the view and make the annotations easy. Wall framing details and a framing schedule were created for the construction drawings and materials takeoff. Settings for controlling wall stud spacing and headers were reviewed. The webinar concluded by creating a framing materials list.
A video replay of the webinar is available here.
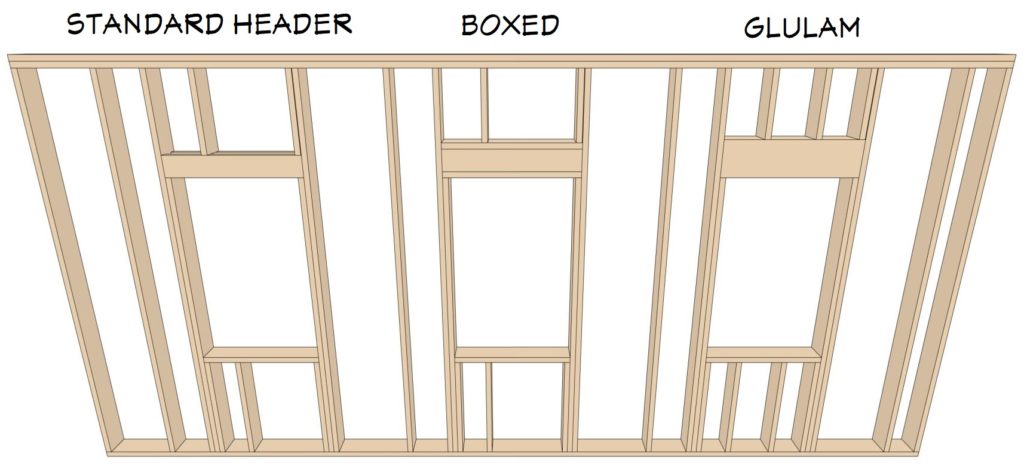
During the question and answer portion of the webinar, there was a question about the types of headers that can be automatically generated above openings. The program can automatically create a variety of header types including a traditional header, boxed, glulam, steel framing, and more. With automatically framed headers, you can specify the size and number of headers to use, and their placement within the wall
This webinar used the Austin sample plan. The full sample plan can be downloaded from our samples gallery.
More information about wall framing in Chief Architect is available here.
The next session continues the design process by adding floor and roof framing.
Session 6: Ceilings — Vault, Shed, Tray & A Reflected Plan
The next session in the Austin webinar series was about ceiling design. This session built continued from the roof session and started by creating a ceiling plan view. Settings that can impact ceiling design and the ceiling plane tool were reviewed. How to create a barrel roof and ceiling was demoed. A tray ceiling was created and modified into a coffered ceiling. Soffits were used to create a unique custom ceiling in the living room and kitchen. The webinar concluded by preparing the view for a layout sheet.
A video replay of the webinar is available here.
During the question and answer session with Chief Architect staff, there were several interesting questions about the manual ceiling plane tools. The manual ceiling plane tools allow you to create a ceiling plane of any pitch while specifying the bottom or ridge height. You can use these tools to create any style of ceiling, such as having a vaulted ceiling with a flat area in the middle.
This webinar used the Austin sample plan. The full sample plan can be downloaded from our samples gallery.
More information about ceiling design in Chief Architect is available here.
The next session continues the design process by adding a wall framing.
Session 5: Roofs — Styles, Options & Details
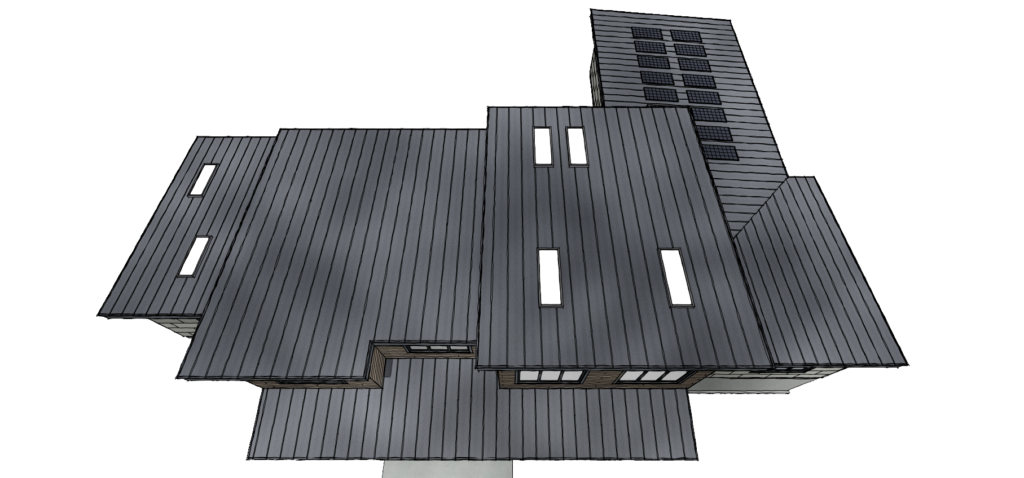
The fifth session in the Austin webinar series was about roof design. The webinar continued from the foundation session and started by reviewing the different automatic roof styles the program can create. The webinar demonstrated how you can use settings in the Wall Specification dialog to change the way a roof builds automatically. Next, we covered how you can use Chief Architect’s manual roof tools to create roof planes and make further adjustments to the roof. After demoing how the roof tools work, the roof system was reset, and a shed roof system was built. A shadow board was added and skylights were placed in select areas. Finally, an area with exposed rafters was added off the back.
A video replay of the webinar is available here.
The webinar had a question and answer session with Chief Architect staff. A question was asked about designing a dutch gable floating dormer. First, the roof system was designed except the dormer. A manual roof plane was drawn coming off the ridge where the dormer was wanted. A copy of the roof plane was made and reflected about its ridge. Finally, a wall was drawn in and marked as an attic wall to be cut by the roof at the bottom, completing the dutch gable floating dormer.
This webinar used the Austin sample plan. The full sample plan can be downloaded from our samples gallery.
More information about roof design in Chief Architect is available here.
The next session continues the design process by adding a custom ceiling.
Session 4: Foundations — Crawl, Basement, Slab & Mixed
The next session in the Austin webinar series was about creating various foundation types. The webinar took the plan from the last session and added a foundation underneath the floor plan. First, the webinar reviewed the default settings for designing a slab, crawl space, and basement foundation. A mixed foundation using each of the three styles was created. Next, the basement was adjusted to hang the first-floor framing from the basement walls. The webinar concluded by creating a Saved Plan View for the foundation.
A video replay of the webinar is available here.
The webinar provided attendees the opportunity to ask questions to Chief Architect staff. Several users were interested in adding additional footing and pier options. On the Chief Architect 3D Library the Post and Pier System catalog has a variety of footings, blocks, pier forms, and more that you can simply click and place into your design. This catalog can be downloaded here.
This webinar used the Austin sample plan. For sloped and stepped foundations, see the Lake Point and Bachelor View plans. All of the sample plans can be downloaded from our samples gallery.
The next session in the series will continue the design process by building a roof onto the design.
Session 3: Doors & Windows / Schedules & Dimensions
The third session in the Austin webinar series continued from the last session about creating conceptual floor plans by adding doors and windows to the design and generating plan dimensions and schedules. The webinar started by specifying the default settings for windows and then placing windows throughout the plan. The same approach was used for doors. Next, the webinar demonstrated best practices for creating schedules and how to customize them. The webinar wrapped up by specifying the floor plan dimensions to locate the exterior walls framing layer, and opening centers.
A video replay of the webinar is available here.
The webinar had a question and answer session where attendees could ask Chief Architect staff questions. There was a good question asked about where in the program is the best place to create schedules. While there are several areas in the program you can create schedules, the recommended place for creating schedules is in a CAD detail. Creating schedules in a CAD detail makes it easy to manage the schedules data and send it to your layout.
This webinar used the Austin sample plan. The full sample plan can be downloaded from our samples gallery.
The next session continues the design process by adding a foundation and reviewing the several foundation types the program provides.
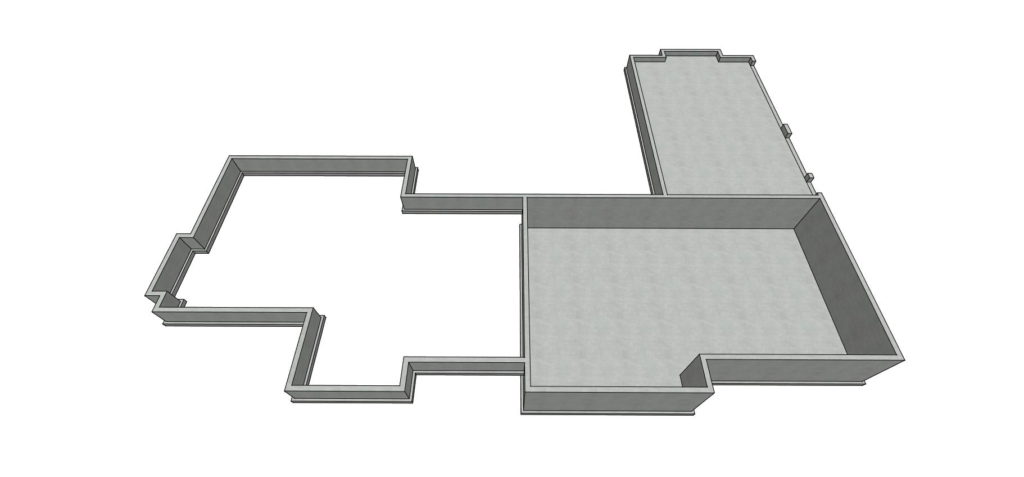
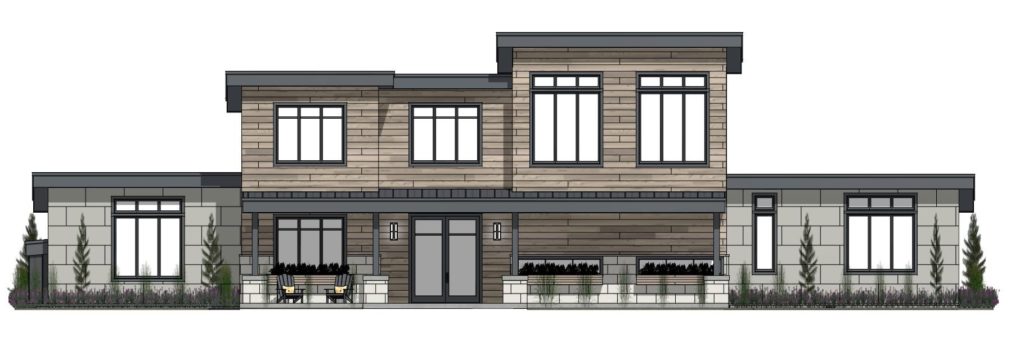
Session 2: Massing and Conceptualization
The next session in the Austin webinar series covered how to draw out a conceptual floor plan and roof to visualize the design. The webinar started by taking the 2D bubble diagram from the last session, tracing it with the wall tools, and then adding a roof. Next, a porch was added and the exterior wall materials were chosen. Some of the first floor walls were specified as pony walls. Finally, an area on the first floor was extruded to account for a fireplace.
A video replay of the webinar is available here.
During the question and answer session with Chief Architect staff there was a lot of interest in customizing the appearance of walls in Plan Views. Chief Architect has several flexible ways to control how walls display:
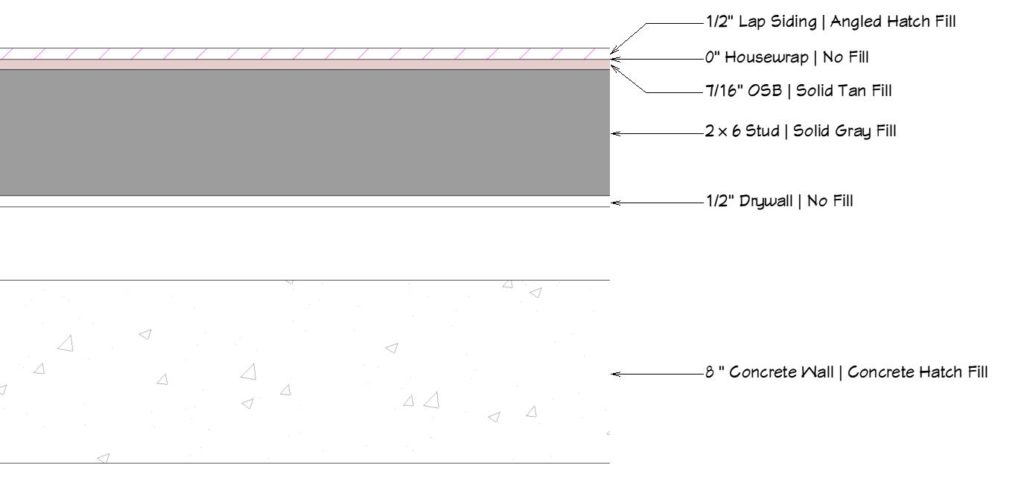
- You can specify how the fill should display for each material that makes up a wall. For example, if you have an exterior siding wall you can specify how the individual siding, housewrap, OSB, stud, and drywall materials should display in your plan. Or if you are using a concrete wall, you can specify how the concrete should display.
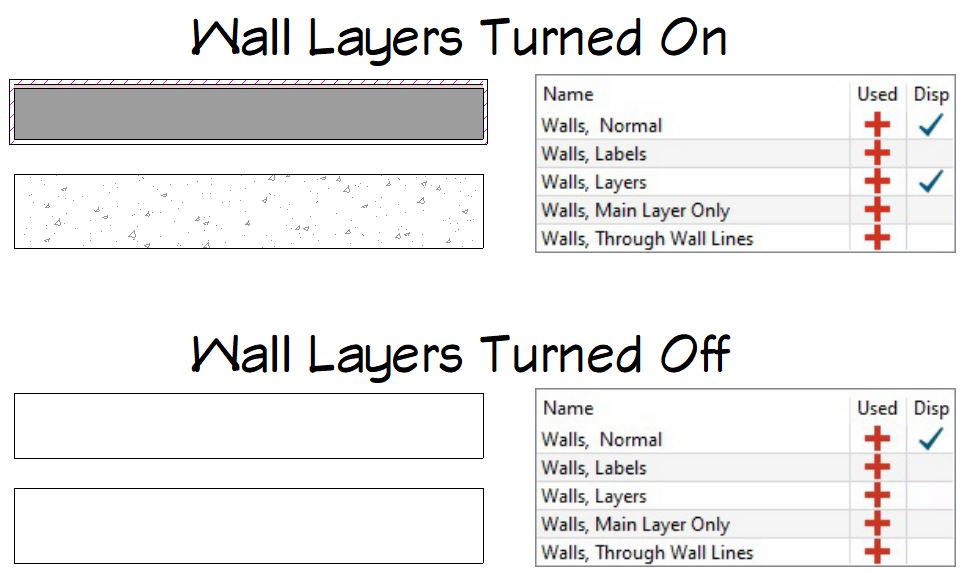
- Using Layers is another powerful way to control how walls display in plan views. You can specify to see the material fill by having the “Wall, Layers” layer turned on. Or if you prefer to just see an outline of the wall with no material fills you can turn this layer off.
- Additionally, you can use Saved Plan Views and the Reference Display to further control how walls display.
This webinar used the Austin sample plan. The full sample plan can be downloaded from our samples gallery.
The next session continues the design process by adding doors and windows and setting up schedules and dimensions.
Session 1: New Plan Tips & Space Planning
The Austin webinar series began by discussing tips and techniques for saving time when starting a new project. The webinar started by taking an existing project and using its settings as a template for the new project. At this time, other known details about the project were specified as default settings so the project builds according to those known details. Next, the webinar reviewed file management best practices and concluded by discussing different approaches for drawing floor plans.
A video replay of the webinar is available here.
The webinar had an interactive session where attendees can ask the presenter questions. A great question was asked about how to start a new plan based on an existing pdf of a floor plan. You can import the pdf into the template plan, scale it, and then use either of the approaches discussed in the webinar to draw the floor plan. Detailed information on how to do this is available here.
This webinar used the Austin sample plan. The full sample plan can be downloaded from our samples gallery. The next session continues the design process by talking about Massing & Conceptualization.


