 By
By Chief Academy has come and gone, and we are left with the notes from the information we shared. I was tasked with the opportunity to provide some thoughts on the rendering functions of Chief Architect and how to go about the process. I’ve condensed my PowerPoint slides and reformulated them for reference in this post. I hope you find some helpful pieces in your rendering journey!
This will be a high-level topic that explores a lot of moving parts. Follow the embedded links throughout to learn more about different topics.
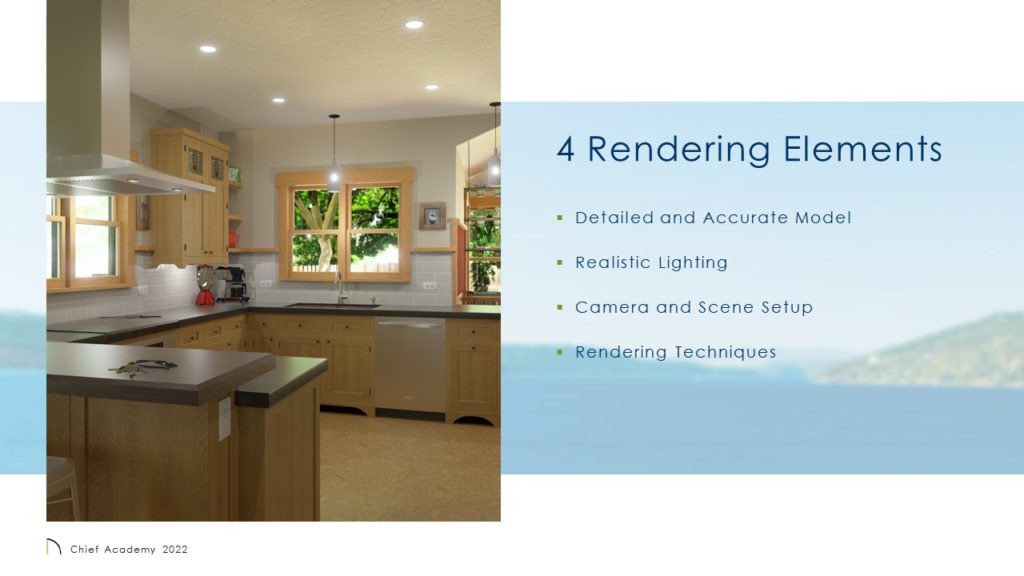
I’ll cover 4 elements related to rendering.
We’ll look at setting up a good model, the importance of lighting, camera settings, and finally, the rendering techniques and features that produce the final product. We’ve created a Ray Tracing Video Series that also covers these concepts and takes a deep dive into ray trace rendering settings.
Detail the Model
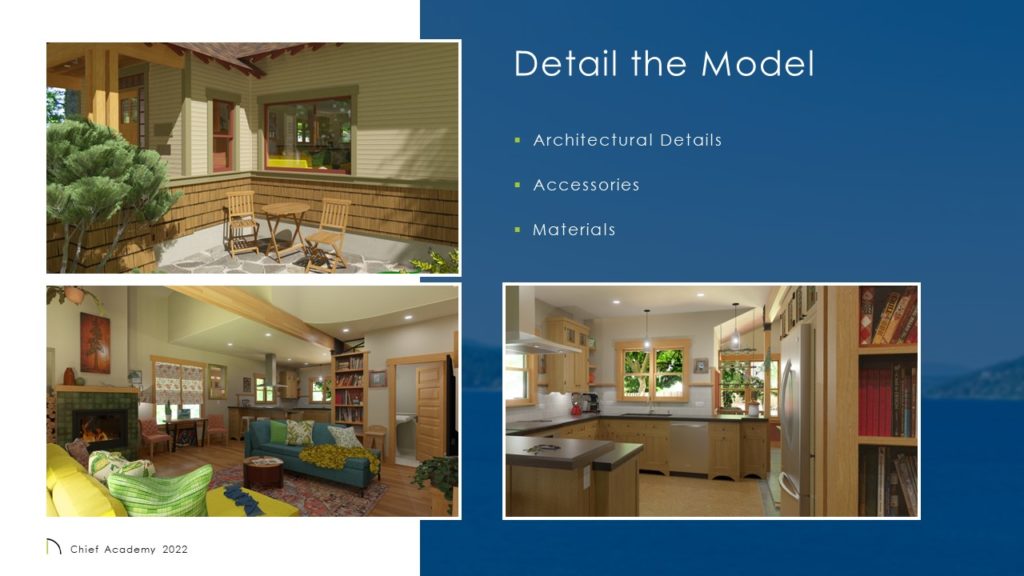
It may seem obvious, but the details in your design project play a huge role in the outcome of your rendering.
Consider providing a level of detail that matches the level of service you intend to provide your clients. If you are conceptualizing the beginning of a project or are supplying a baseline package, it may not make sense to invest the effort into highly detailed photo-real images – there are other tools for that.
However, we are often trying to sell a lifestyle. Capturing more than room layout by including the nuances of a design may be the tipping point for closing the bid or landing an upgrade package with clients.
Check these 3 boxes as you progress through your design to set the foundation for good renderings:
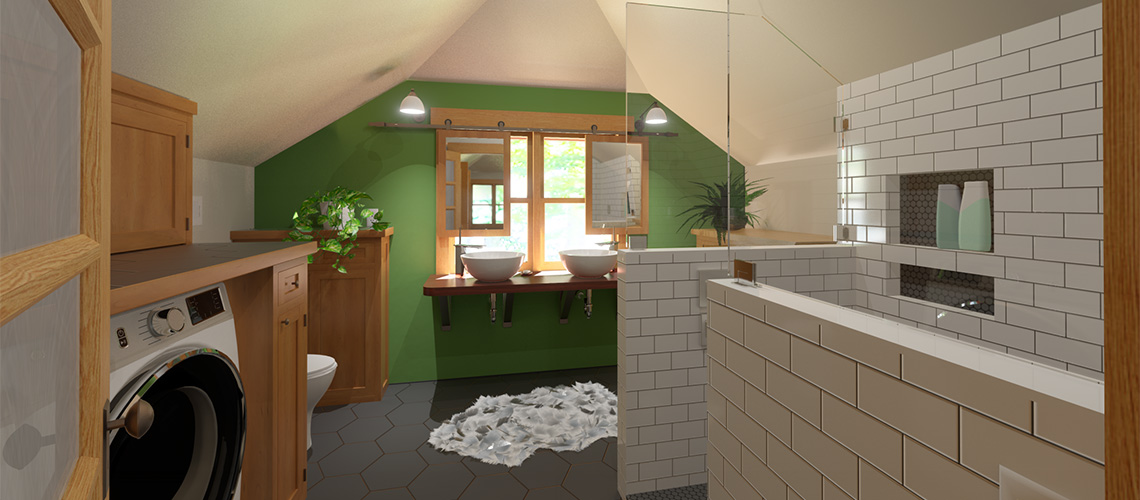
Start with architectural details. Once you know the vision, set up your plan defaults to reflect some of the character in your design. Use molding profiles with a bit of shape for door and window casings, room moldings, and exterior trim. Review your exterior options for frieze, gutters, shadow boards, or exposed rafters. Make the cabinets on-brand – find cabinet doors that will match your spec, attach hardware, and don’t forget crown molding, light rails, and toe kick treatments.
Tools to Get You There:
- Go to the Plan Defaults to set up project details.
- Use the Style Palette tools to try on different looks in your scenes – this is also an easy way to communicate upgrade options when live-demoing for clients.
- Object Painter and Multi-Select with scoping options are tools that make tweaking multiple objects at once fast and easy.
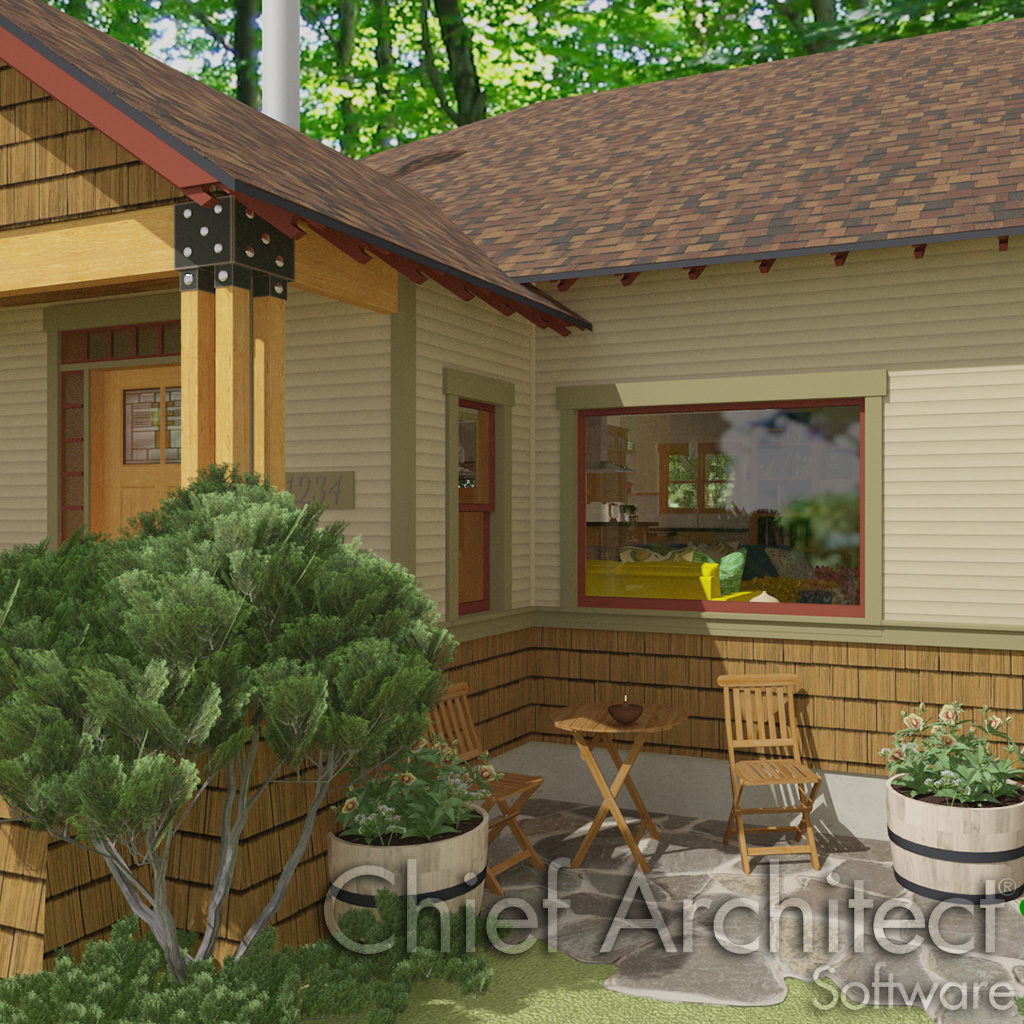
Include some accessories. You may not be interested in interior design, or maybe that is your only interest. Either way, including some “livability” details like furnishings, a familiar backdrop, or just a few plants go a long way toward an appealing scene. Our eyes focus on these bits, and then our brains conceive the periphery to see a space as a whole. Including pieces that are realistic looking or that offer a sense of scale because of their familiarity allows viewers to imagine themselves in the space.
Tools to Get You There:
- The 3D Library is full of both generic and branded objects that you’ll be able to download and add to your Library Browser selection. Look at the stylized furniture, 3D Plants, and accessories catalogs for instant personalization.
- If you can’t find what you need in the Library, you can always import it. Remember to send requests for more library content to our team at CONTENT@chiefarchitect.com. Be an advocate for Chief Architect users everywhere, and proactively ask your favorite brands to partner with Chief Architect.
- Import actual photos for familiar elements. Take a site photo and use it as a backdrop. Ask for favorite portraits, or take photos of framed art and paint them onto canvases to make a connection.
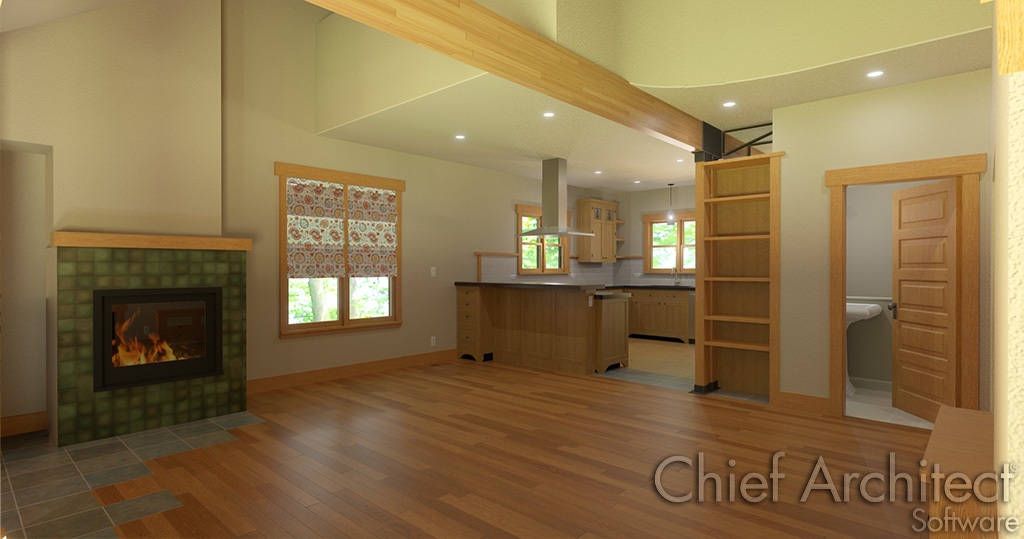
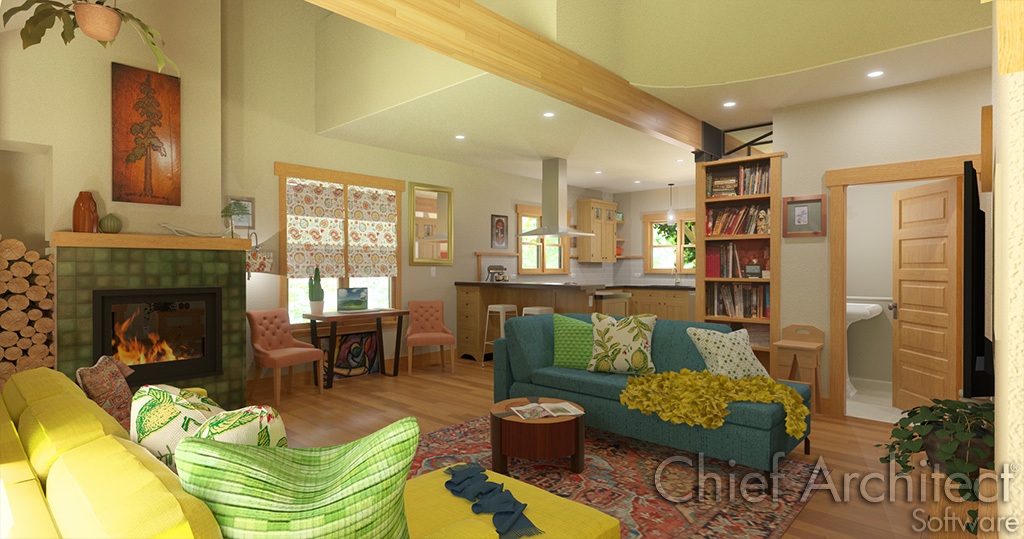
Don’t forget materials. Color selections like catalog downloads from Benjamin Moore and Sherwin Williams (or your favorite paint brands online) provide pre-configured and popular color palettes. But you aren’t only looking at color schemes; the overall setup of materials and the quality of maps used in your scenes are equally important. These attributes impact your final renderings and how surface texture, light, and shadows interact.
Our material specialist, Dustin Cruz, maintains some external resources that you can use to customize your own high-quality materials like flooring and tile through the free download “Substance Player“. This tool allows you to adjust the resolution, scale, and color to create custom materials like tile and flooring and automatically provides additional maps to enhance them. Be sure to visit Dustin’s Advanced Materials tutorial – which has a great explanation of materials and material maps.
Light Your Scenes
For the most part, Chief Architect is designed to mimic real-life scenarios. I’m not saying that it is perfect at doing this, but the goal is focused on realism.
Knowing this, you become armed with the ability to infer a few concepts, apply them to your work, and then tweak settings to push your scene from representative to realistic to artistic. One of the keys is harnessing light. Just as if you were to walk into a dark room and take a photograph, creating a camera view in Chief Architect in a space with no (or not enough) light with produce poor results. Be thoughtful about your lighting model to approach quality renderings.
Think about these three lighting elements:
- Natural Light
- Light Fixtures
- Staged (Added) Lights

Every scene has a sun. You get to control it. This can act as a primary light for your exterior scenes and be a big contributor to the light that comes through windows and glazing in your interiors.
When you want to represent the most accurate impact of daylight on your design, use a Sun Angle to define geo-location, time of day, and time of year. Create multiple Sun Angles to produce sun studies and understand how the light and heat might impact your design at different times, seasons, and site orientations.
When you want a well-lit scene but are not concerned with geography, use the sun as a giant light source that streams through windows and makes appealing shadows on exterior surfaces.
Tools to Get You There:
- Include a North Pointer and Sun Angle to create true-to-life daylight. If you turn ON shadow generation in plan view, you have a great tool to use during the design phase for passive solar considerations.
- Create multiple sun angles that represent important times of the day or seasonal changes to show your client how the sun will impact the final space.
- If you aren’t interested in accurate geography or are still planning site orientation, you can use the North Pointer as a quick previewing tool. Simply select and rotate it in plan view and watch the shadows update.
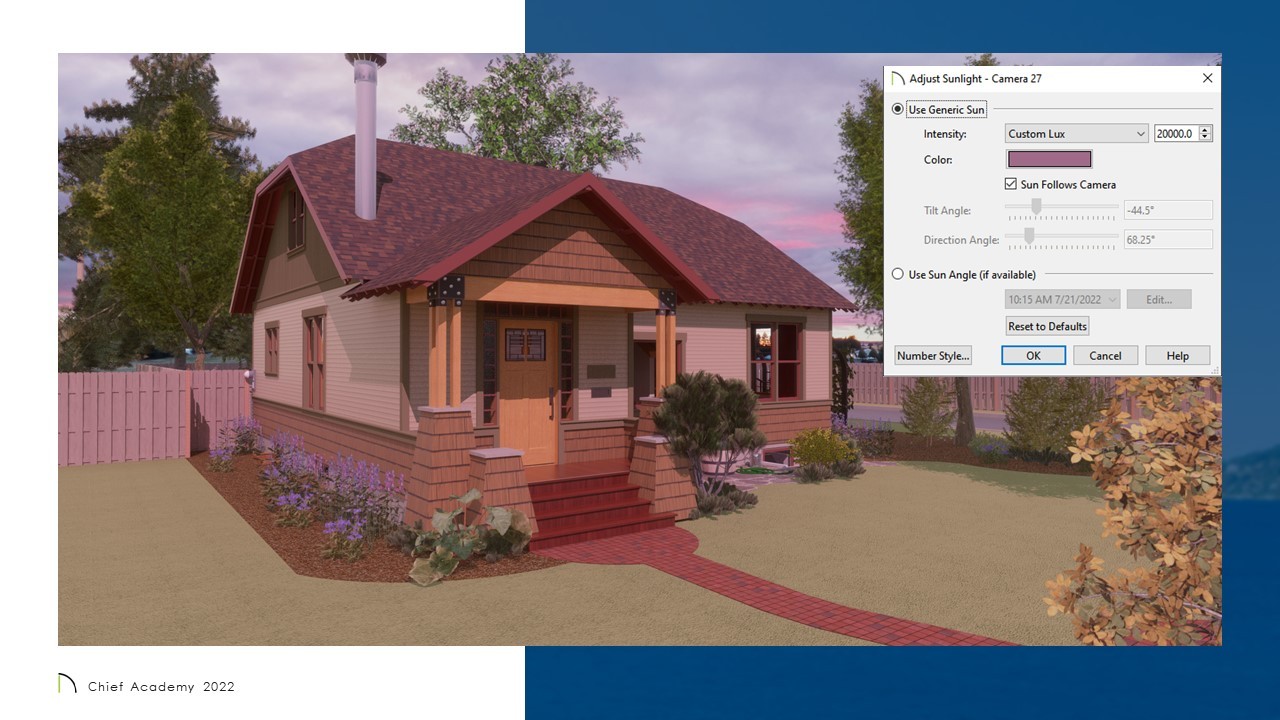
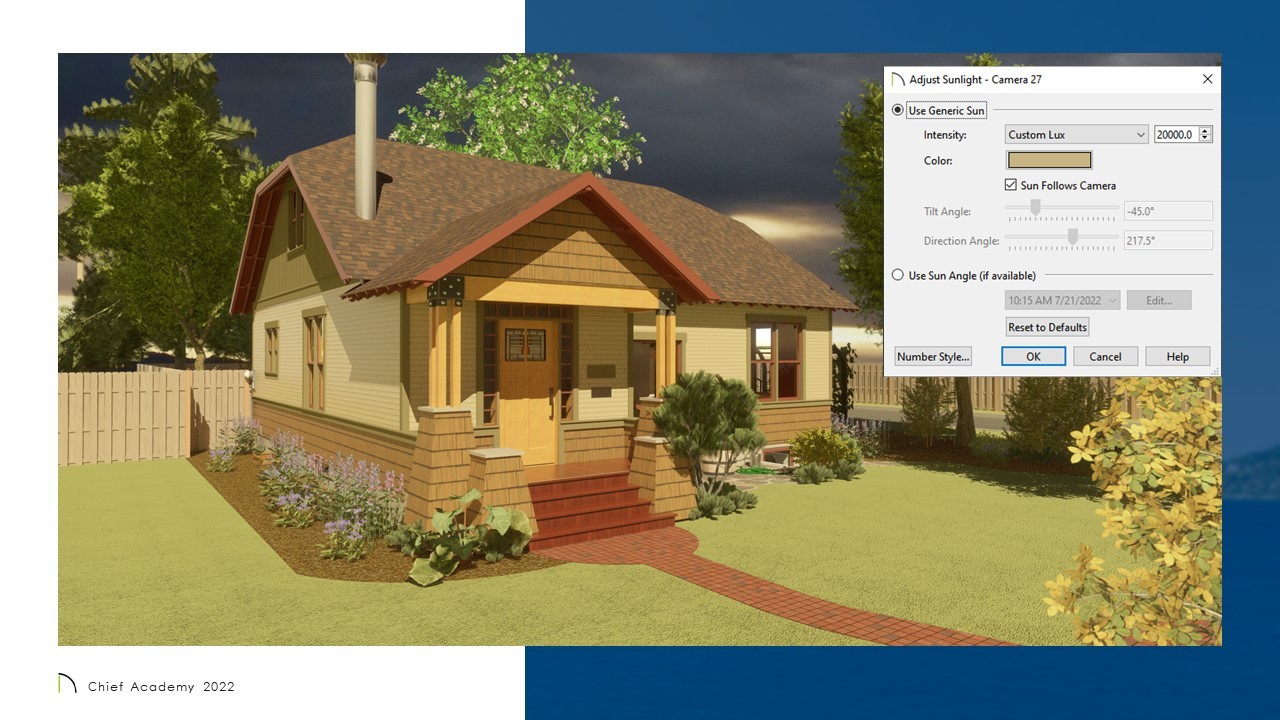
- You can also use the generic sun as a giant light source and adjust its angle in the sky or set it to follow the camera so that your scenes are always illuminated – a popular control for exterior views.
- Control the intensity of the sun and the color of its light to mimic dawn and dusk. I like to use this in combination with different backdrops to create a mood.
- Turn the sunlight OFF to prevent it from contributing to the scene altogether, instead relying on other lighting tools.
Install all the light fixtures. If you want your scenes to be realistic, add all the light fixtures in your design that will be installed in the home. Don’t forget accent lighting like floor and reading lamps. This is also your time to channel your inner photographer. We’ve all seen the spotlights and diffusers that are staged for a photoshoot.
Tools to Get You There:
- You can mimic the same concept by including Added Lights. These are sources of light that are not associated with a 3D Model, but instead used to create an artificial lighting effect to enhance areas of the scene – I often see these used under counter overhangs to draw attention to details that might be obscured otherwise.
- Using materials and Backdrops to react in the scene is another trick. You can exaggerate some material properties to help emphasize the look of your scene by contributing light and color from reflections.
- Each fixture has its own set of properties and may even have multiple light sources associated with it. Review and manage these via the light’s individual specification dialog or through the Adjust Lights dialog.
- When you set up Lighting Sets, you can control which fixtures are ON and contribute to the scene. Not only does this aid in realistic views, but it can help with performance – too many lights can wash out a scene and reduce some of the contrast. Practice turning lights OFF and creating test scenes to understand their impact.
- Be aware of the impact you may be making by adding objects with multiple light sources like chandeliers and Rope Lights.
- Rope lights can potentially add many sources and slow down some types of renderings. You can control the spacing, size, and intensity of rope lights.
- Some Light fixtures have multiple sources. You can control these individually or all at once, but it is easy to miss a setting and then later wonder why your scene isn’t behaving as expected.
- When you stretch light fixtures, like pendants and chandeliers, beware that the light information is not moving with the 3D data. You can see where the light source is relative to the 3D object by turning on “Show Position in 3D View”.
Camera Setup
After your model is refined, you can start to set up specific scenes with cameras. Cameras are used for technical drawings in Chief Architect and are also fundamental to showing your scenes in 3D and creating individual renderings. Let’s look at the different types, some of their settings and management features, and some methods of driving or navigating them through your design.
For most practical purposes, there are two sets of cameras available in Chief Architect. Elevation and Section cameras create a view of a single plane in your project. You can include dimensions and notes on these views and use the CAD tools for detailing. I call these “2D” cameras, but technically they are creating a 3D view of your model. Perspective cameras include the Full Overview, Floor Overview, and Full Camera tools. Let’s talk about perspective cameras for use in rendering.
Use the Full Overview camera to create whole exterior scenes. This tool is nice because it automatically tries to focus on the center of your scene, making navigation very intuitive. The Cross-Section Slider, combined with Full Overview cameras, is an effective way to show off the interior and exterior relationship of the spaces.
We often call the Floor Overview tool the “Dollhouse View“. This camera omits everything above the currently active floor level. This is a good tool to communicate space planning and the flow of rooms throughout a home.
The Full Camera will be your go-to for most interior shots or for detailed exteriors. It mimics the point-and-click action of holding a camera in real life. Just click in the plan where you would be, and drag to your focus point. Navigation will rotate around this point.


All of the camera types have defaults, and any camera you create can be saved in your design. You’ll quickly start to get a feeling for your preferences and should think about setting up your Template files to use these settings. Configurations like layer sets, the active rendering technique, whether you show shadows, and how the camera’s display in plan views can all be pre-configured.
Saved cameras are stored in the Project Browser, where you can preview, edit, and organize them. You can even copy and paste your favorite cameras to easily replicate their settings for reuse in new scenes.
When I’m working on my cameras for final renderings, I like to pay attention to these settings:
- I like to make sure Show Shadows, Reflections, and Bloom are ON in my Full Camera views. Shadows can sometimes be unrealistic in Floor Overviews, so they are OFF by default for that camera type. Bloom is the fuzzy glow around lights, I really like this effect, but it is pretty subjective and may not be your cup of tea.
- I can define a light set to be used with my cameras. Here my light sets are based on different rooms. This way I can use the light set in multiple scenes that feature a specific space.
- Depending on what I’m trying to capture in my scene, I’ll often modify the Field of View. This control is similar to adding a wide-angle lens to a camera. Make the value bigger to widen the view. This might add some distortion, but is a good way to include a small space inside a scene. If you are working on a before and after or render to reality scene, you may find that you have to adjust this value to mimic the original photograph.
- I also pay attention to the “Clip Surfaces Within” setting. This will remove surfaces that are within the specified distance to the camera. Increase this value to remove an obstacle from your scene, or set it low to include objects in the foreground. The “Hide Camera-Face Exterior Walls” control performs a similar task but simply removes entire walls that may obscure an interior scene.
- On the “Selected Defaults” Panel, control what’s displayed using Active Defaults. These are the same that you might use for Plan Views and Elevations, but with fewer options. I like to set up a few different layer sets for 3D Views. Depending on what I need in the scene, it becomes really easy to show framing for Glass House views or to display rafter tails, or gives me a way to eliminate distracting items, unneeded geometry that eats up processing time, and sometimes to overcome z-fighting.
- I like to set the cameras that I’ll use for presentation views as “Display as Callout” on the Plan Display panel. This makes it seamless for me to reference them on my plan view and layout, and I just think it looks more professional and clean. I use the callout label in the camera’s name so it is easy to find in the Project Browser.
Once your cameras are set up to your liking, start creating and storing them in the design. Use the Middle Mouse button to Pan or Orbit in the view, or use the toolbars to move the camera in specific ways.
- Sometimes after lots of navigating and scrolling, the camera can move strangely – I use the “3D Center Camera on Point” feature to reset the view. “3D Focus On Object” does something similar, but it will also move the camera to be close to the focal object.
- Creating navigation paths in the form of Walkthroughs opens up your ability to record videos that are appealing promotional pieces and virtual tours through the spaces.
- The Mouse-Tilt Camera option is a great way to preview a 360 Panorama, which is an interactive view you can cloud share through your Chief Architect account through e-mail or embed on your website. You can also export these as image files for viewing on platforms like Facebook and Google Images.
Rendering Techniques
Now you are ready to finalize scenes and share them as presentation images. Any camera can be viewed using different rendering techniques. I’ve classified them here as “Artistic” vs. “Realistic”. I would call Vector, Glass House, Technical Illustration, Clay, Watercolor, and Line Drawing more artistic. On the realistic side are the techniques that will provide texture maps and lighting models with shadows – Standard, Physically Based Rendering (PBR), PBR plus Ray Tracing, and CPU Ray Tracing.
You’ll need to have compatible computer hardware in order to fully take advantage of every rendering technique.
Let’s look at these and discuss some of the techniques’ different settings. You can set up defaults for the rendering techniques, in fact, it is likely you will develop your own favorite signature settings for individual techniques that you will want to apply to your templates.
Click on the gallery image to read an explanation of the settings I use for each rendering technique.


.")


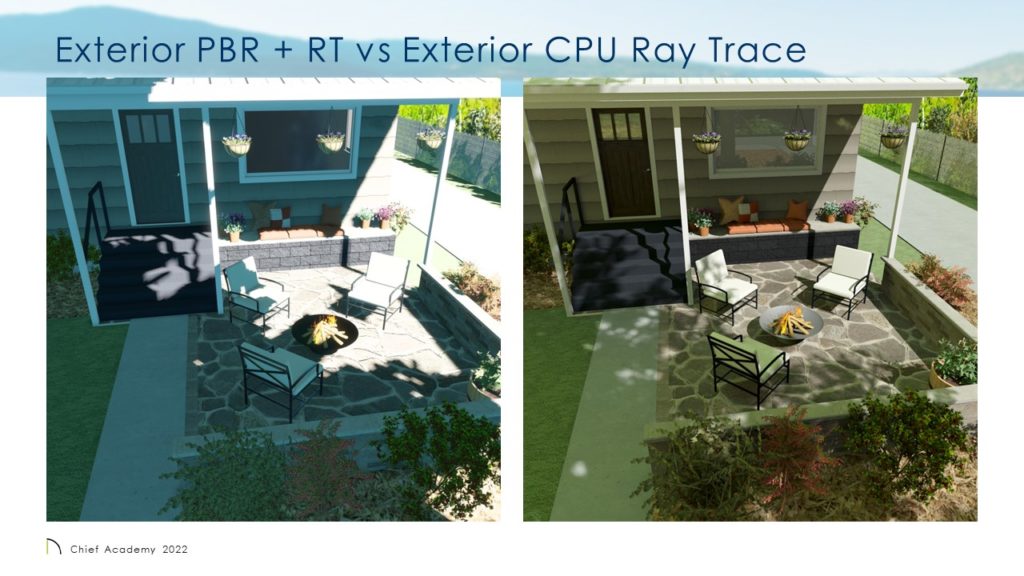
Here’s a quick example that compares PBR Ray Tracing and CPU Ray Tracing. I wanted to illustrate a patio addition for this modest house. It has two giant spruce trees in the front yard, which I was able to represent with 3D plants. I couldn’t get the right feeling of the light with a PBR view, but the CPU Ray Tracing really captured the look and was able to help the homeowner envision the idea with confidence.
The moral of the story for all of this is that there are lots of good tools for creating presentation views in Chief. Hopefully, there are some ideas here that will get you started on your rendering journey.
Please share your progress with us ~ we love to see what you create!
Send your images and stories to social@chiefarchitect.com


2 comments